PDF Documents
Open PDF documents in Rift to view, navigate, search, annotate, measure, compare, collaborate on, and manage markup in real time, then save, submit or print the results directly from your browser.
Overview
Rift is Lunr's browser-based PDF viewer and markup tool. It renders each page pixel-for-pixel and opens in your browser, so there is no desktop software to install.
Beyond viewing, Rift is a full markup tool. You can highlight and comment, draw shapes, take measurements from a drawing, stamp and sign, compare two revisions, and work on the same document with your colleagues in real time.
PDFs open in your browser with no plugin or download required.
Opening a PDF in Rift
How a PDF opens depends on how your administrator has set up the viewer.
- When Rift is the default viewer, PDFs open in Rift everywhere: full documents, the preview dialog, and change request attachments.
- When Rift is available but not the default, open a document and click the View in Rift button to switch to it.
If Rift is your default viewer and you need the classic PDF viewer, click View in PDF Viewer to switch back.
Large documents load a page at a time, so the first pages appear before the whole file has downloaded.
Viewer Overview
The viewer fills the browser window, with a toolbar across the top and a panel rail down the side.
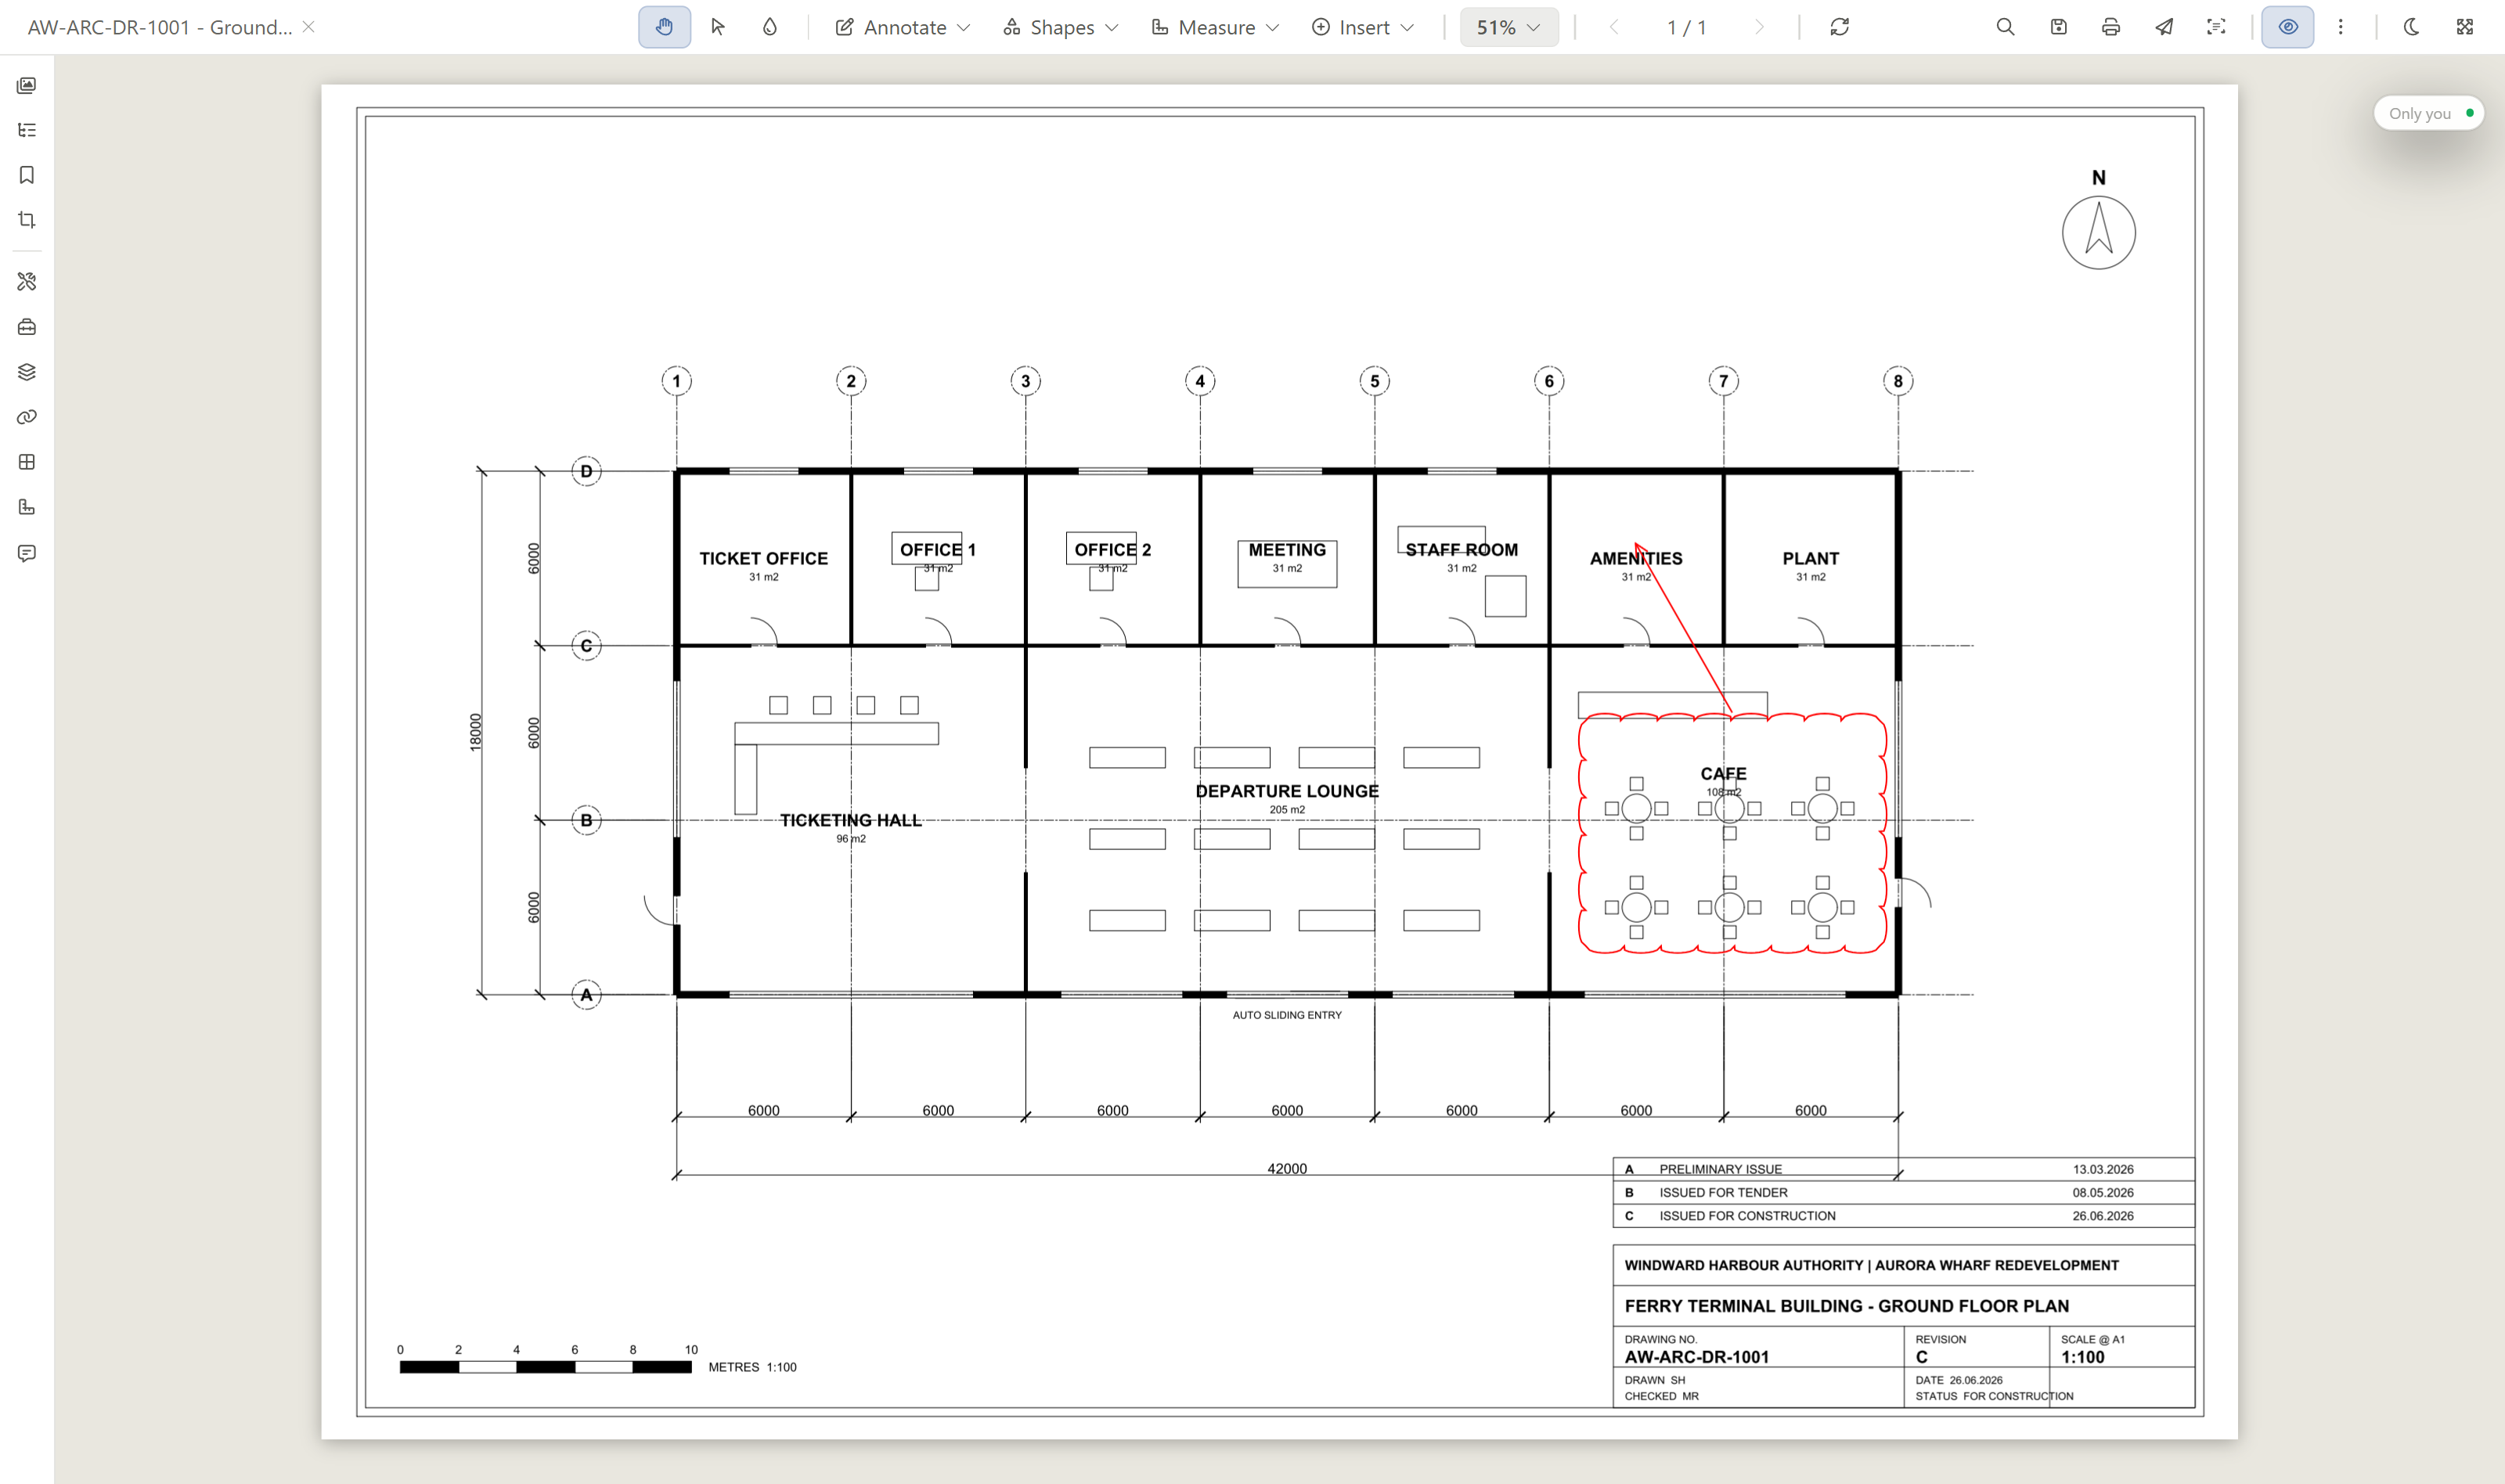
Toolbar
The toolbar holds the tools you use most often.

- Pan moves the page, and Select picks annotations and text.
- The Annotate, Shapes, Measure, and Insert buttons open ribbons of related tools.
- Match Properties copies the style from one annotation onto another.
- On the right are Save As, Print, text search, Bookmark this document, Full screen, the light and dark theme toggle, and the Markup file menu.
Press Ctrl+K at any time to open the command palette and search for any tool or action by name.
Panels
A rail down the side opens the panels. They are grouped into navigation panels and markup panels.
- Navigate and view: Pages, Outline, Saved Views, and Title Blocks.
- Create and manage markup: Tool Chest, Presets, Layers, Hyperlinks, Spaces, Measurements, and Comments.
Navigation
Use Pan to move around the page, and scroll to zoom in and out around the pointer.
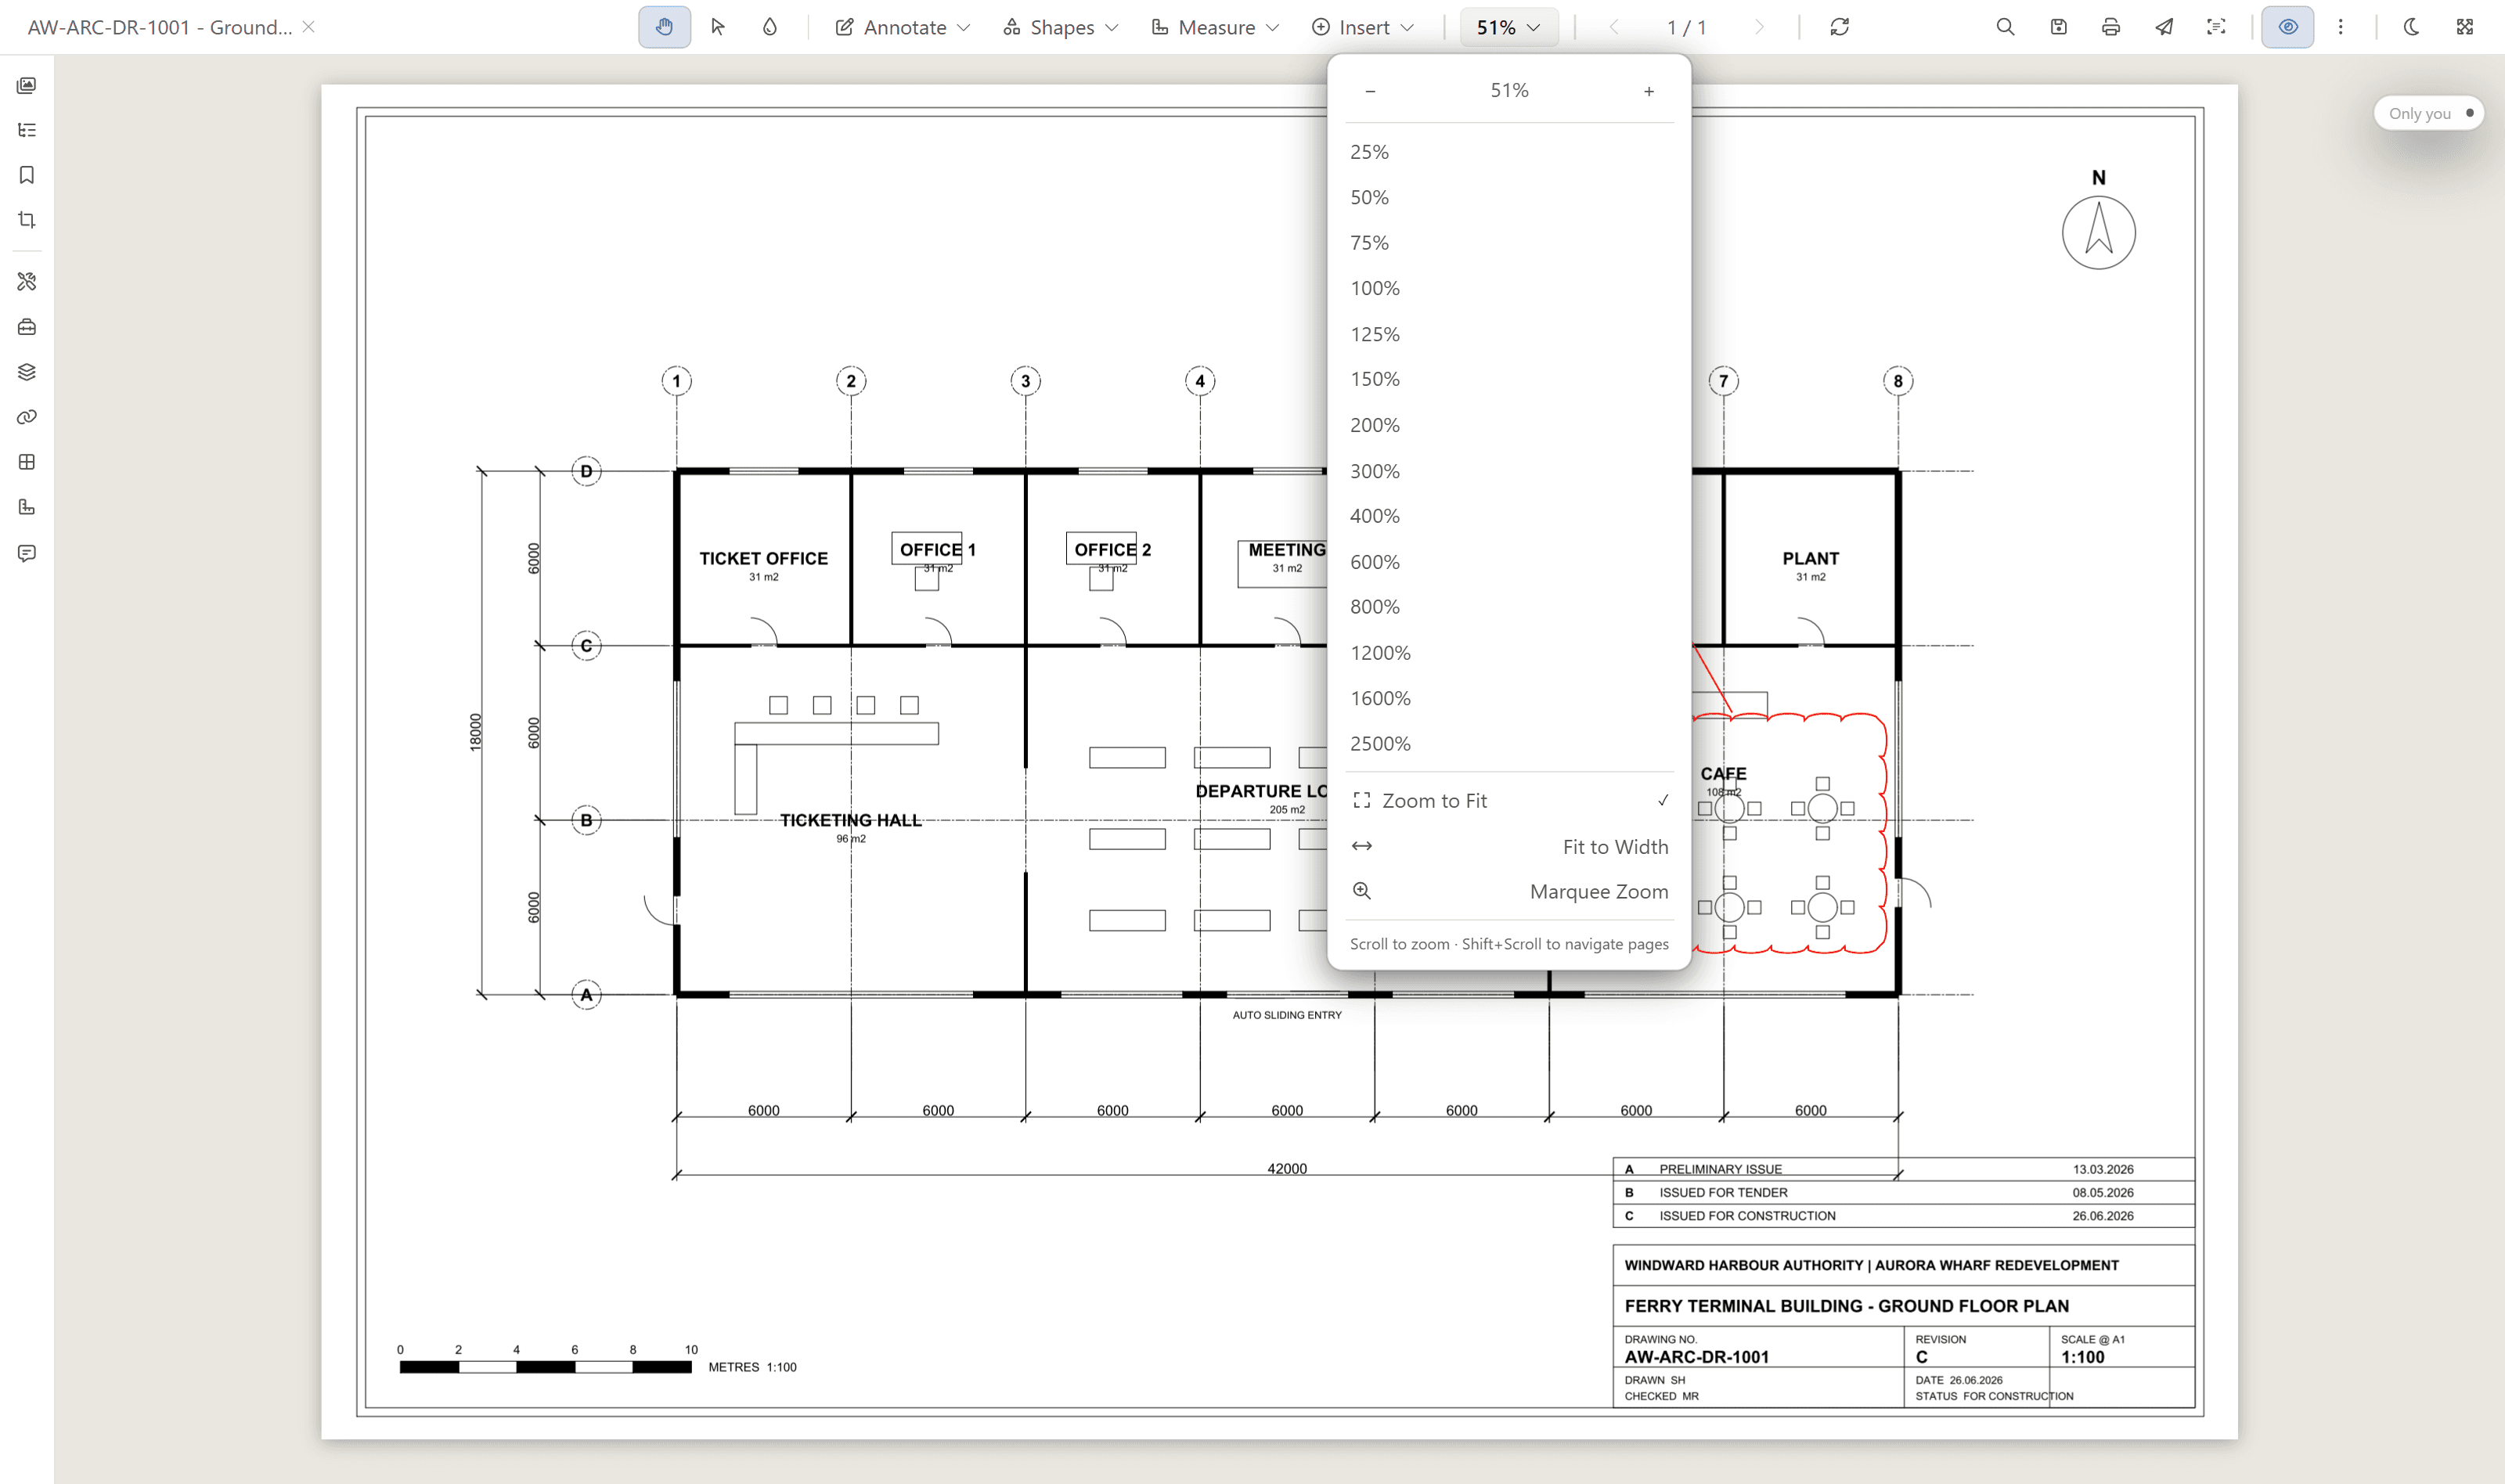
Open the Zoom control to set the zoom level or choose Zoom to Fit, Fit to Width, or Marquee Zoom, which zooms to a box you drag.
Move between pages with Previous page and Next page, or click the page number and enter a page number to jump to using Go to page. You can also rotate a page when it has been scanned at an angle. After you rotate a page, a Save Orientation button appears, which keeps the new orientation for everyone.
Finding Text
Click the search icon, or press Ctrl+F, to open the Search panel. Type your text and Rift lists every match, grouped by page.
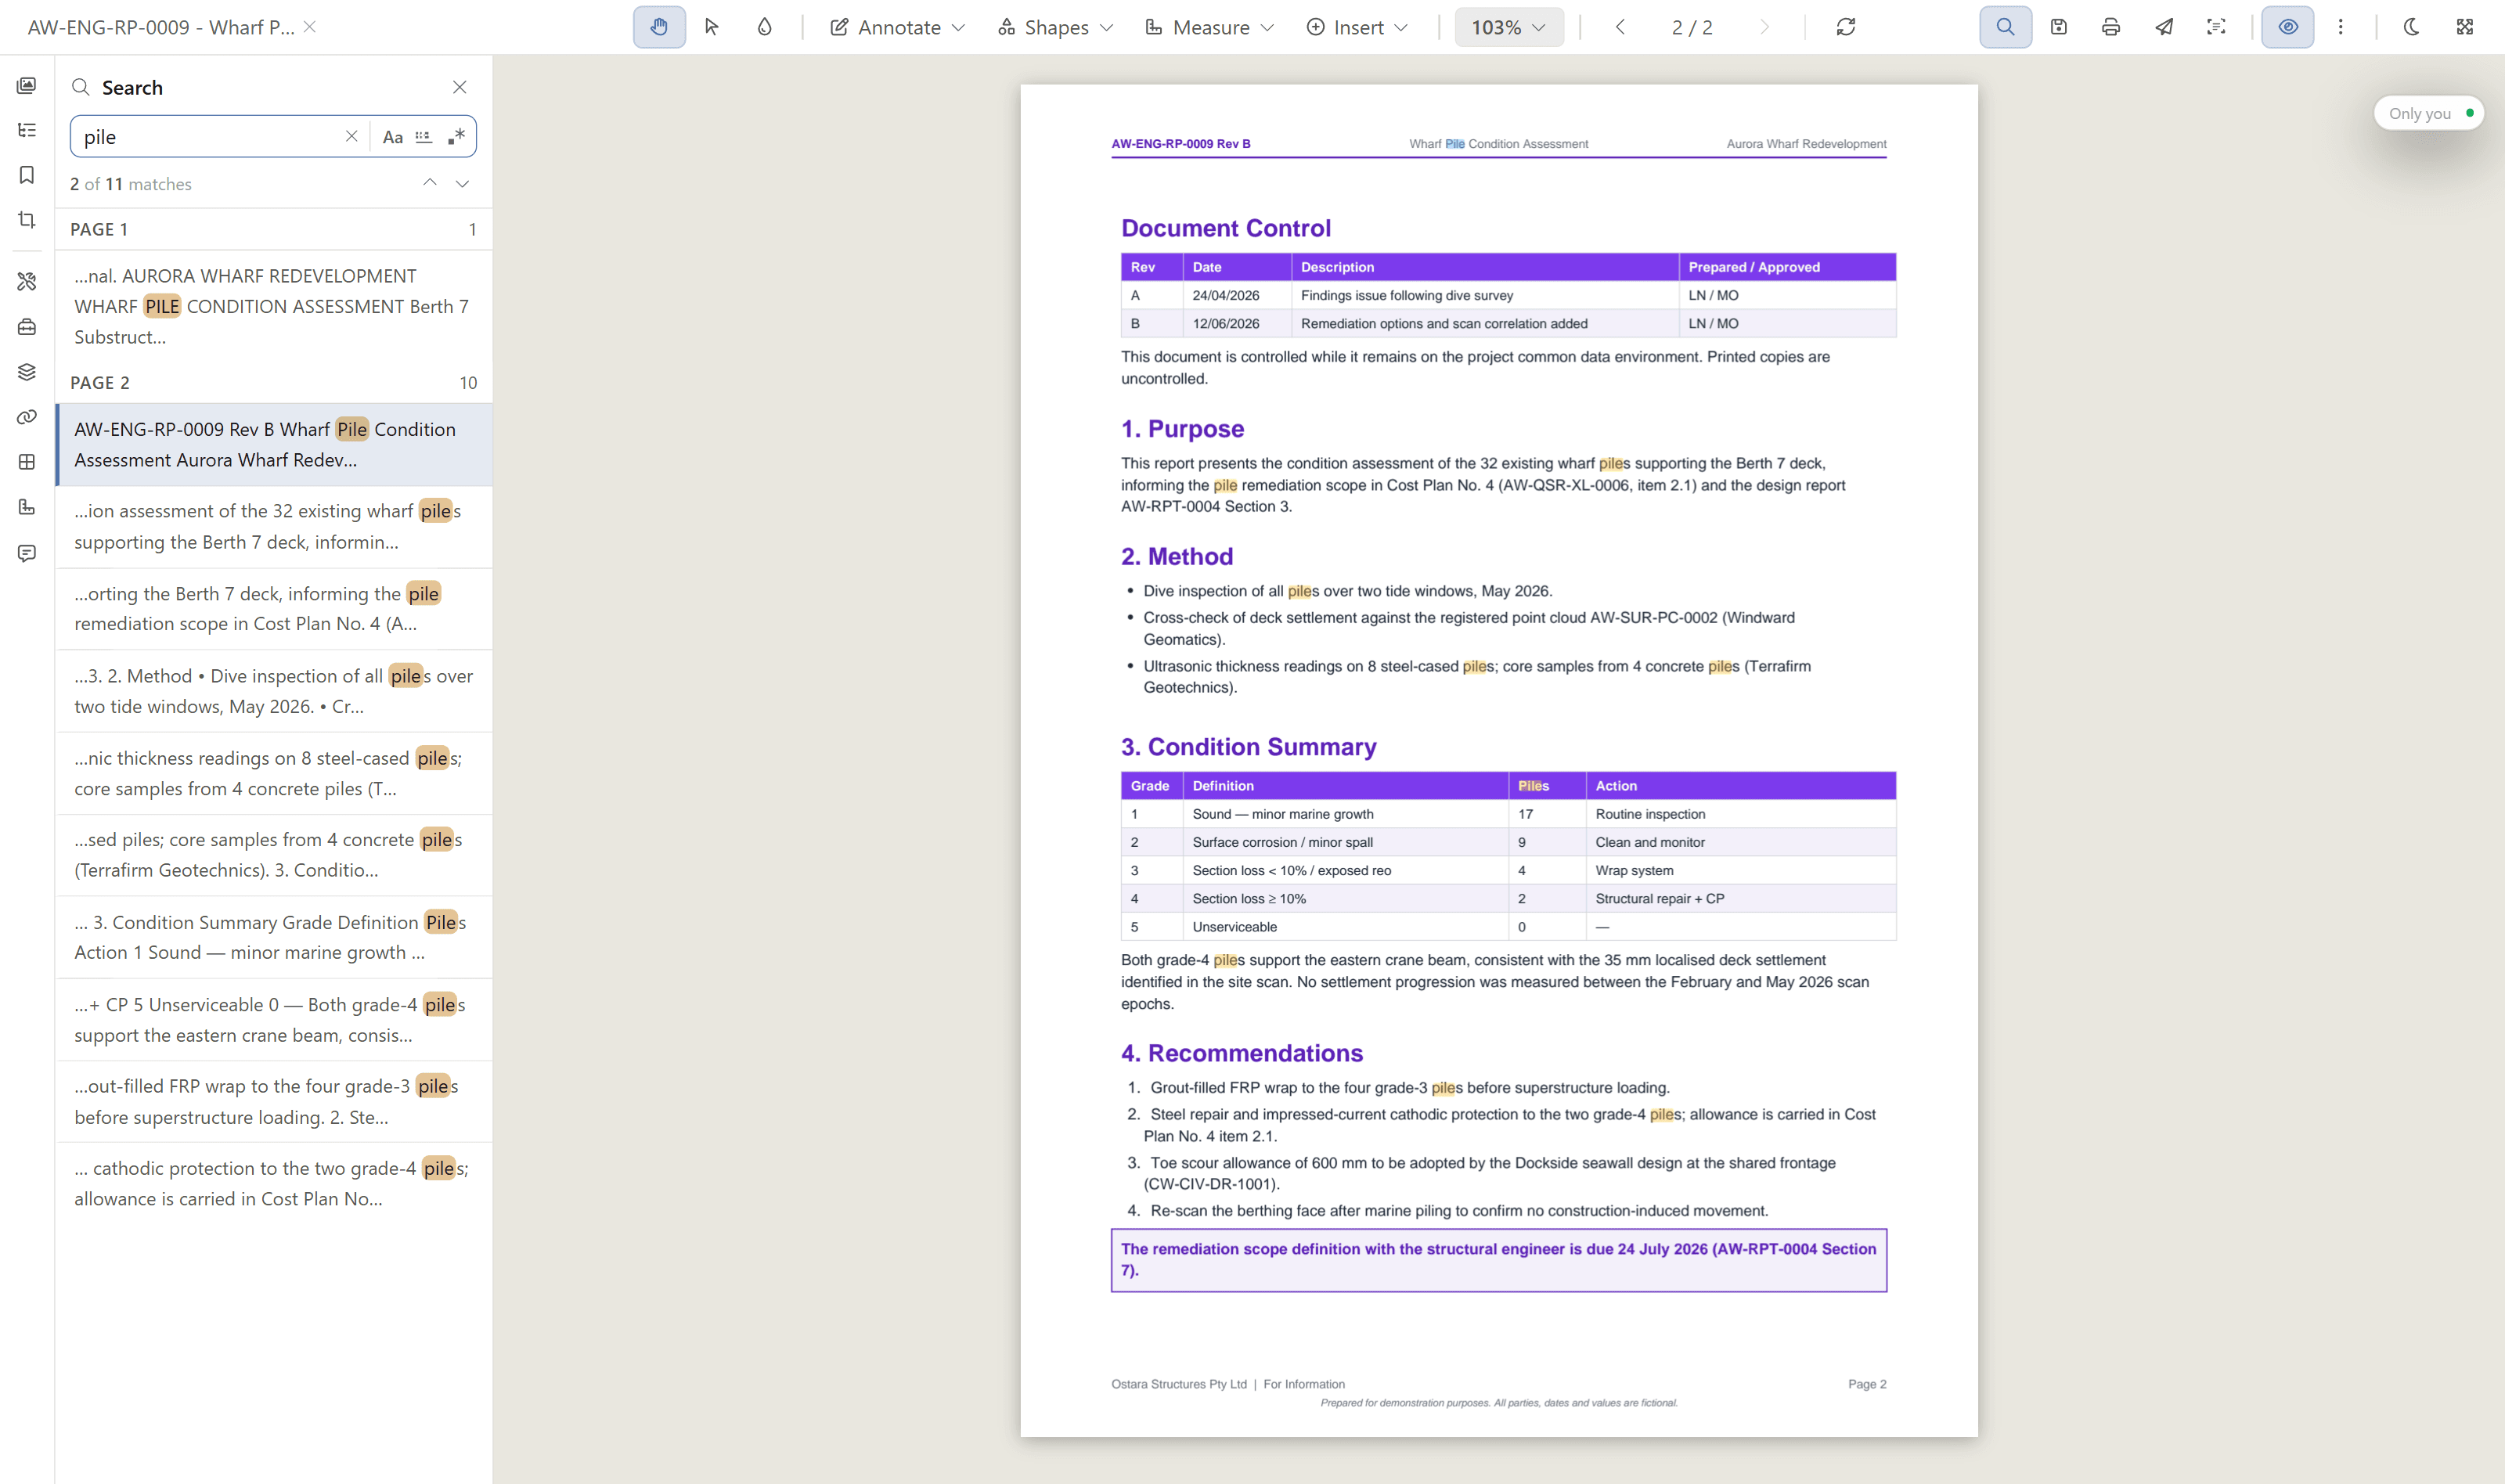
Narrow the search with Match case, Whole word, and Regular expression. Press Enter to go to the next match and Shift+Enter for the previous one.
Annotation
Open the Annotate ribbon to mark up the document. You can add Highlight, Underline, Strikeout, and Squiggly text markups, draw Freehand, add Text, a Callout or a Sticky Note, and leave a Comment.
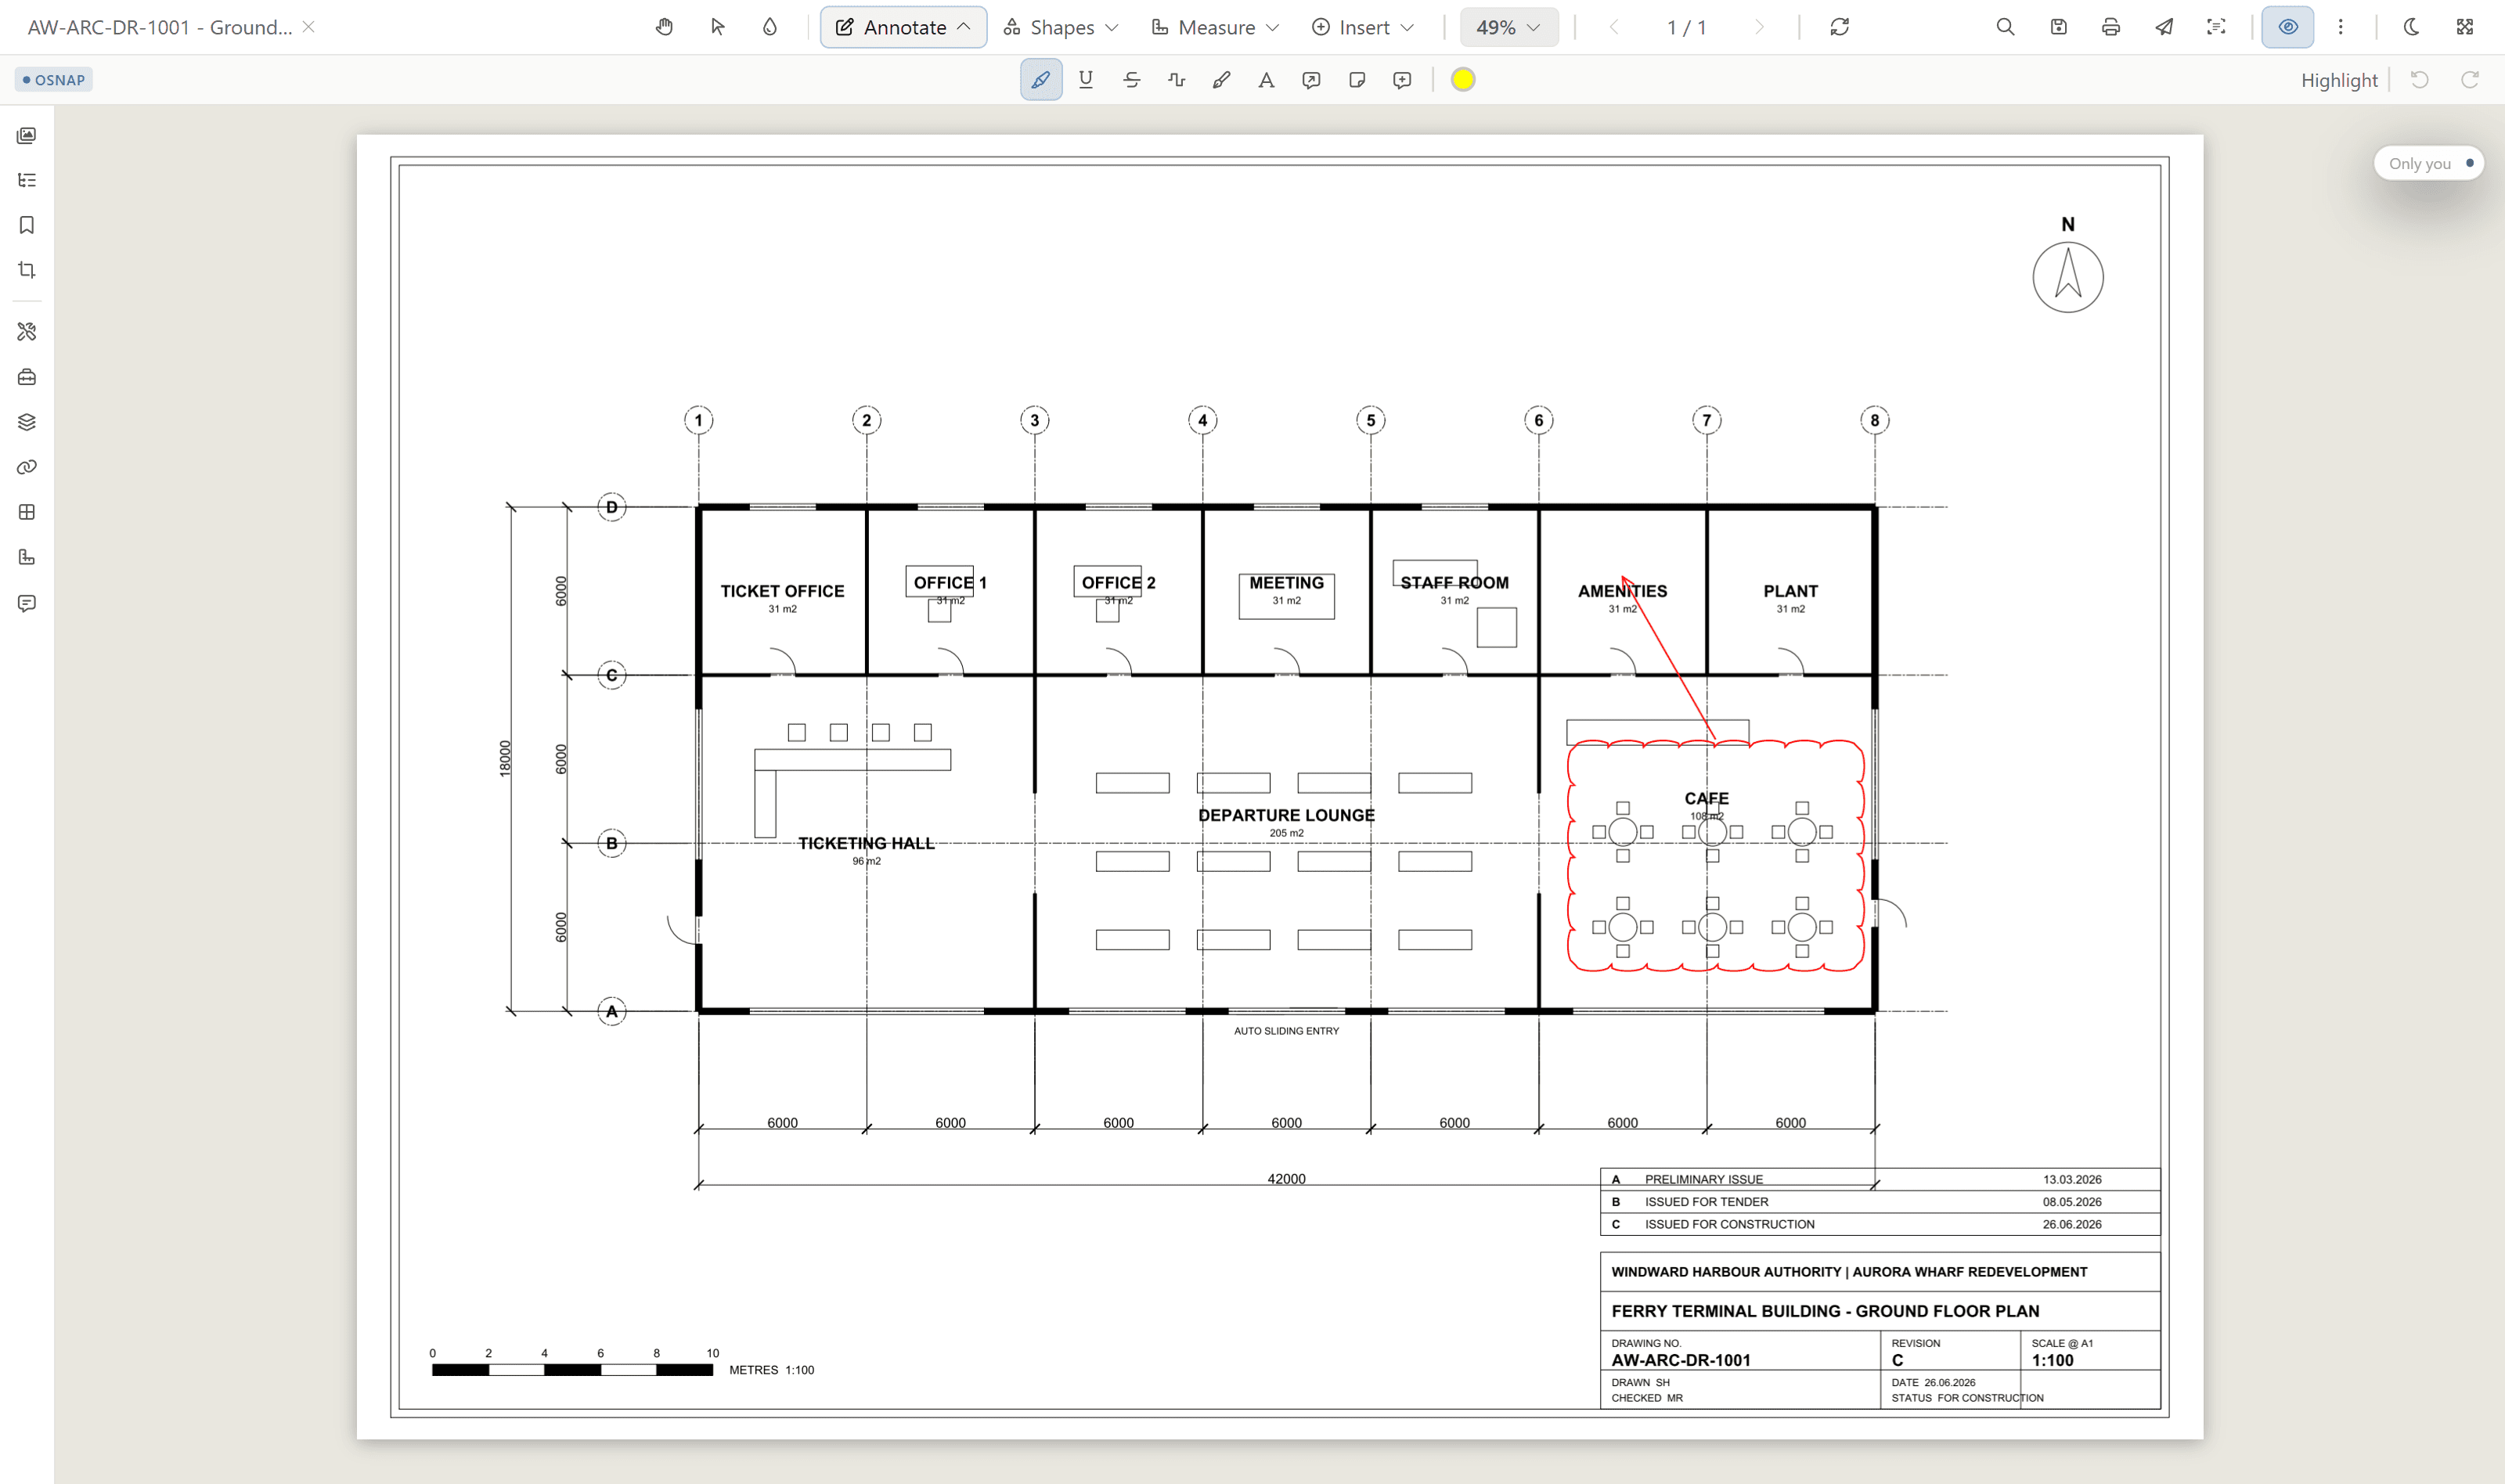
Open the Shapes ribbon to draw Rectangle, Ellipse, Line, Arrow, Arc, Cloud, Polyline, and Polygon shapes.
Each ribbon lets you set the annotation colour and stroke width, and choose a Solid or Dash border. Use Undo and Redo to step back and forward through your changes.
You can also mark up straight from the page text. Select text with Select, and a small bar appears where you can Copy it, or turn it into a Highlight, a Comment or a Hyperlink.
Marking up a document requires the Annotation access right. For your markup to be saved, the document also needs to be under an active workflow.
Measurements and Take-offs
Open the Measure ribbon to measure and count directly on a drawing. You can measure Distance, Area, and Perimeter, Count items, and use Dynamic Fill to measure an enclosed region by clicking inside it. Use Space to define a named region on the drawing.
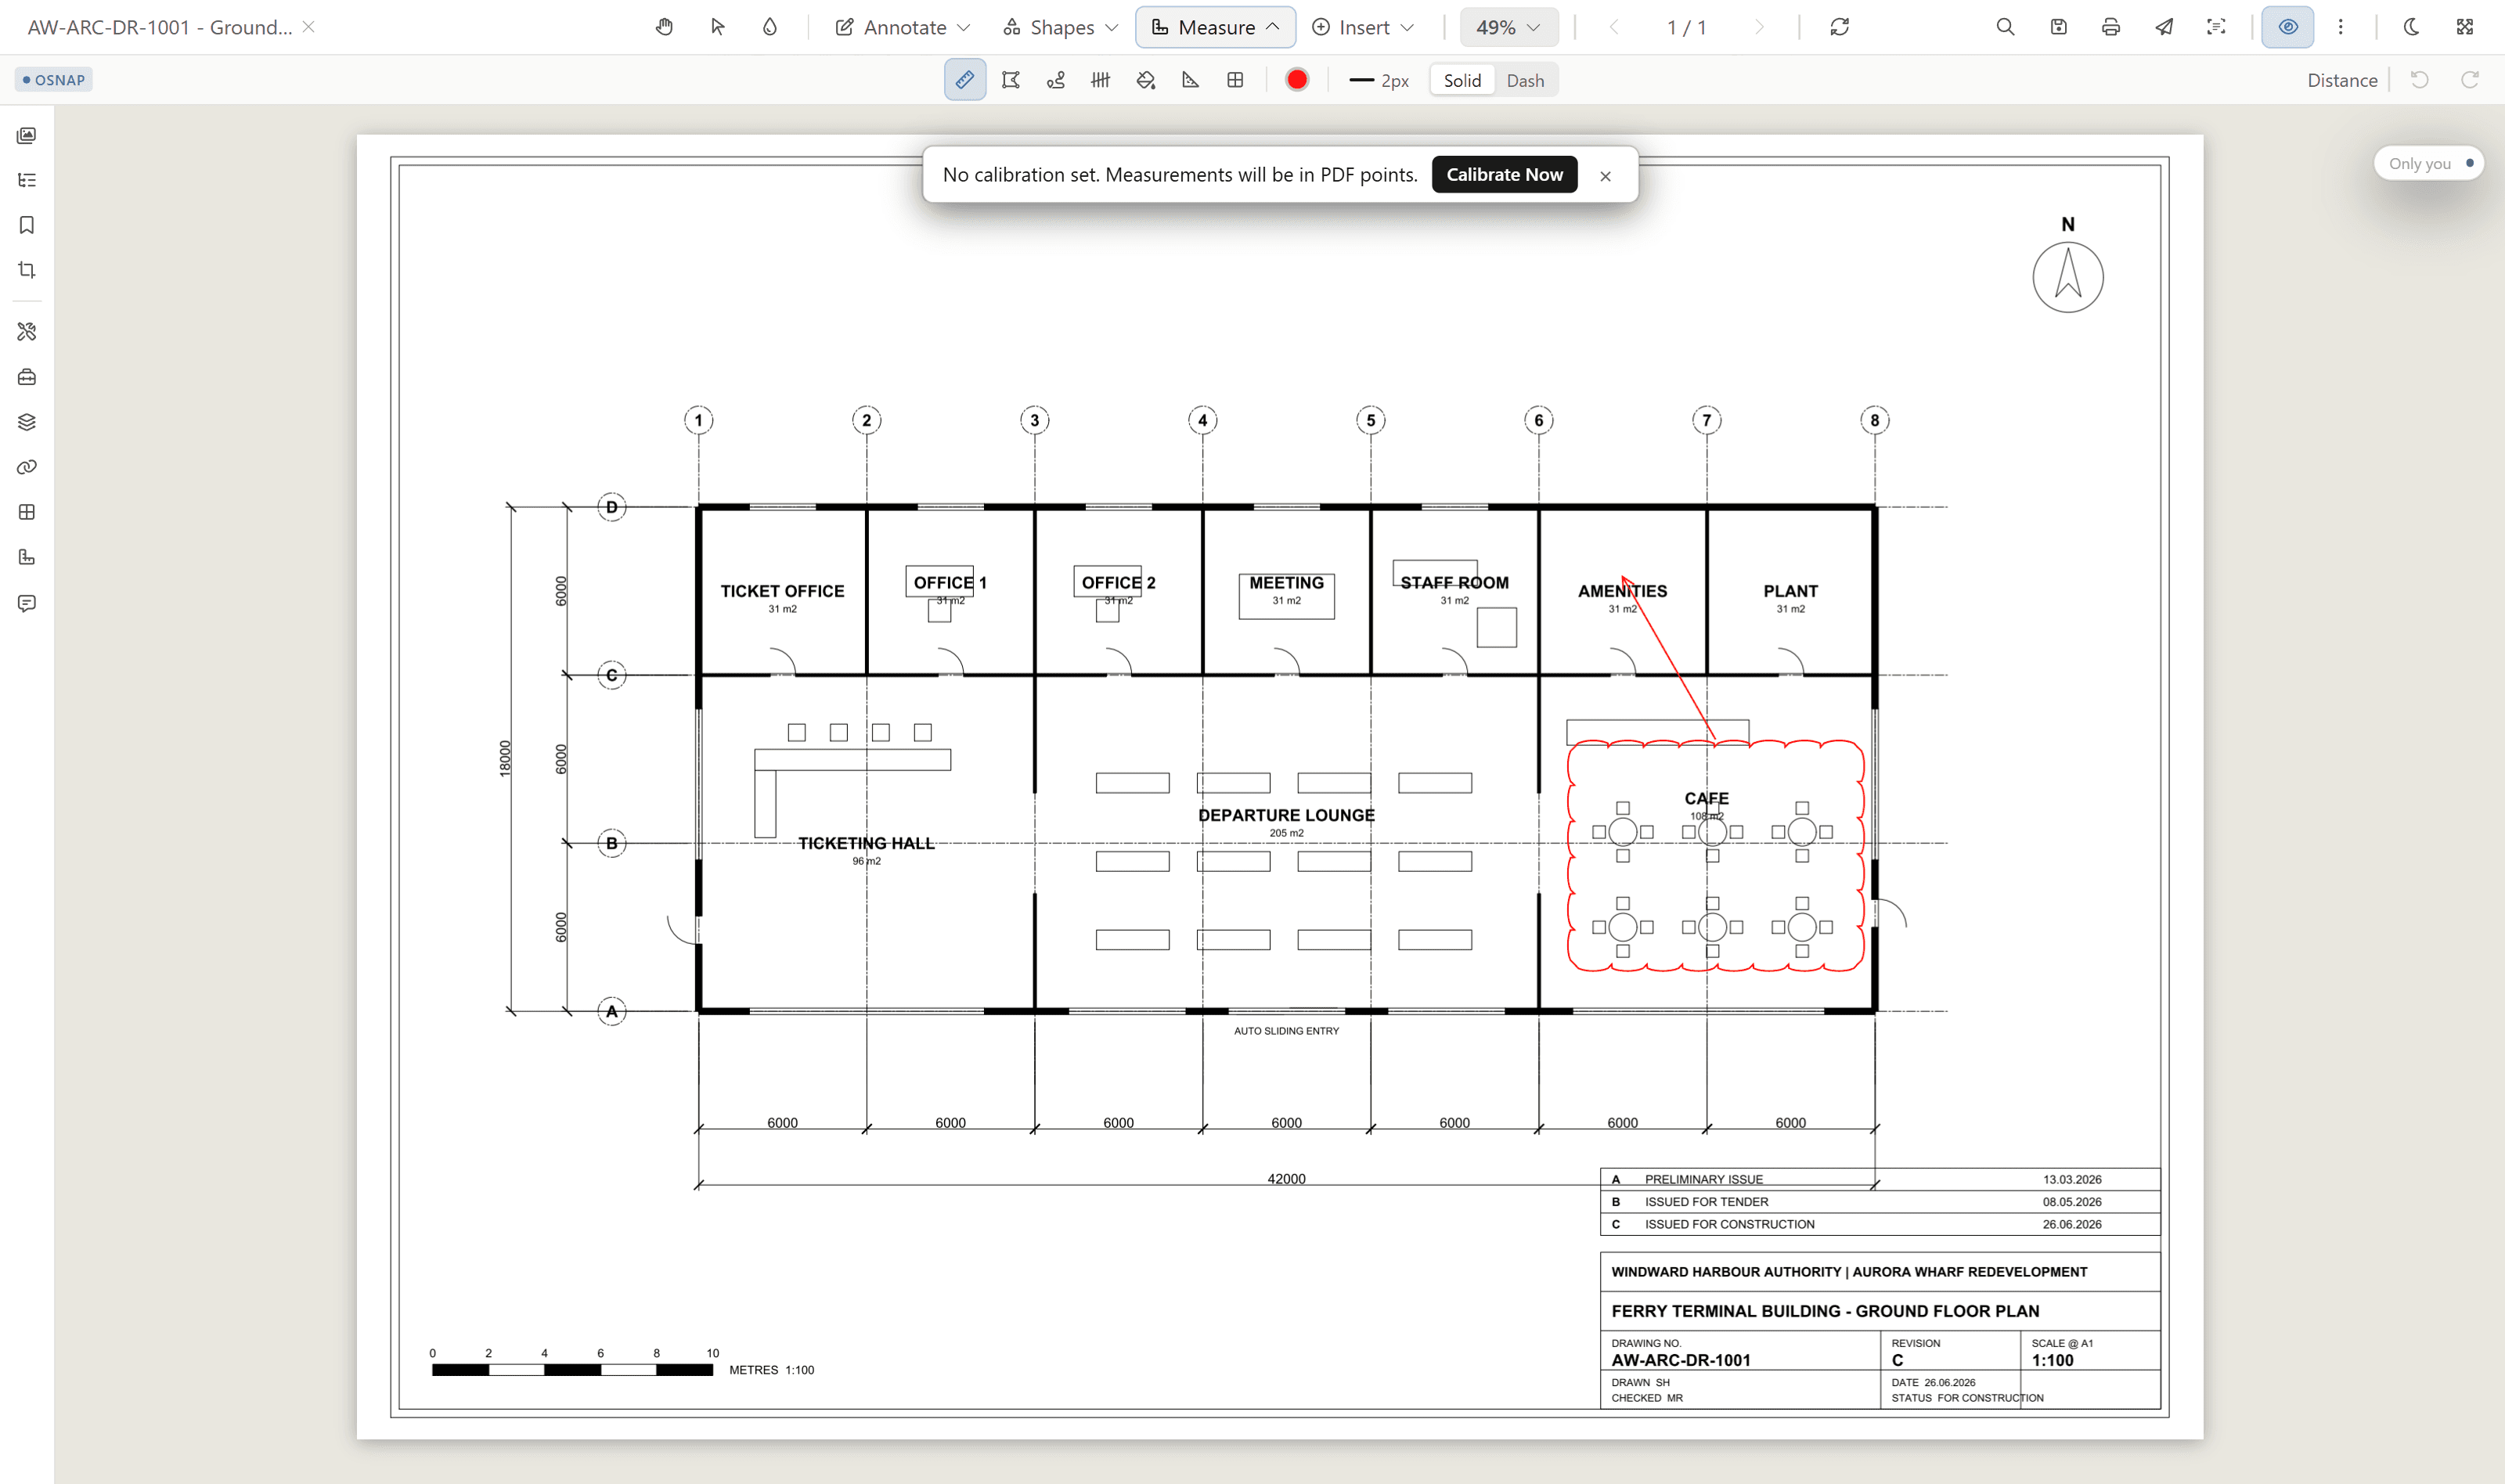
Before you measure, use Calibrate to set the real-world scale for the drawing, so lengths and areas are reported in the correct units. The OSNAP object snap feature, toggled with F3, snaps to the lines and corners of the drawing.
Every measurement appears in the Measurements panel, where you can see per-unit totals and export them to CSV.
Stamps, Signatures, and Hyperlinks
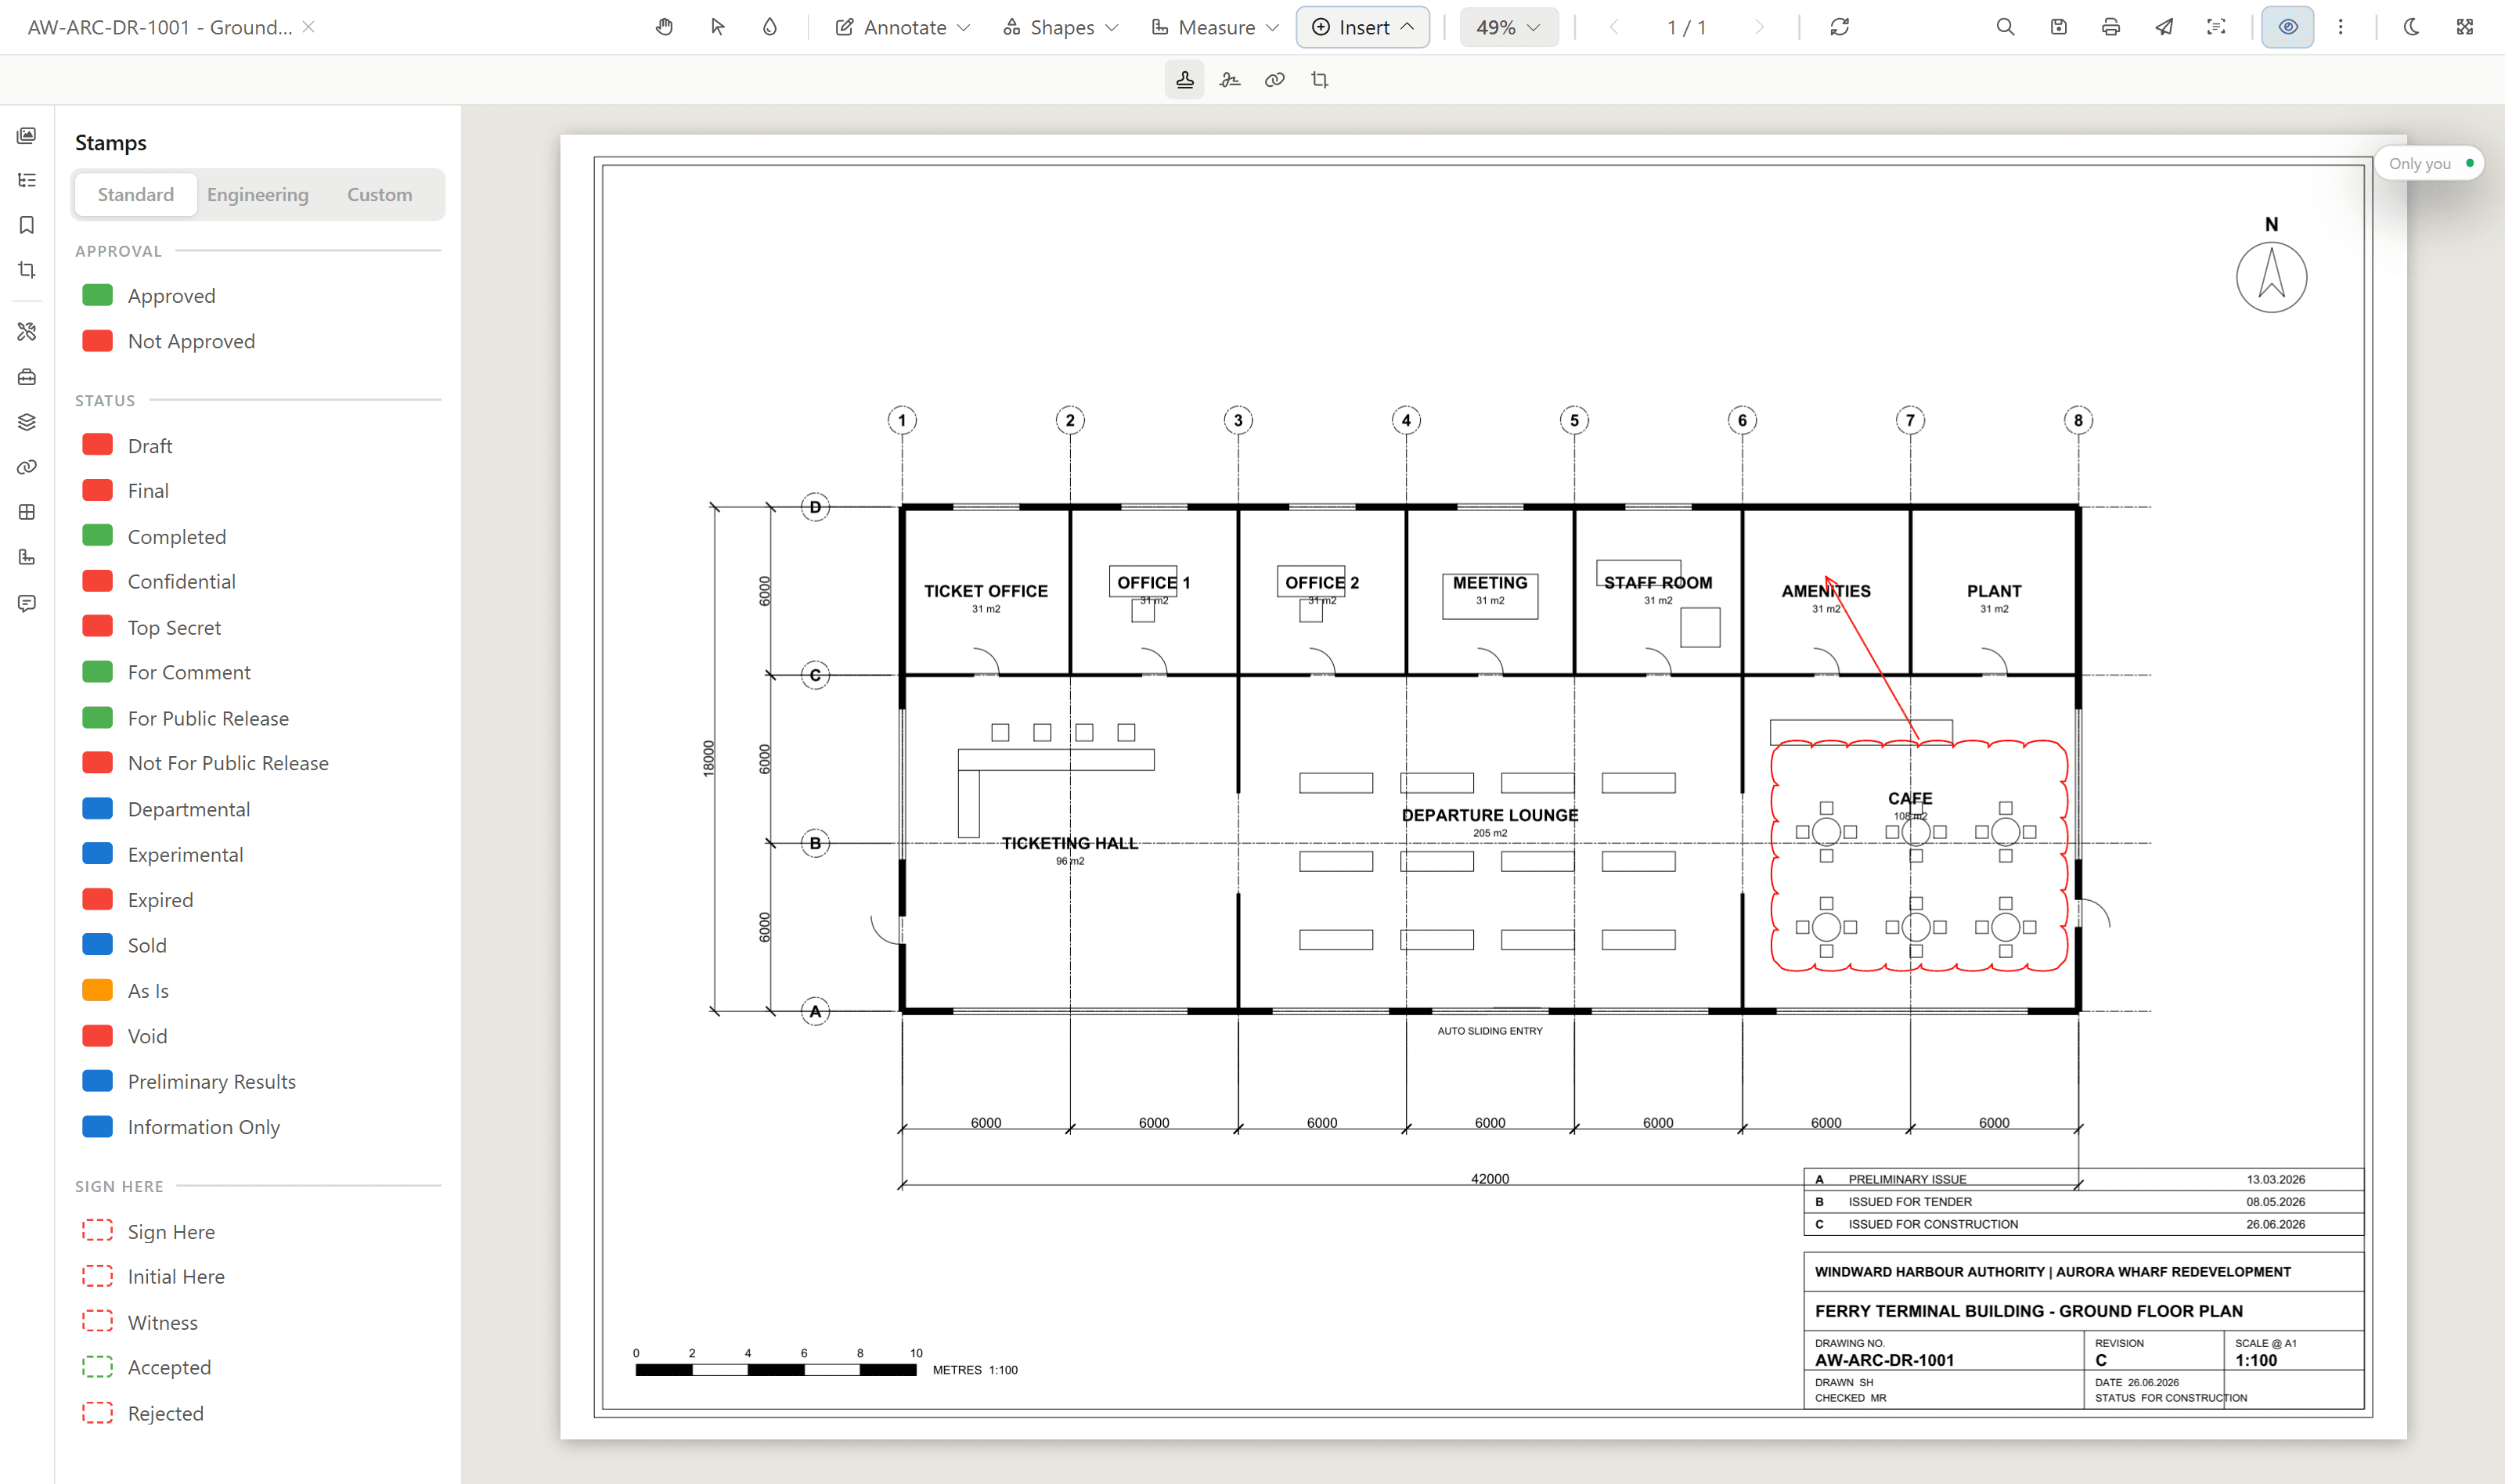
Open the Insert ribbon to add a Stamp or a Signature, both of which you can save and reuse. Use Hyperlink to draw a clickable region that links to a page, a web address or another document, and Title Block to select a title block and extract its tags.
The Stamps panel groups the stamps as Standard, Engineering and Custom, so you can pick an approval, status or sign-here stamp and drop it onto the page.
Links in a document are clickable. Click a link to jump to another page, open a web address in a new tab, or open a linked document. Links work even when you are only viewing.
Editing and Deleting Markup
Pick the Select tool, or press V, then click a markup to select it. Drag it to move it, or drag its handles to resize or reshape it.
When a markup is selected, the Annotation Properties panel opens, where you can change its colour, opacity, stroke width, fill and border style. You can also Save as Preset or Set as default style so your next markup matches.
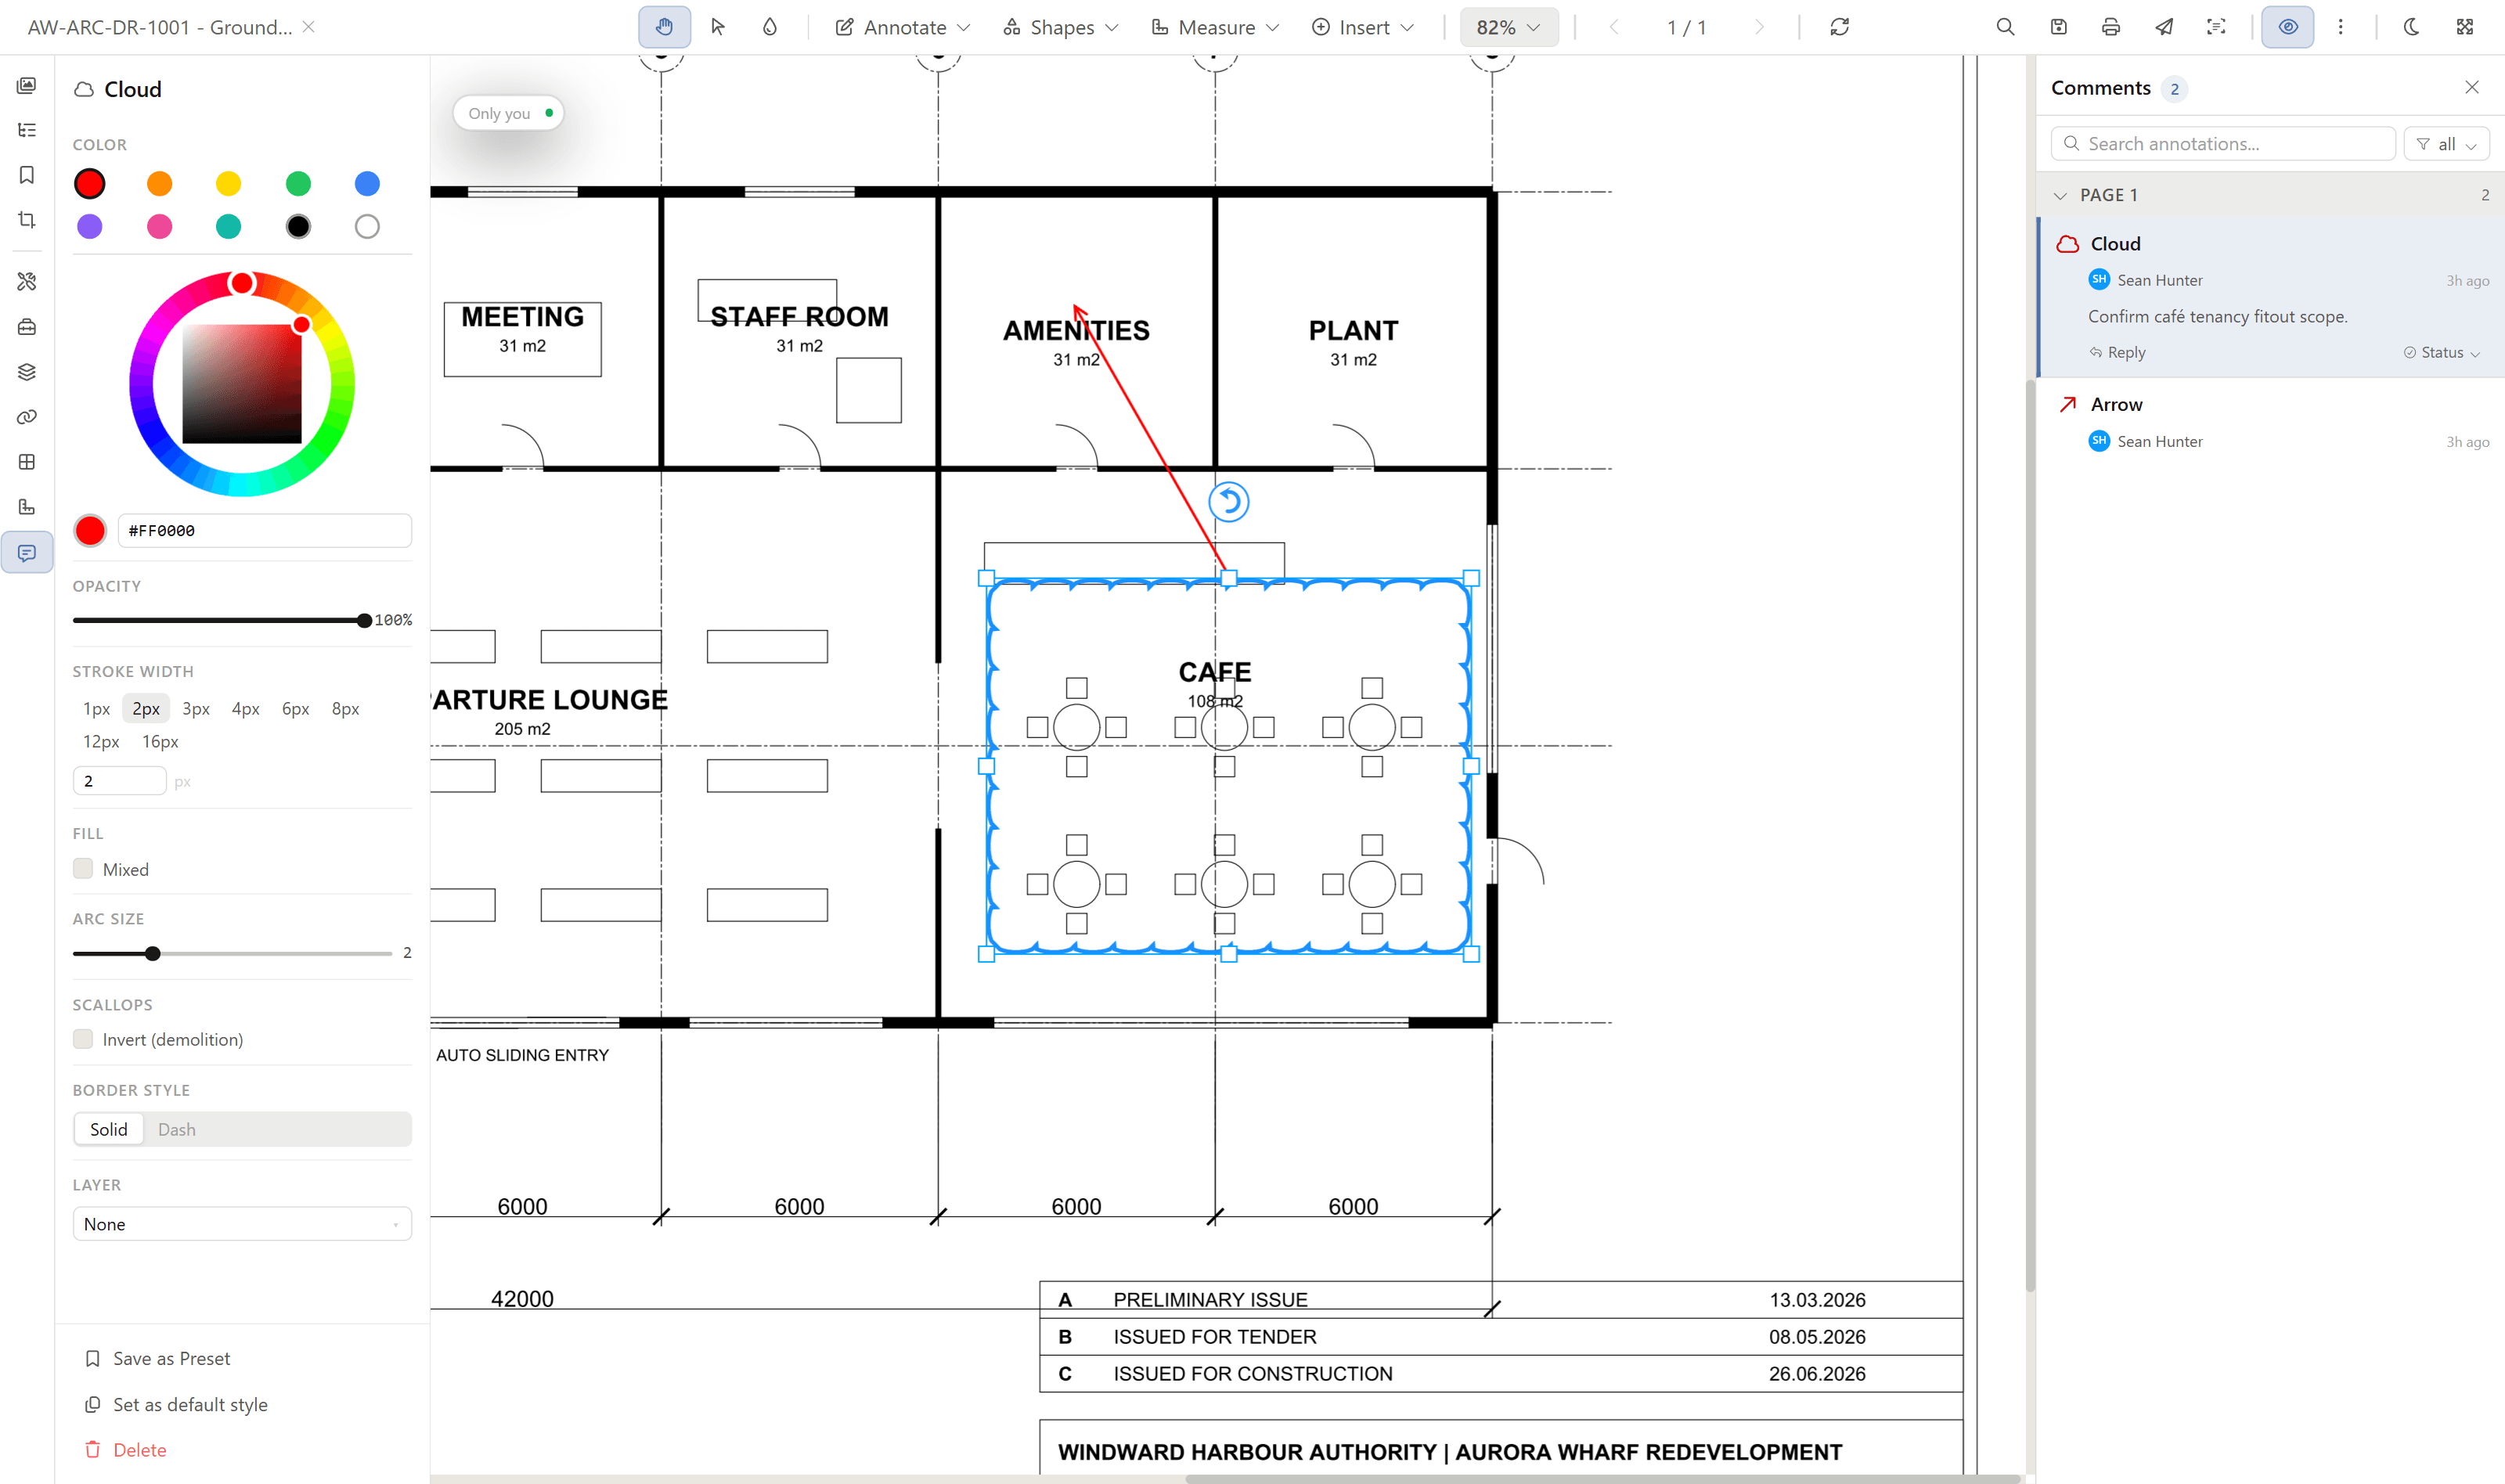
- Press Delete to remove the selected markup. You can also right-click it and choose Delete.
- Select two or more markups, then press Ctrl+G to group them or Ctrl+Shift+G to ungroup.
- Use Match Properties to copy one markup's style onto others: click a markup to sample its style, then click each markup you want to apply it to.
Comments
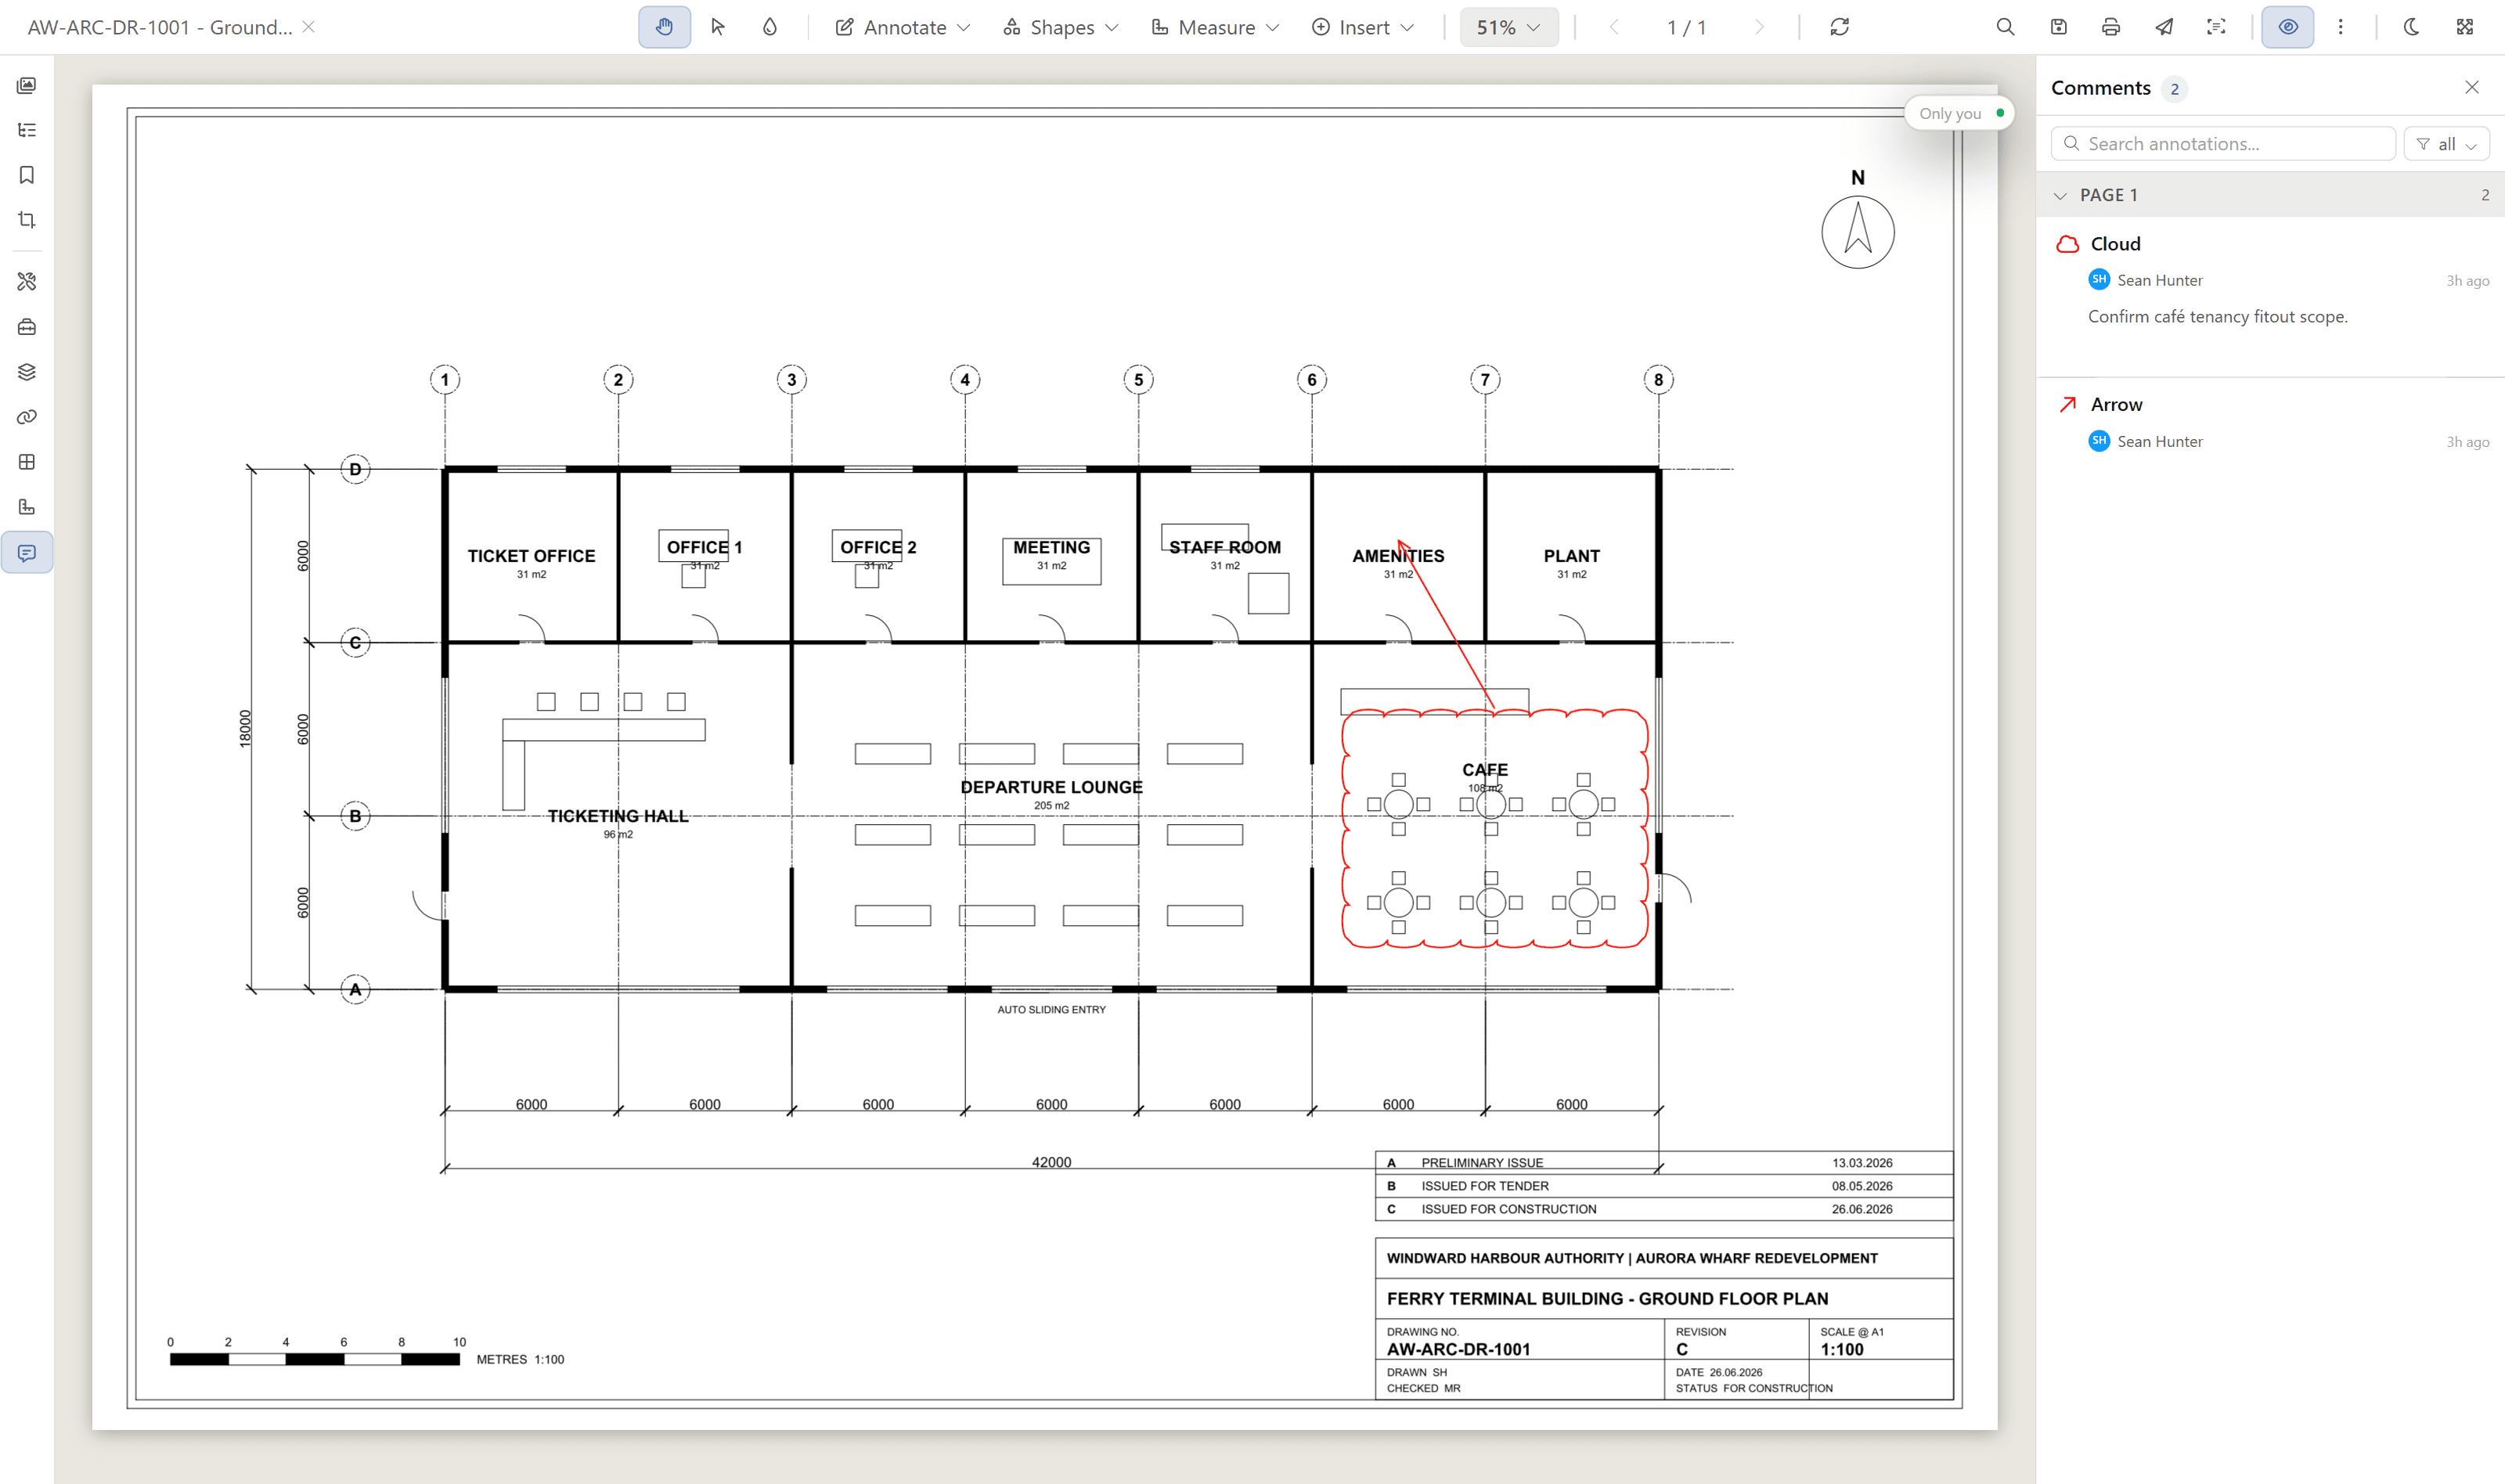
Use the Comment tool, or the bar that appears when you select text or a markup, to leave a comment. The Comments panel lists every comment on the document, so you can read them and jump to where each one sits on the page. Use Reply to respond in a thread and set a comment's status as the review moves on.
Working With Panels
The panels give you more control over a document:
- Pages shows page thumbnails, and Outline shows the document's bookmarks.
- Saved Views stores the current page, position and zoom as a named view you can return to, and can play your views back in order as a presentation.
- Tool Chest holds reusable symbols you can drop onto the page, and Presets stores annotation styles you have saved.
- Layers lets you show and hide parts of a drawing. See Working with drawing layers below.
- Comments and Measurements list the comments and measurements you have added.
Working With Drawing Layers
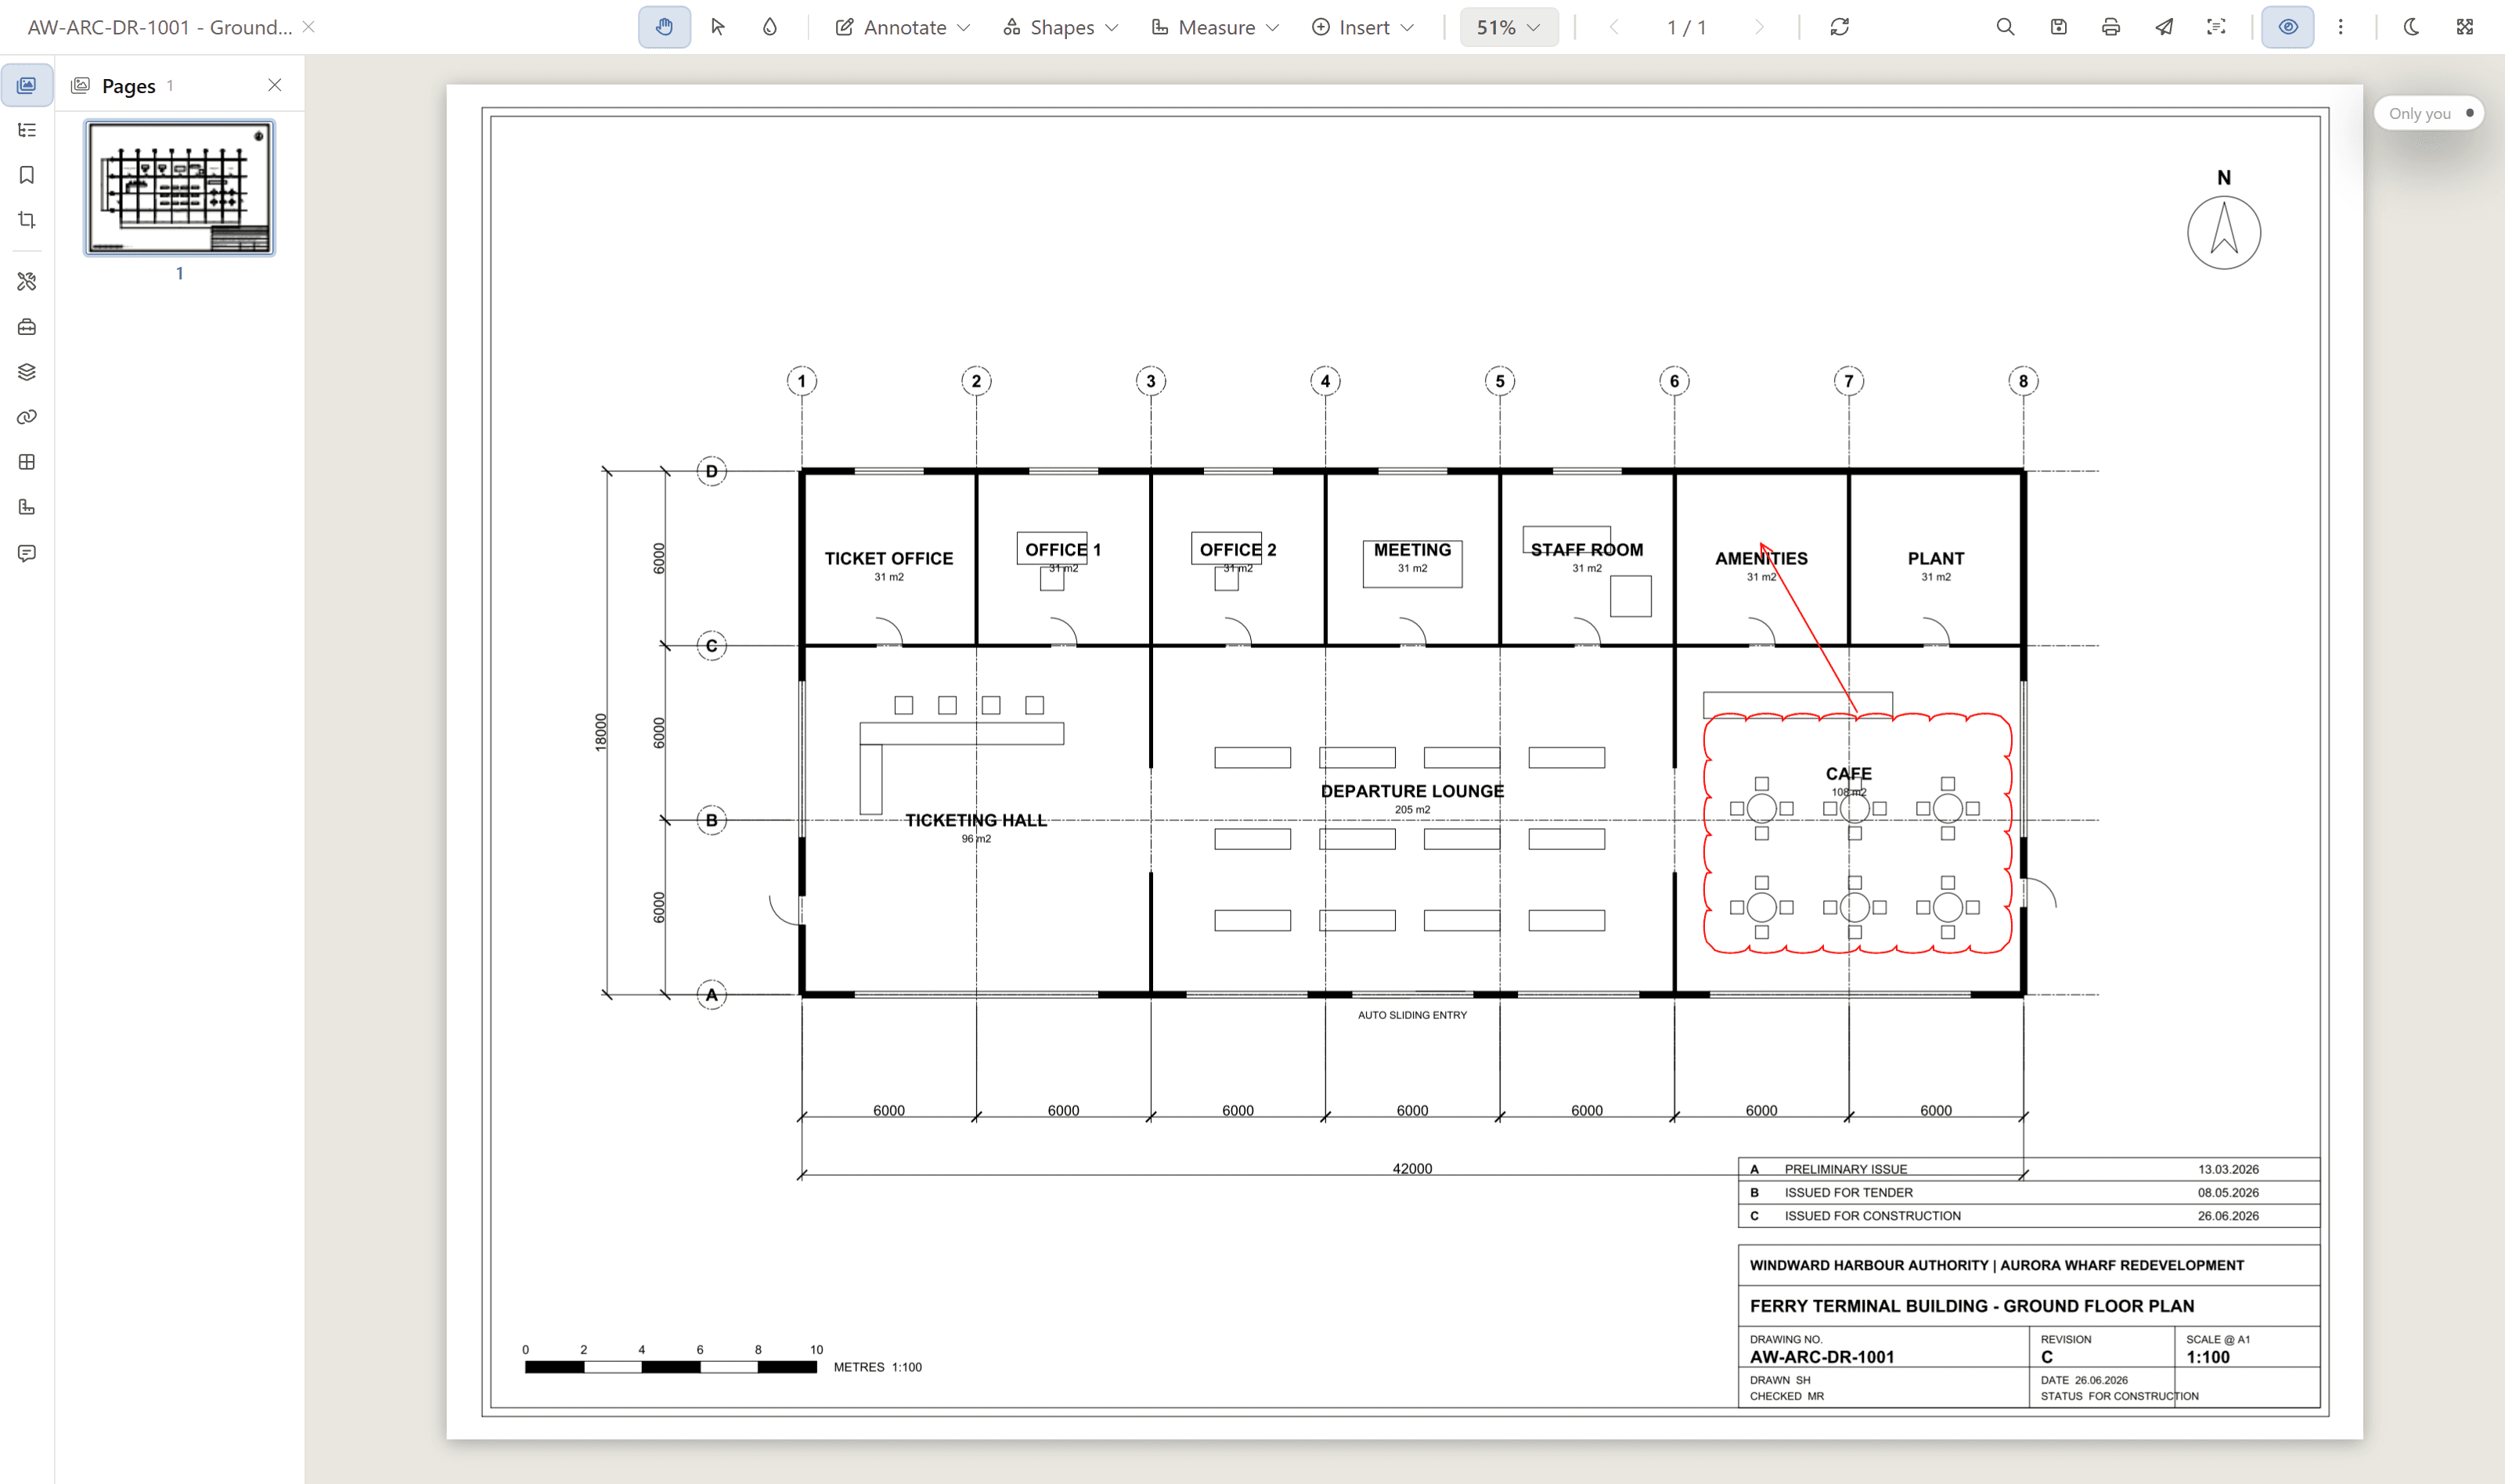
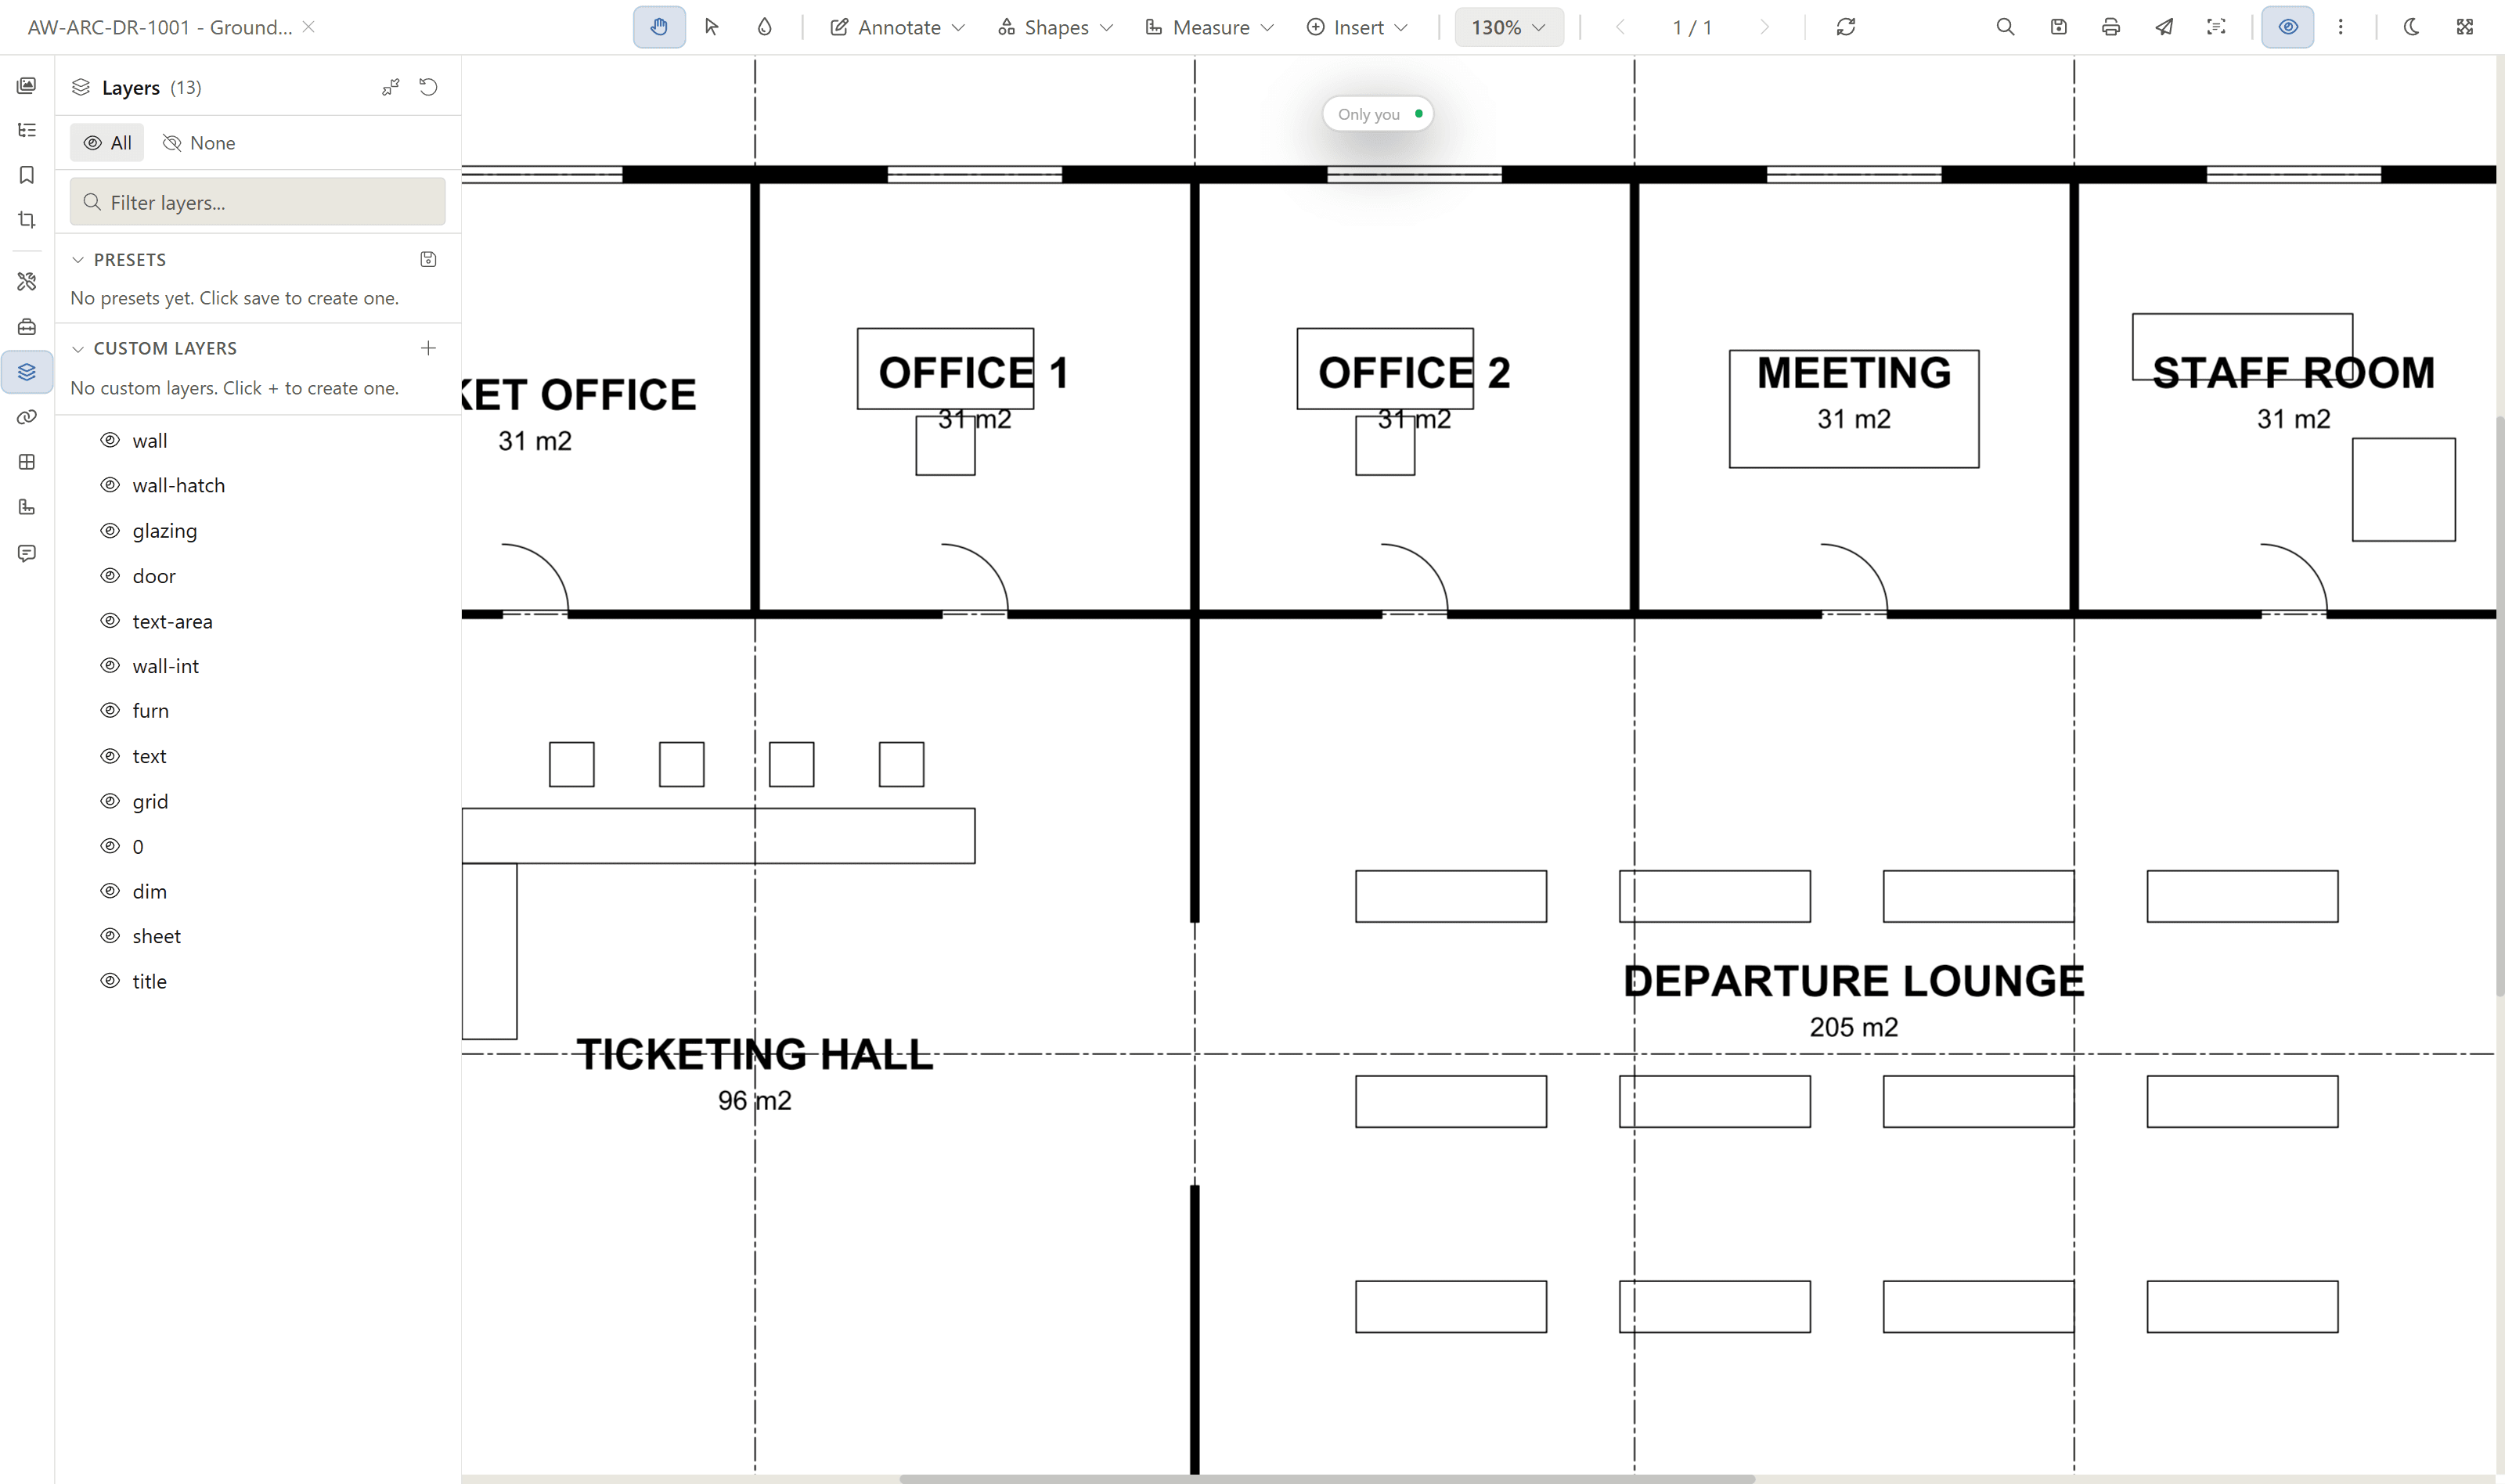
Drawings that come from CAD keep their layers. When a DWG is opened in Lunr, the layers from the original drawing, such as walls, glazing, furniture and dimensions, carry through to the PDF. The Layers panel lists every layer, so you can show and hide parts of the drawing to focus on what matters.
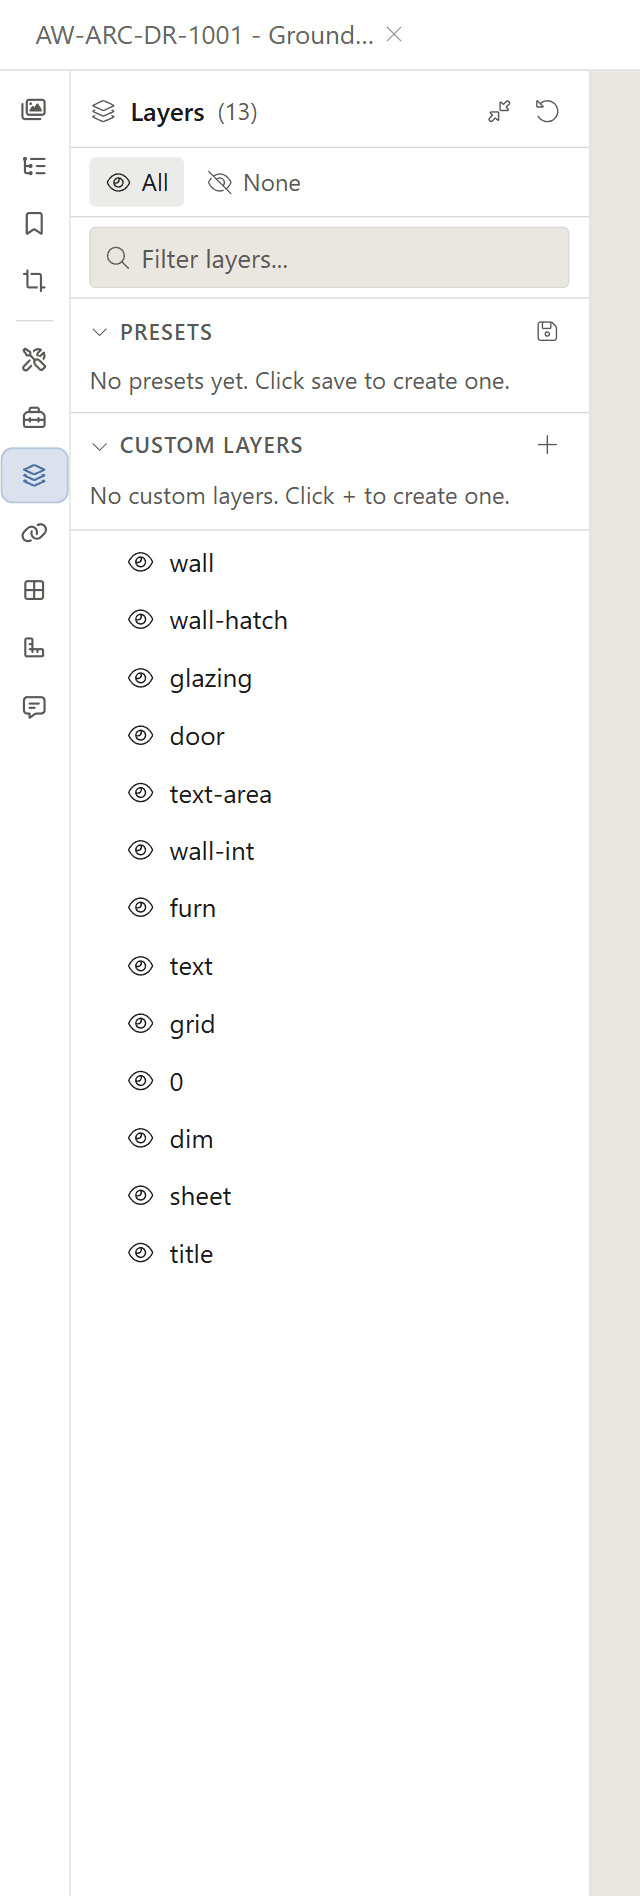
Open the Layers panel from the panel rail. Each layer has its own row with a visibility control, and the panel header shows how many layers are visible.
Showing and Hiding Layers
Click a layer's eye to hide it, and click the eye again to show it. The drawing updates immediately.
- Click All to show every layer, or None to hide them all.
- Type in the Filter layers field to find a layer by name.
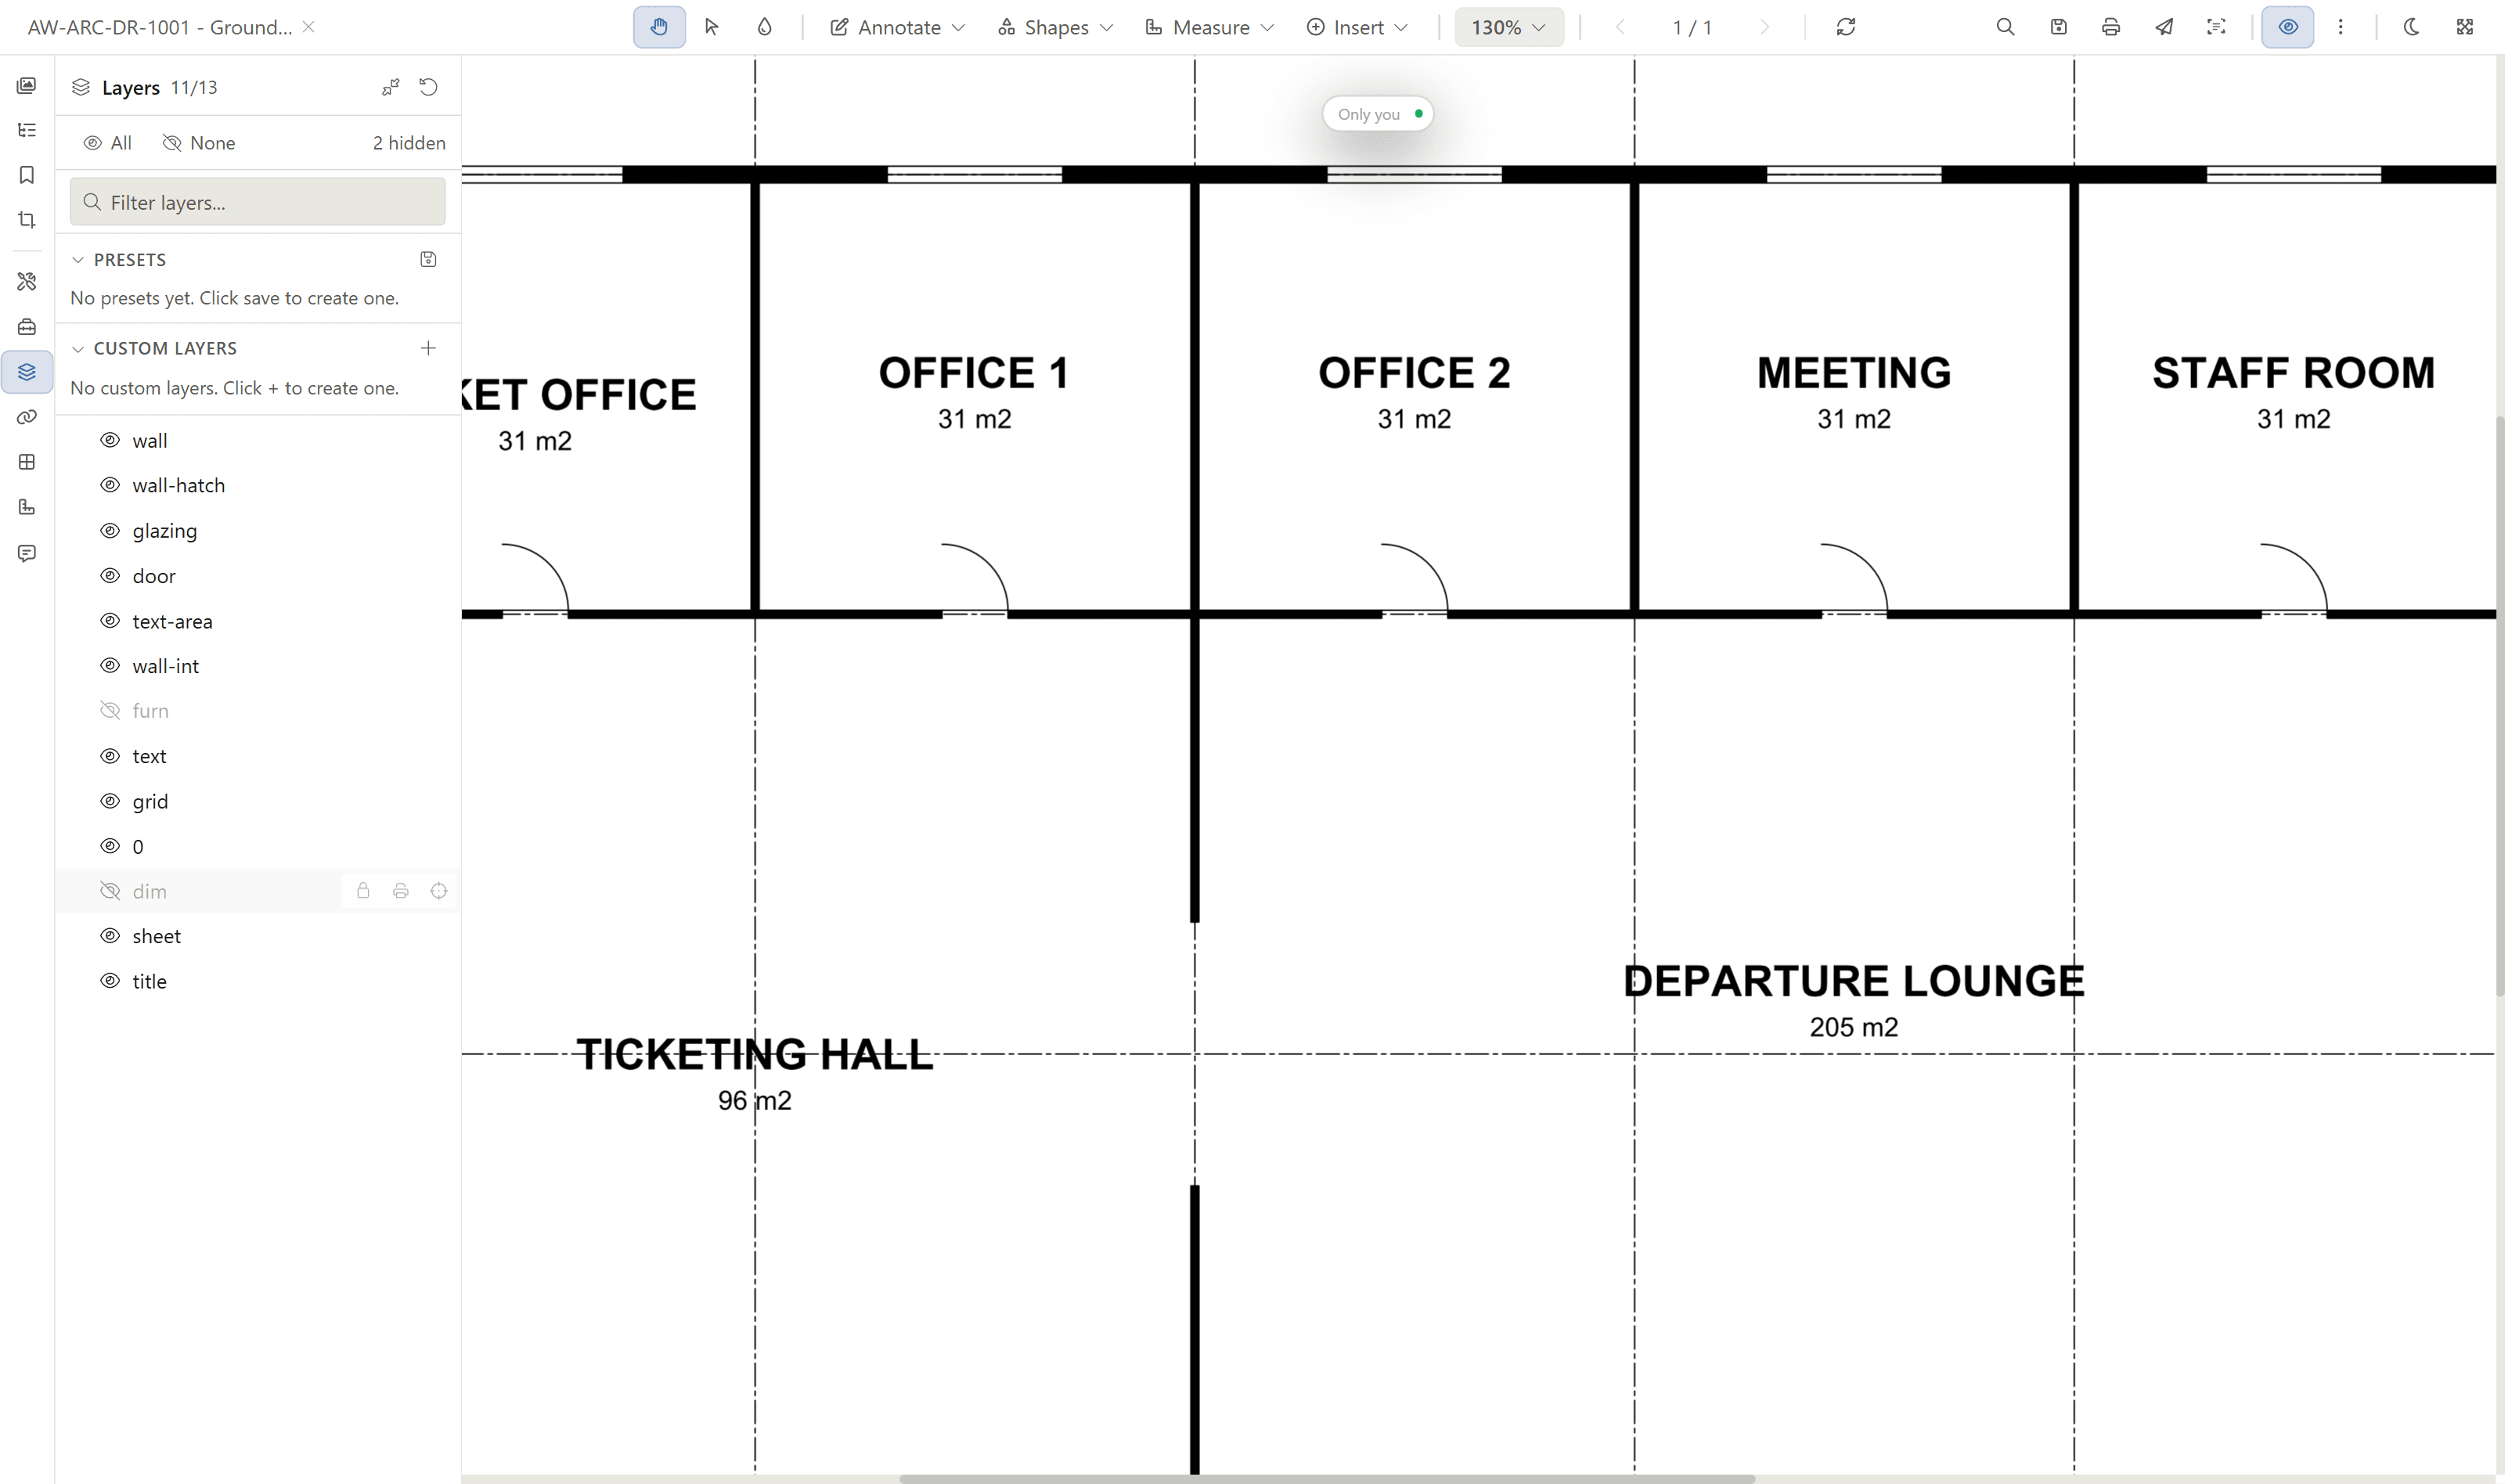
- The header count, such as 11/13, and a hidden badge tell you how many layers are hidden.
For example, a ground floor plan with every layer visible shows the walls, glazing, doors, furniture, room labels and dimensions together.
Hiding the furn and dim layers takes away the furniture and the dimensions, leaving a cleaner plan of the rooms. The header now reads 11/13 with two layers hidden.
Custom Layers and Presets
You can also do more than show and hide:
- Set a layer's opacity, or lock it so it cannot be changed.
- Add a custom layer to group your own markup.
- Save the current mix of visible layers as a preset, then return to it later from the Presets section.
- Use the reset control in the panel header to return every layer to its default state.
Comparing Documents
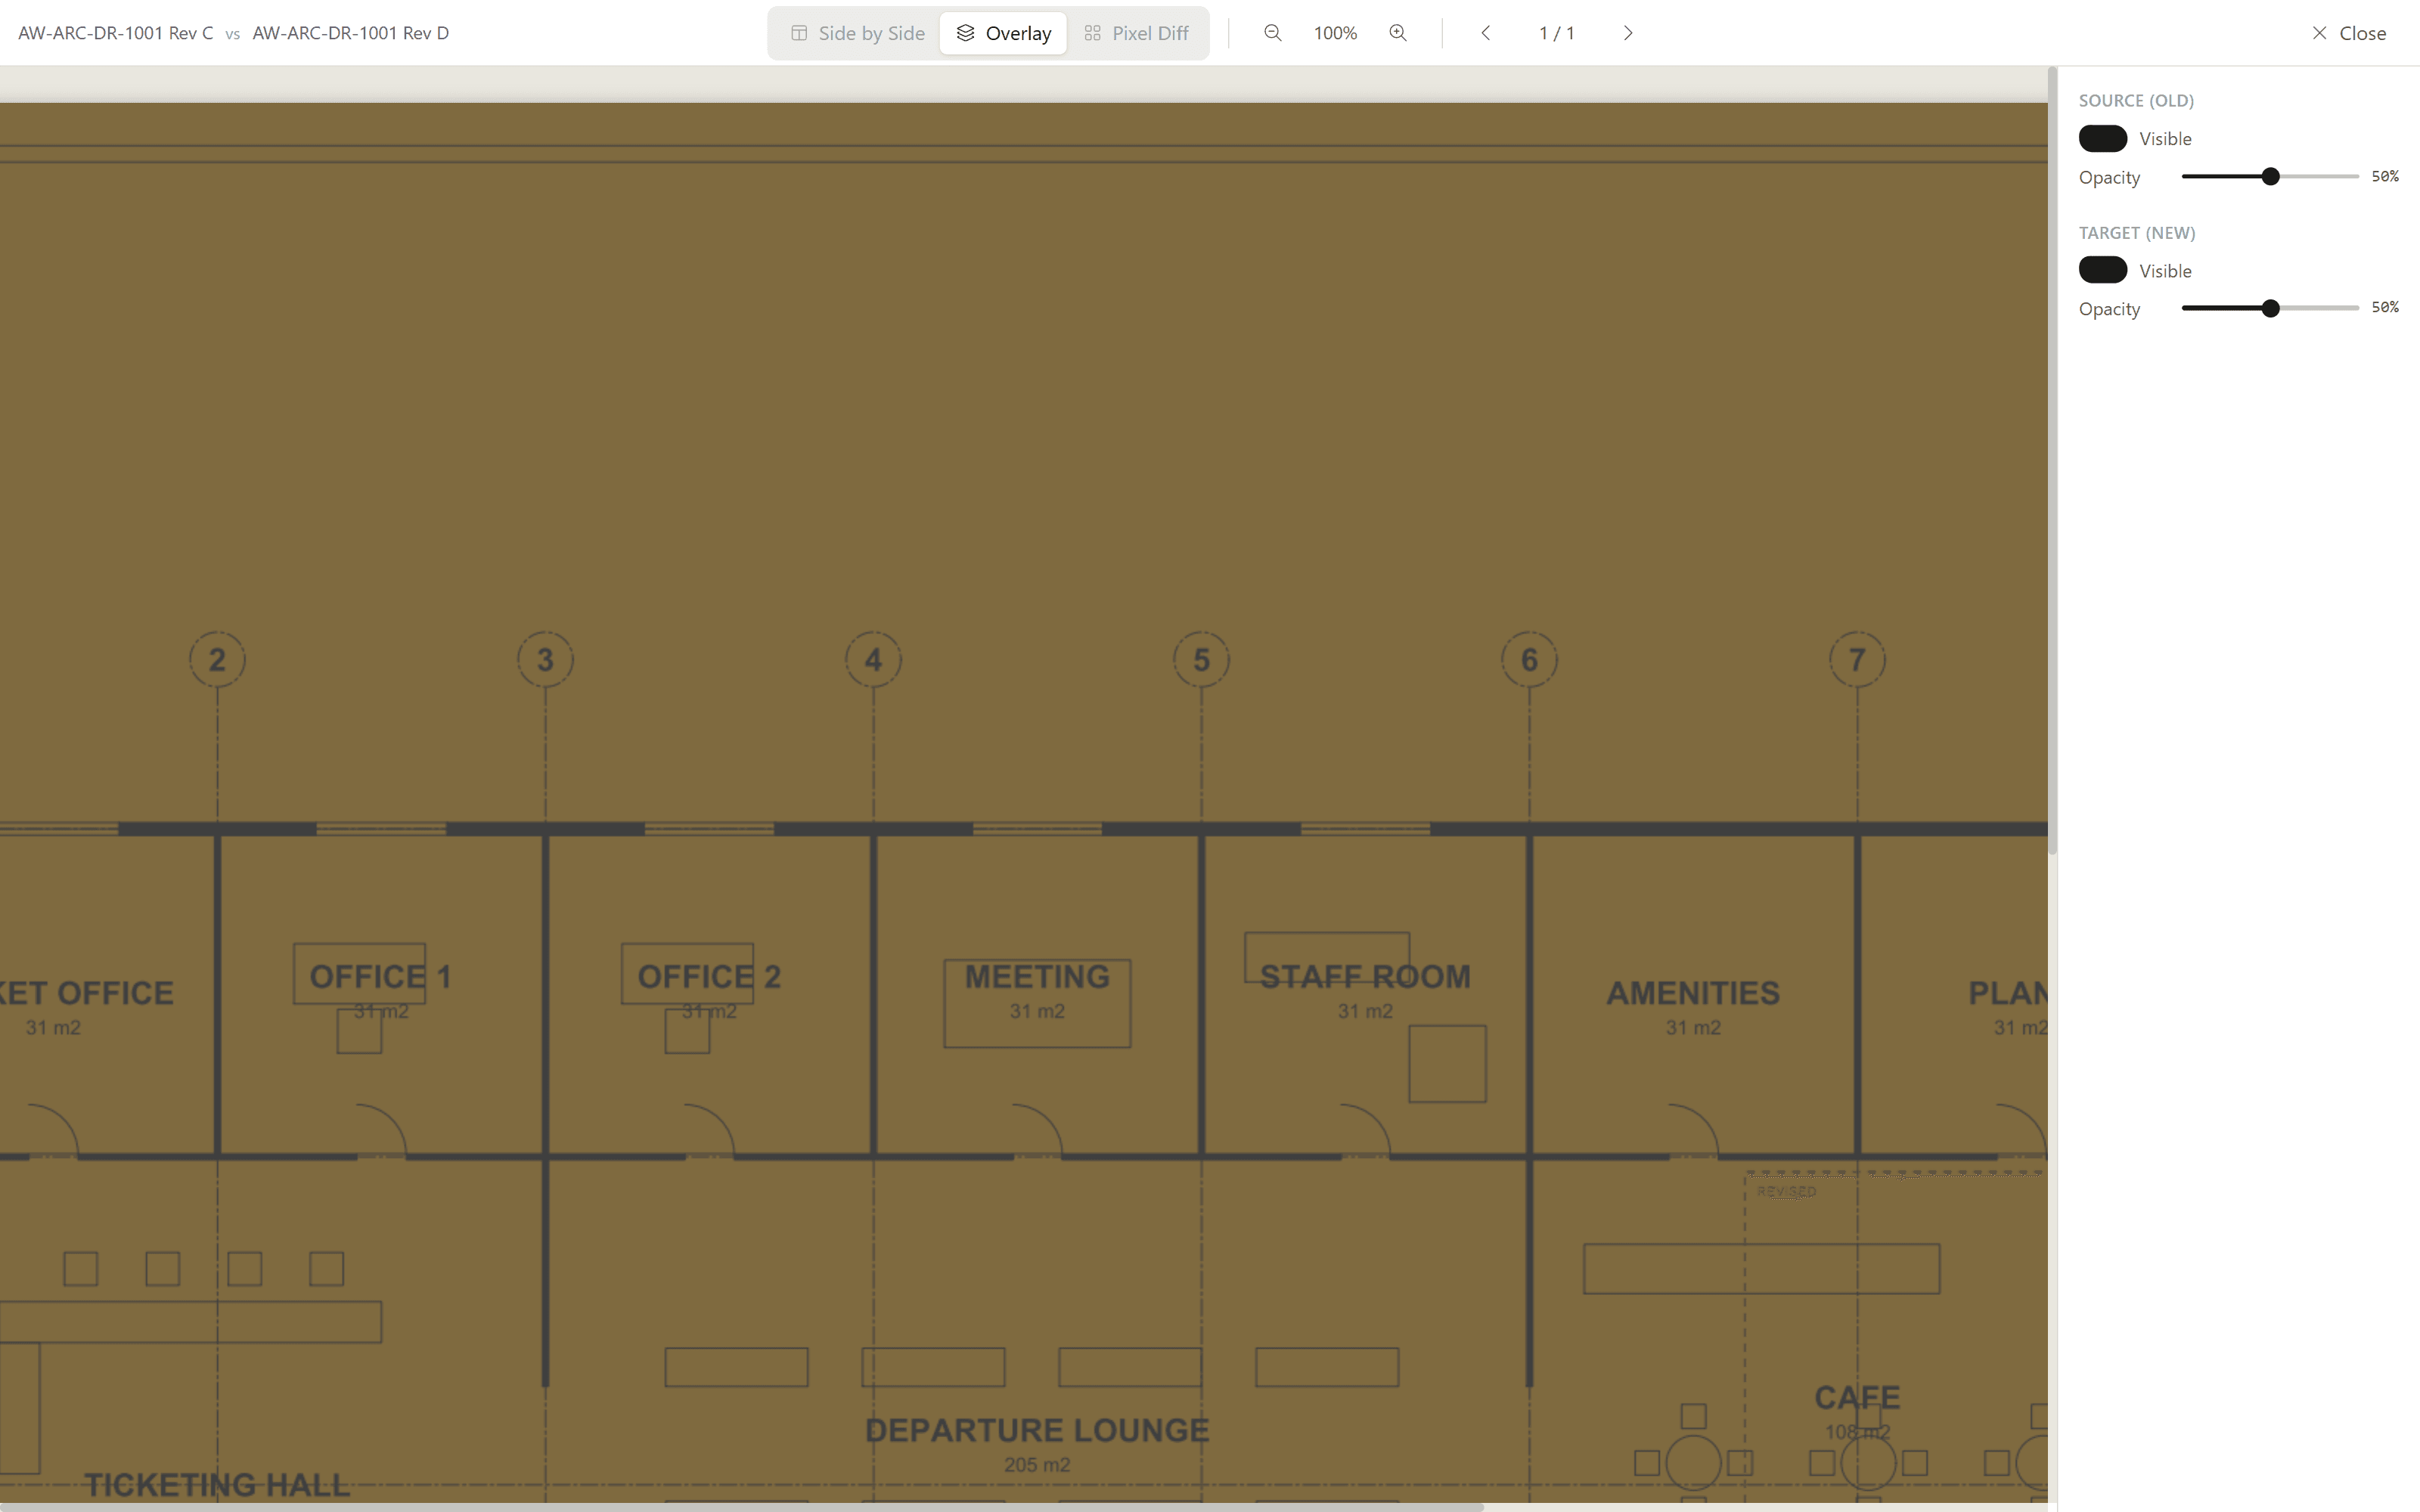
To compare two revisions, select exactly two documents and open the comparison viewer, which shows the earlier revision as Old and the later one as New. Choose how to view the differences:
- Side by Side shows both documents next to each other. Turn on Synchronise scroll to move through both at once.
- Overlay places one on top of the other, and you can set each layer's opacity to fade between them.
- Pixel Diff highlights the pixels that have changed.
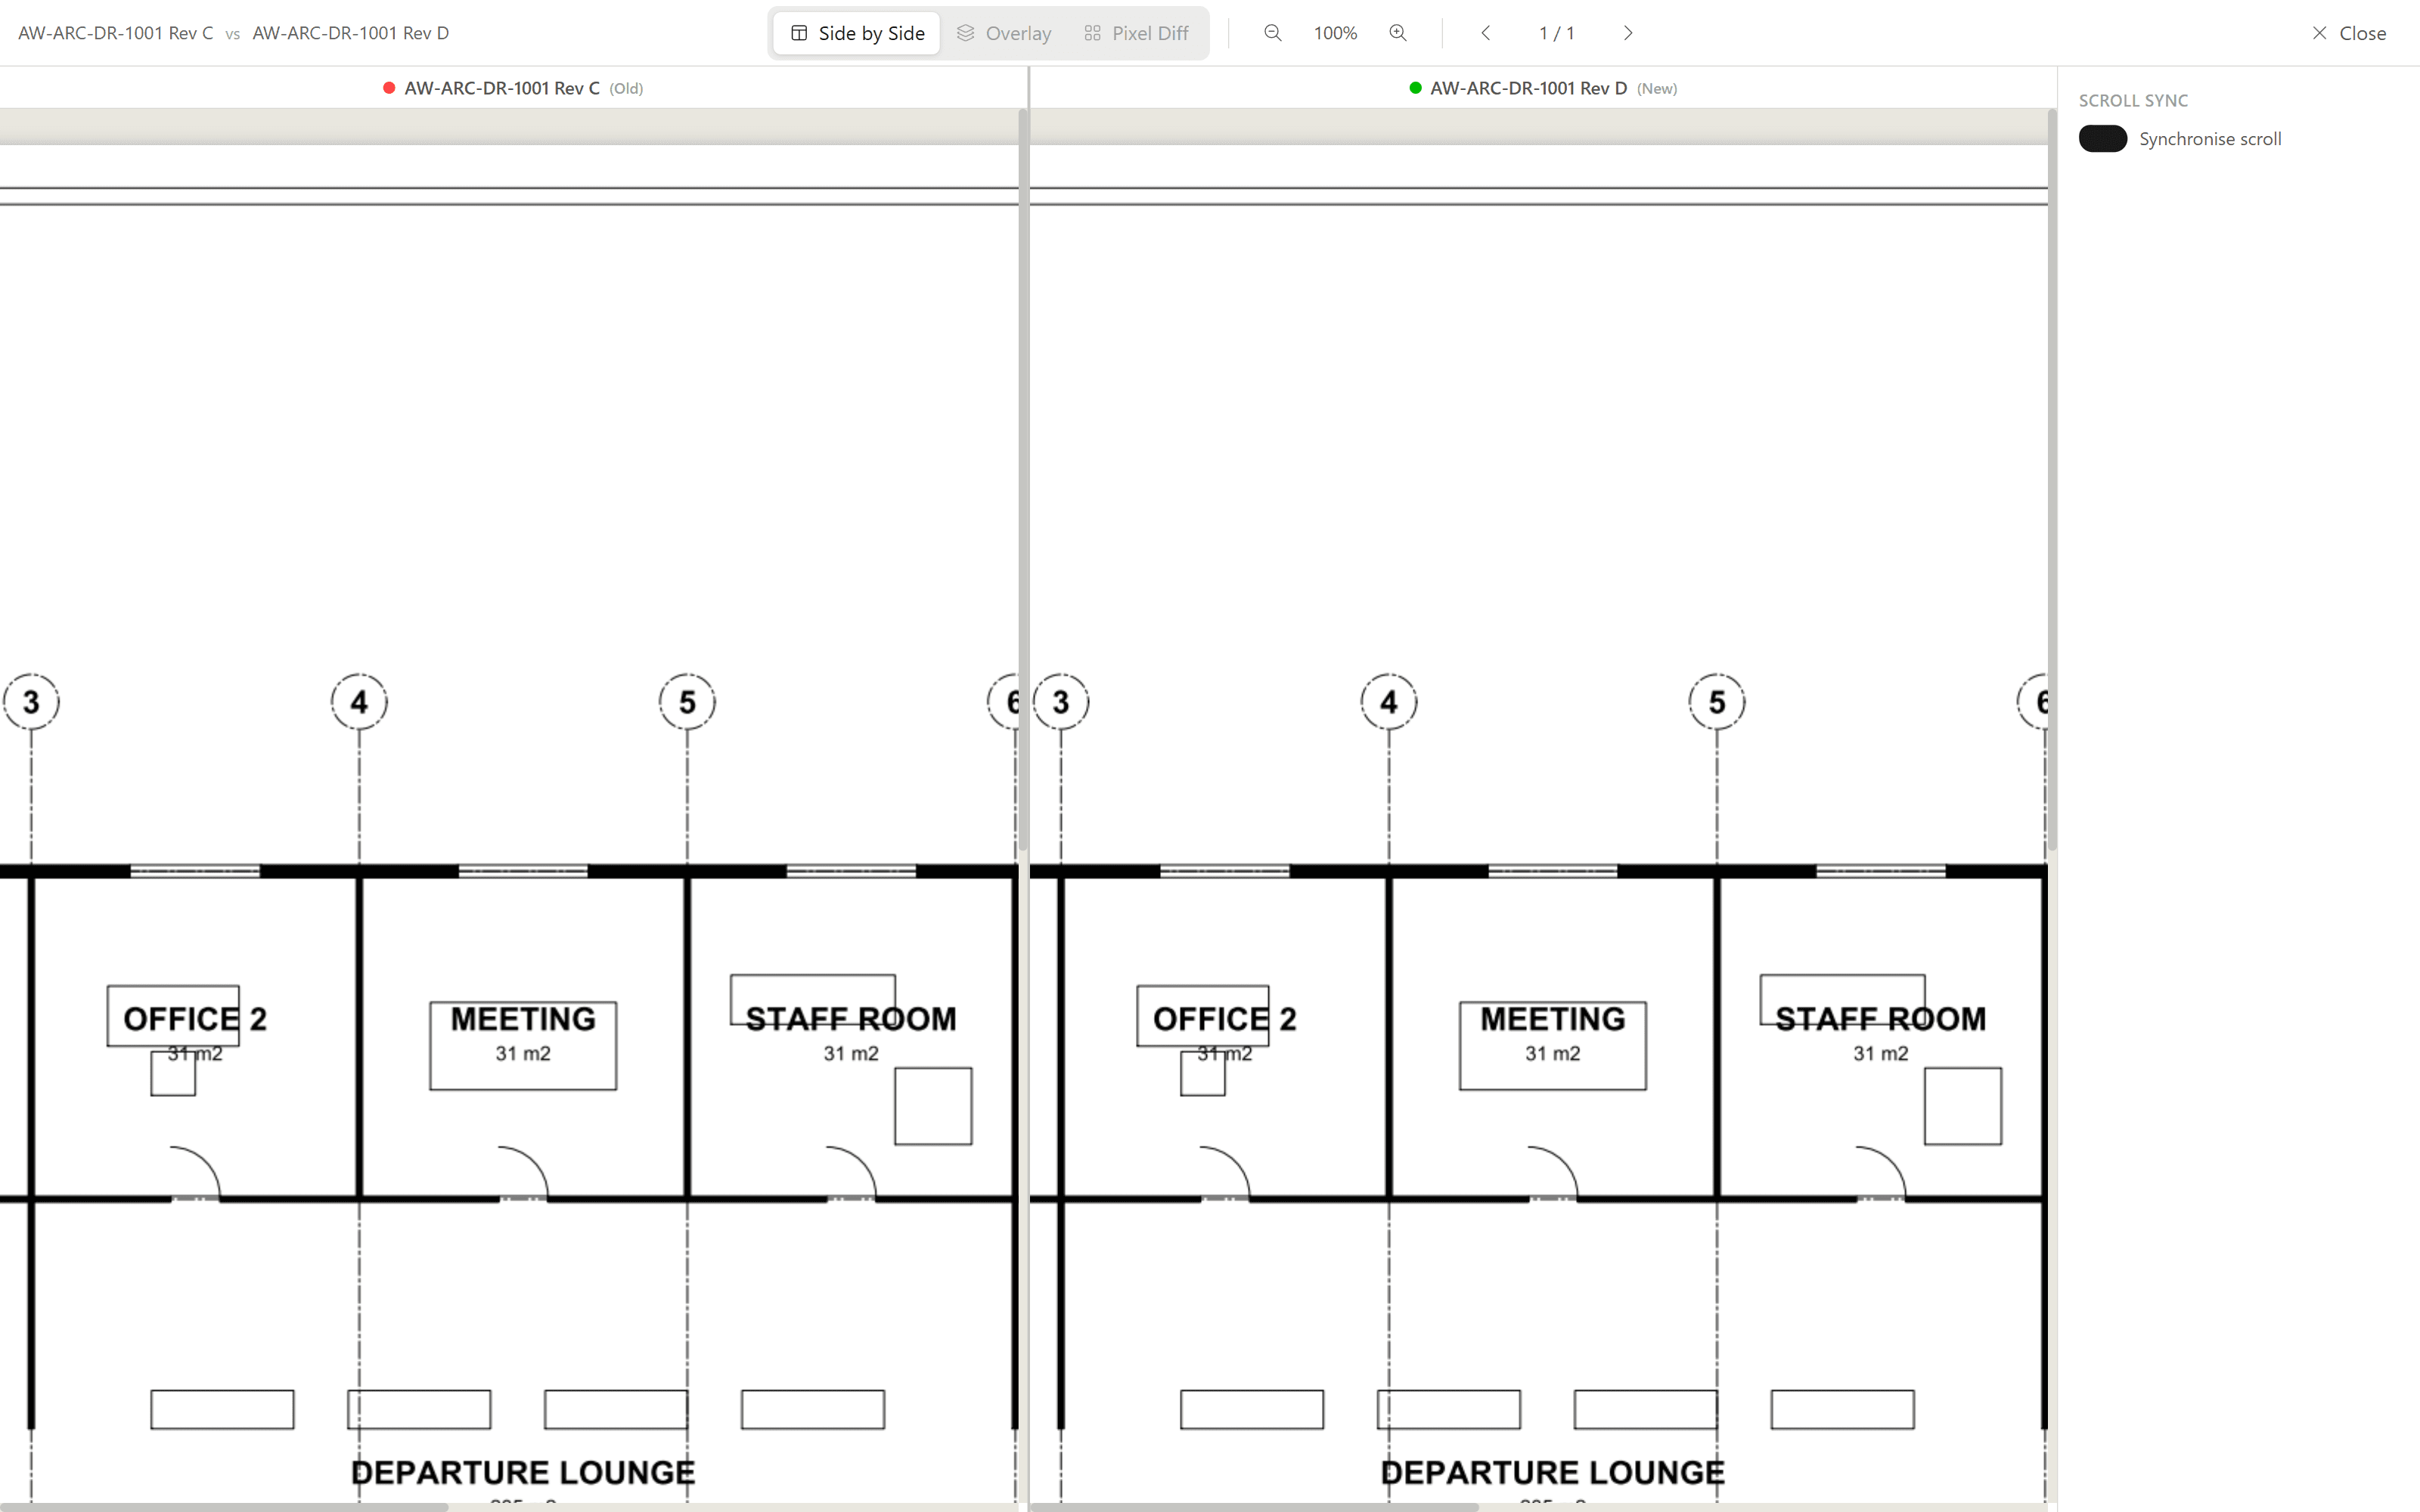
In Overlay mode, a revision cloud on the newer drawing stands out clearly against the older one.
Working Together in Real Time
When real-time collaboration is enabled, you can see who else has the document open, and their annotations appear live as they work.
Saving Markups
While a document is under an active workflow, your markup is saved automatically as you work, into the same layer the classic PDF viewer uses. There is no separate save step.
To send your markup on, click Submit Redline. Choose Create RFI to raise a new Request for Information with your annotations attached, or Add to Change Request to attach them to a new or existing Change Request, then click Continue. This flattens your markup into a PDF so it reaches the right people. You can submit a redline even if you have not added any markup.
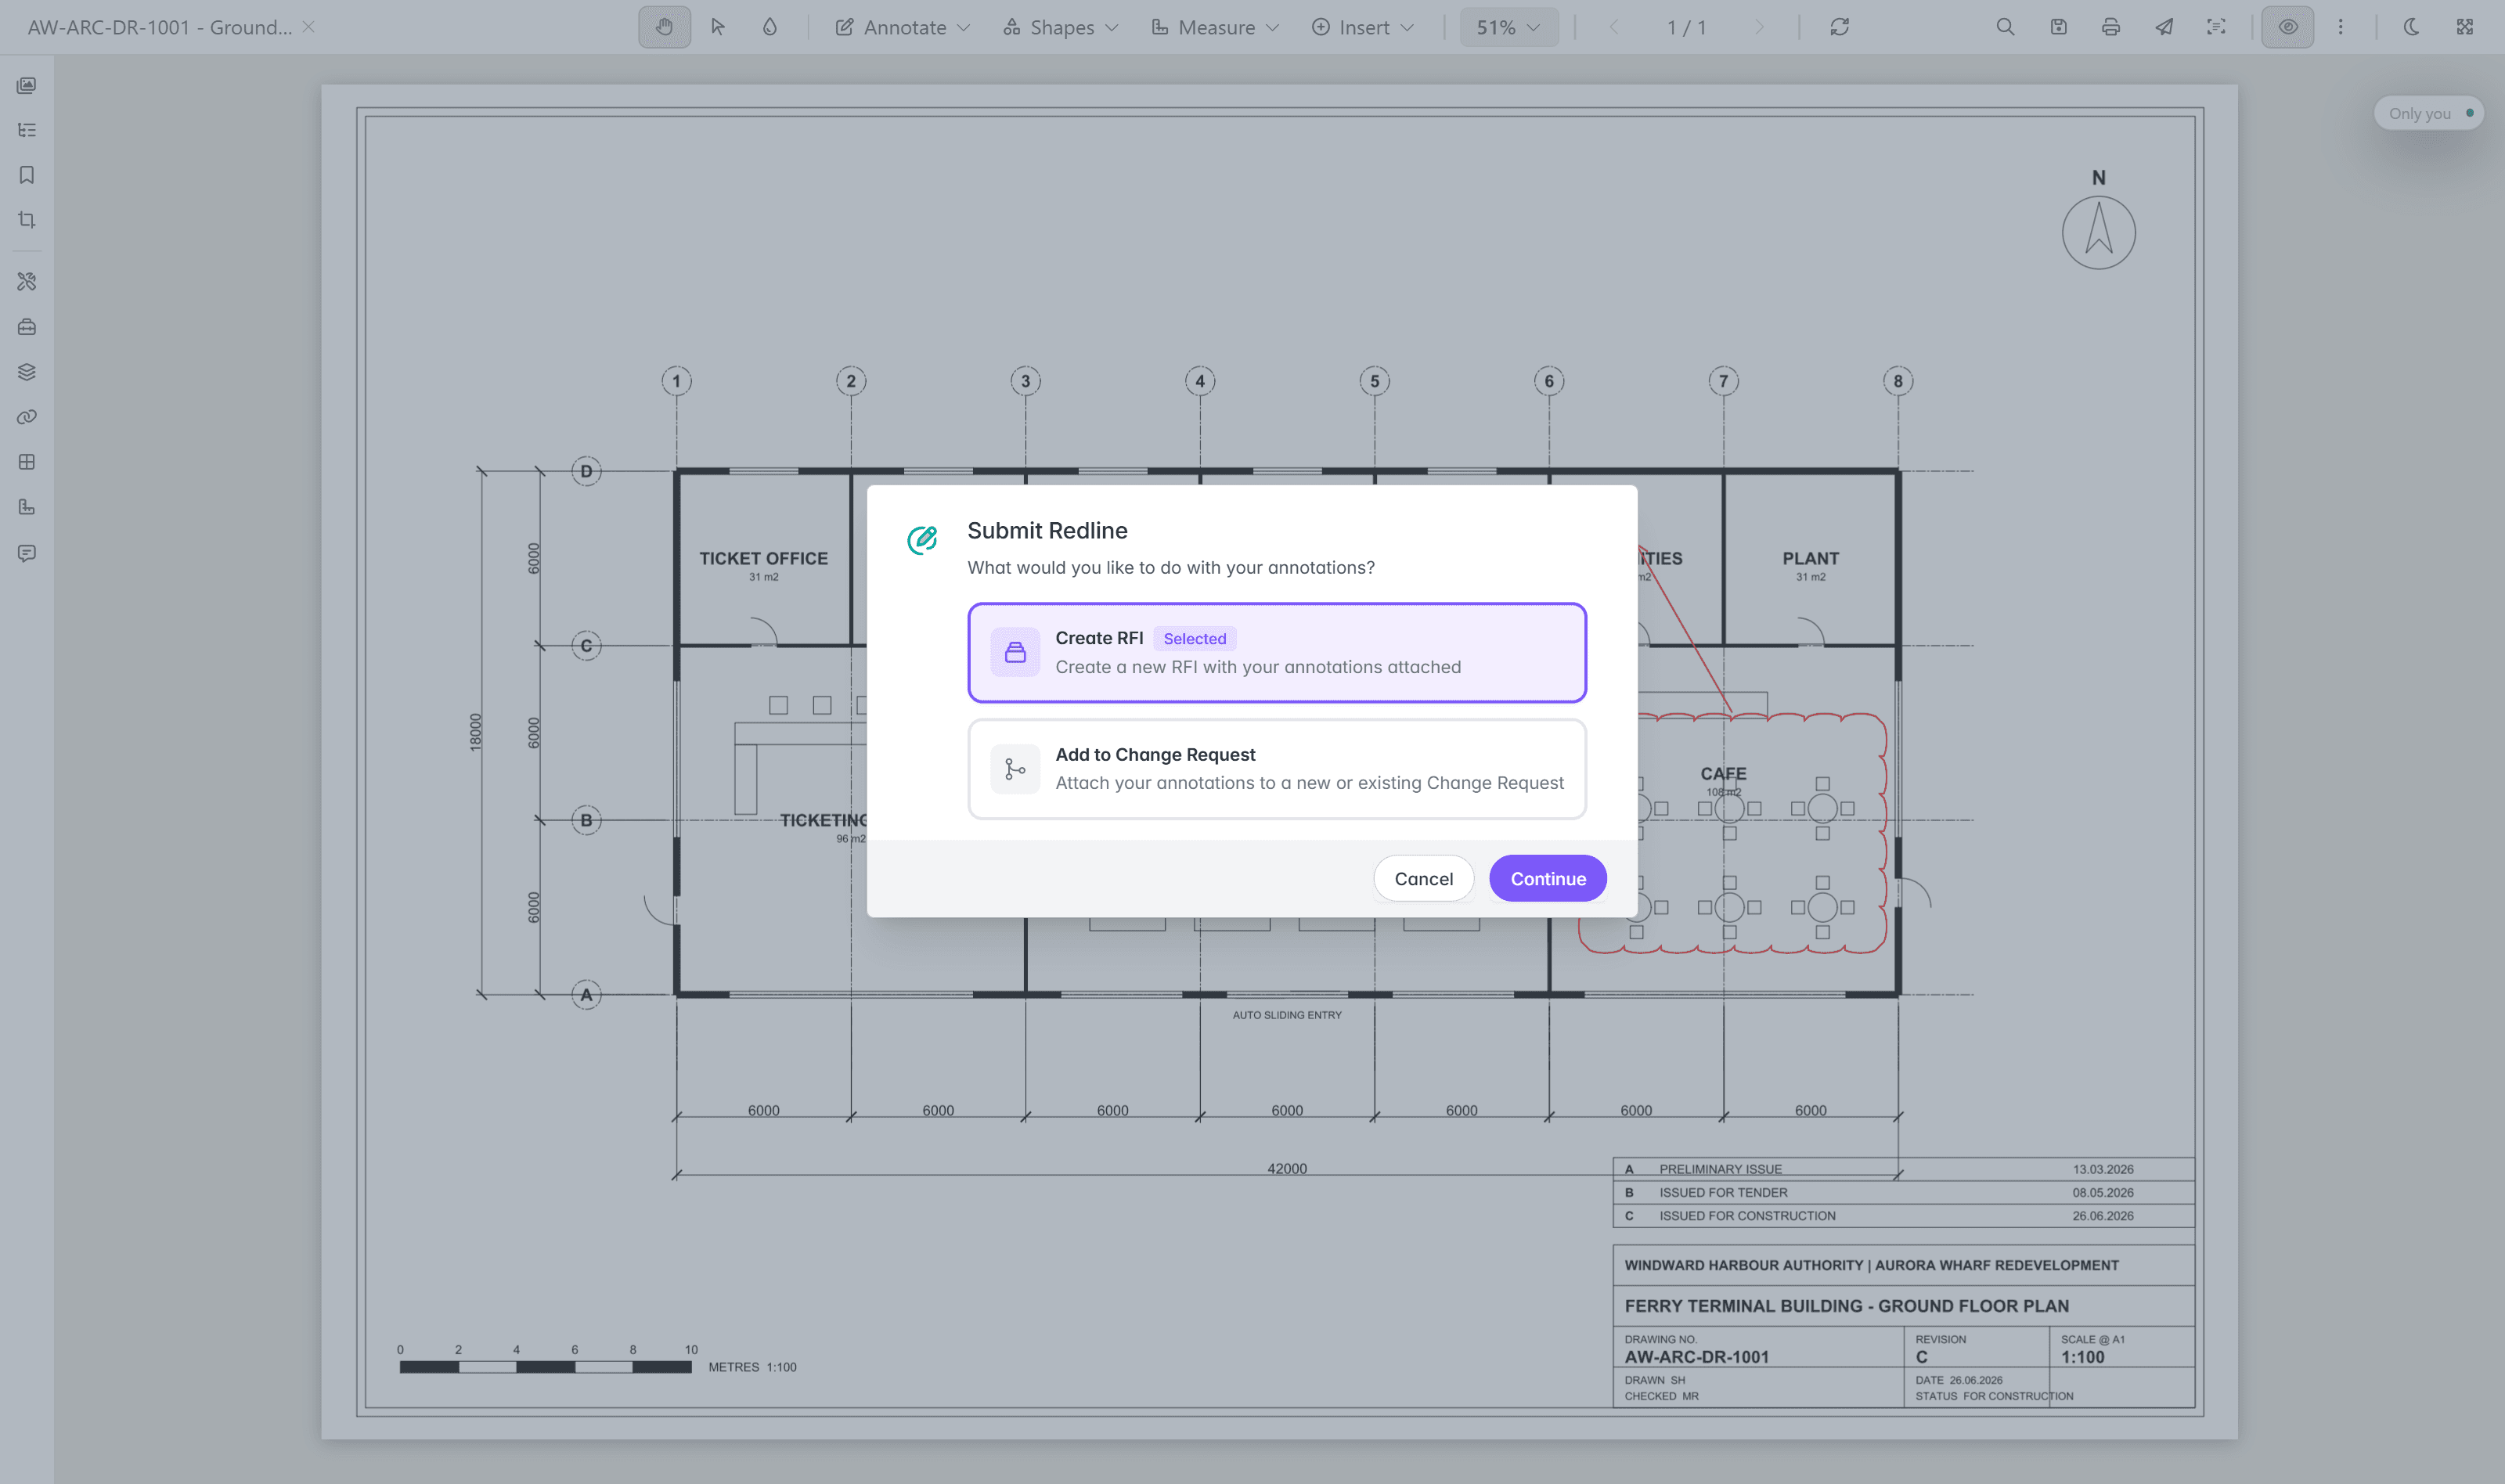
Where change requests are not enabled for your organisation, Submit Redline goes straight to the RFI route without offering the choice.
Choosing Create RFI opens the Submit Redline Request form, gathered into sections:
- Recipients picks who should review the redline, using the same people picker as elsewhere in Lunr.
- Request Details carries the required fields: a Subject, a Request Type, a Project Number, and a Needed By date. Where your organisation has no redline categories configured, the form notes that it is defaulting to Redline.
- Optional extras offers a Message for any quick context or next steps.
- Attachments takes supporting files, for reference material or markups beyond the document itself.
- Additional Project Details appears where your project team relies on extra fields for redlines, with one entry per field.
Select Submit Redline Request to send it. The request appears in the RFIs tab of the Collaboration area with a Redline category, covered in RFIs.
Use Show redlines and Hide redlines to show or hide redline markup while you work.
Exporting and Printing
Click Save As to download a copy. You can save a PDF (*.pdf) with the annotations flattened into the PDF, choosing whether to Include Annotations and Include Comments, or export the markup on its own as XFDF Annotations (*.xfdf).
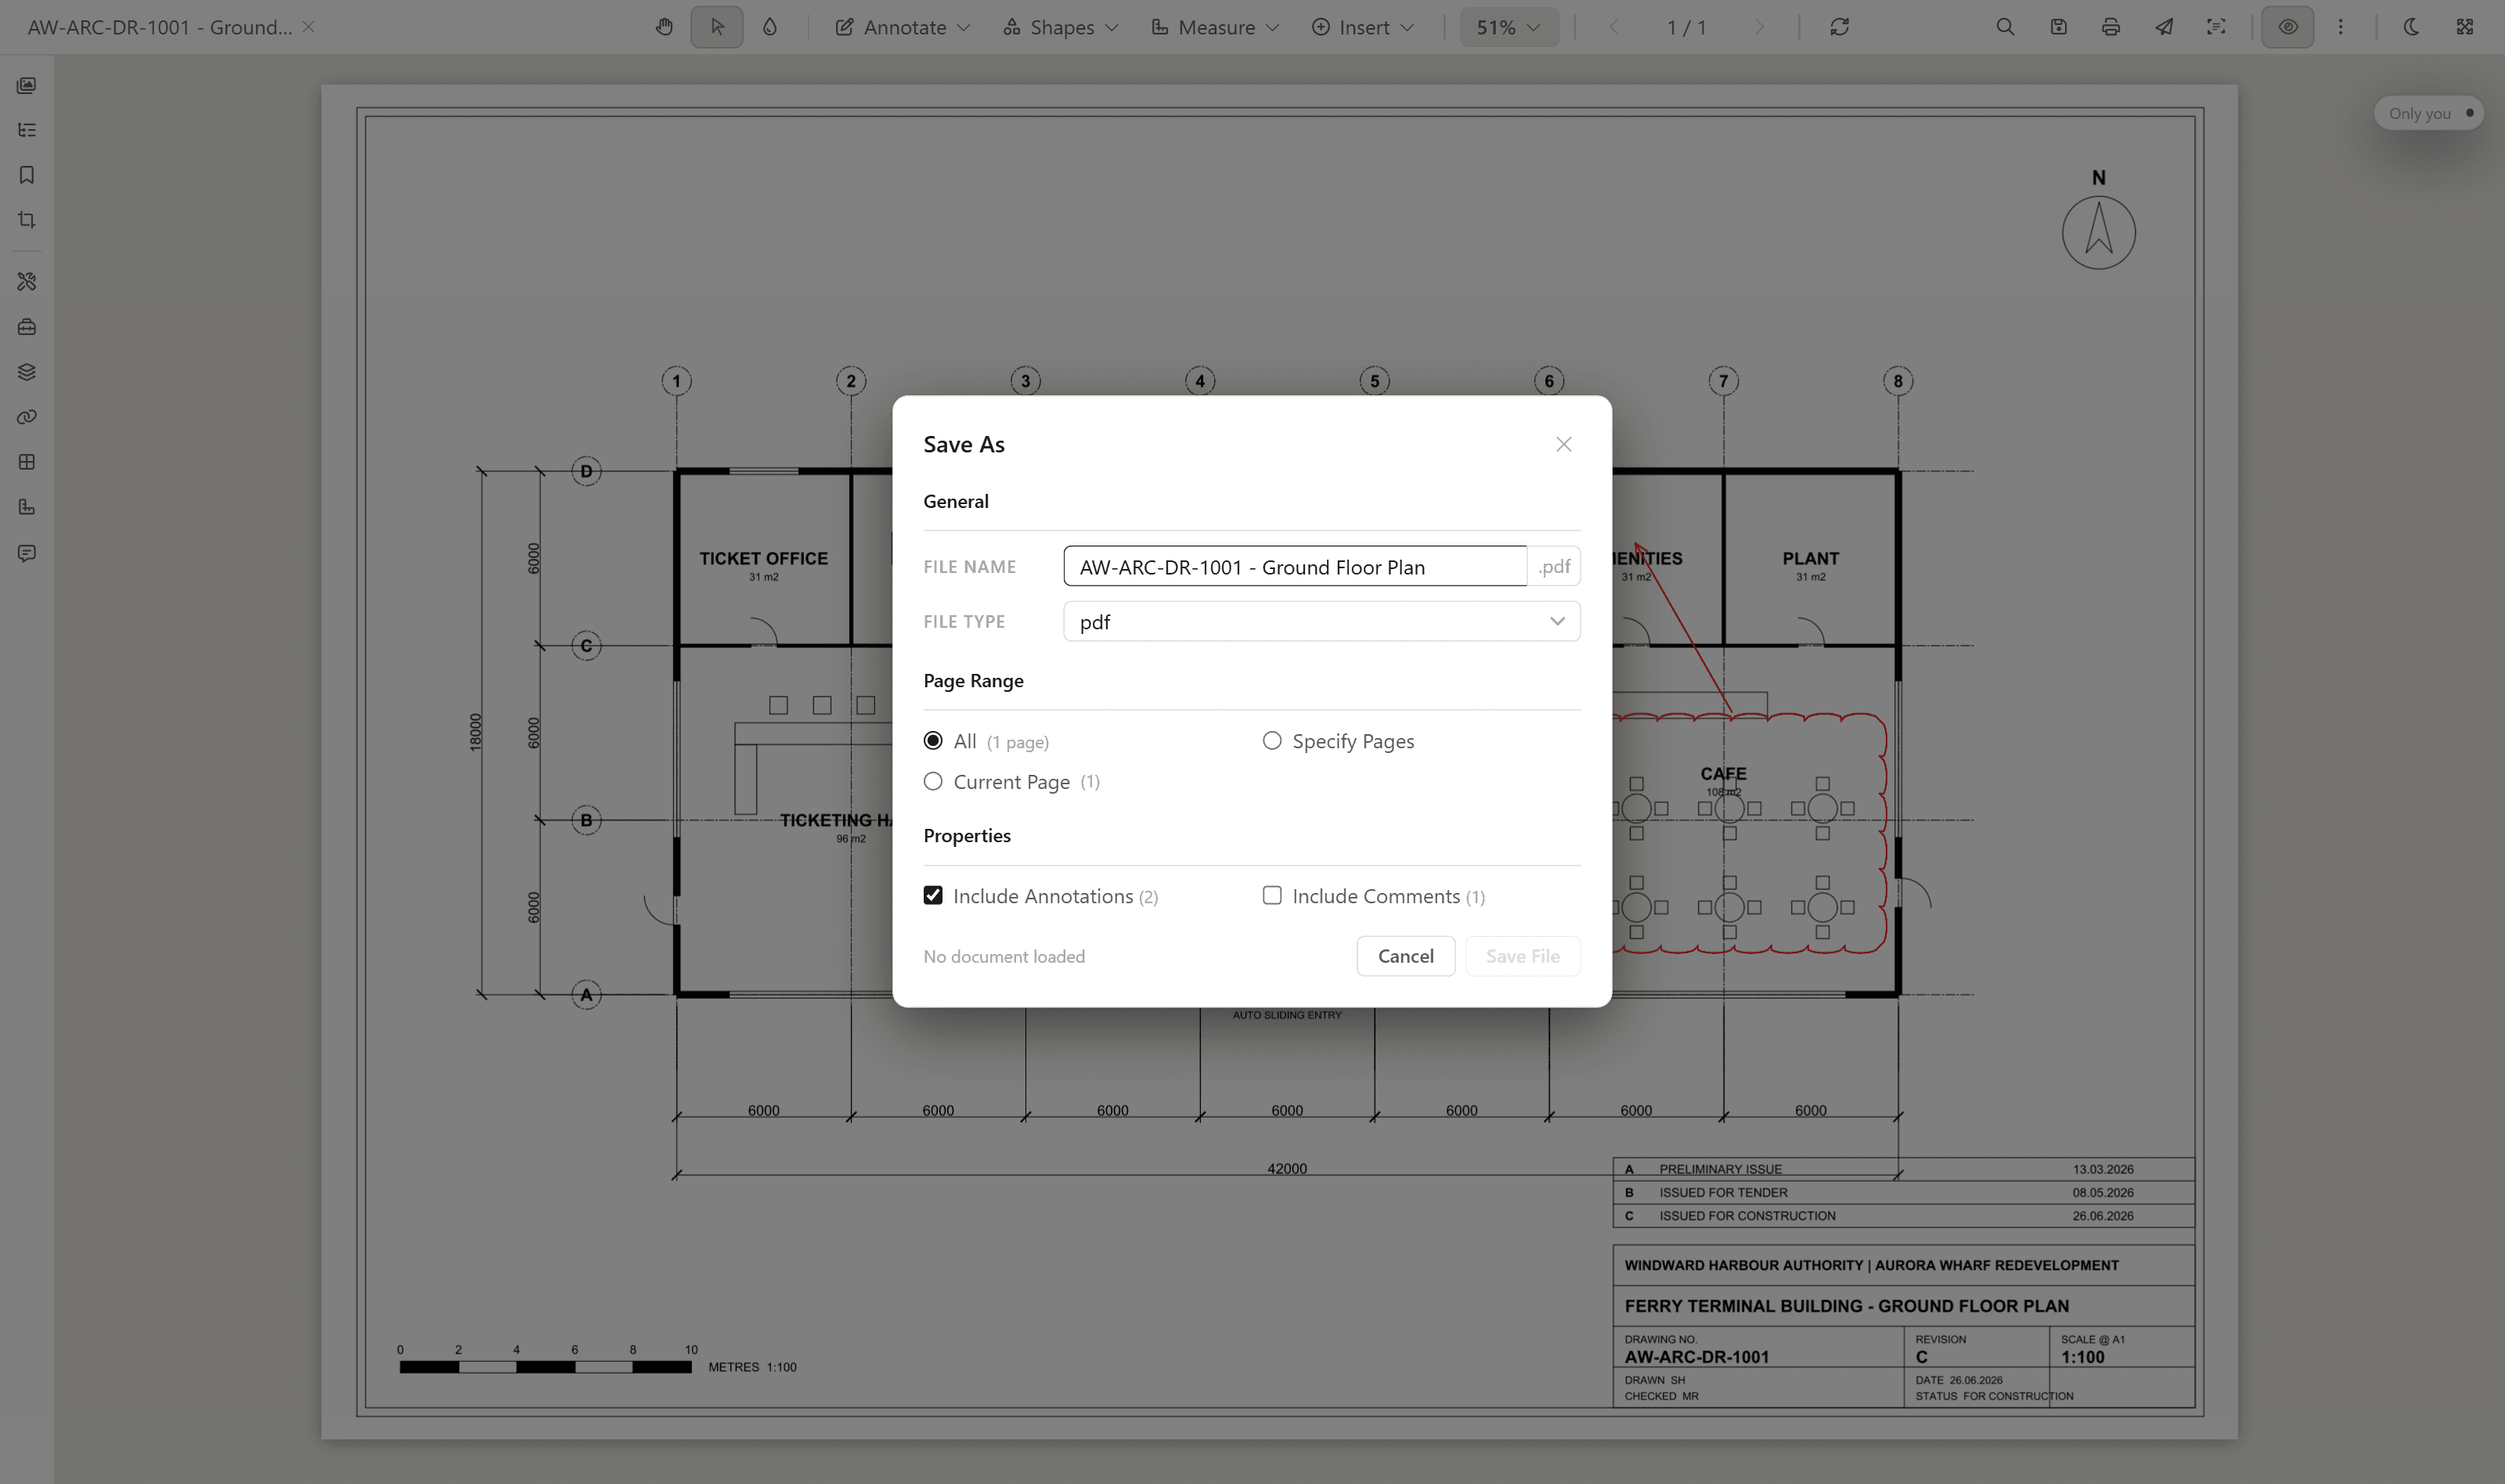
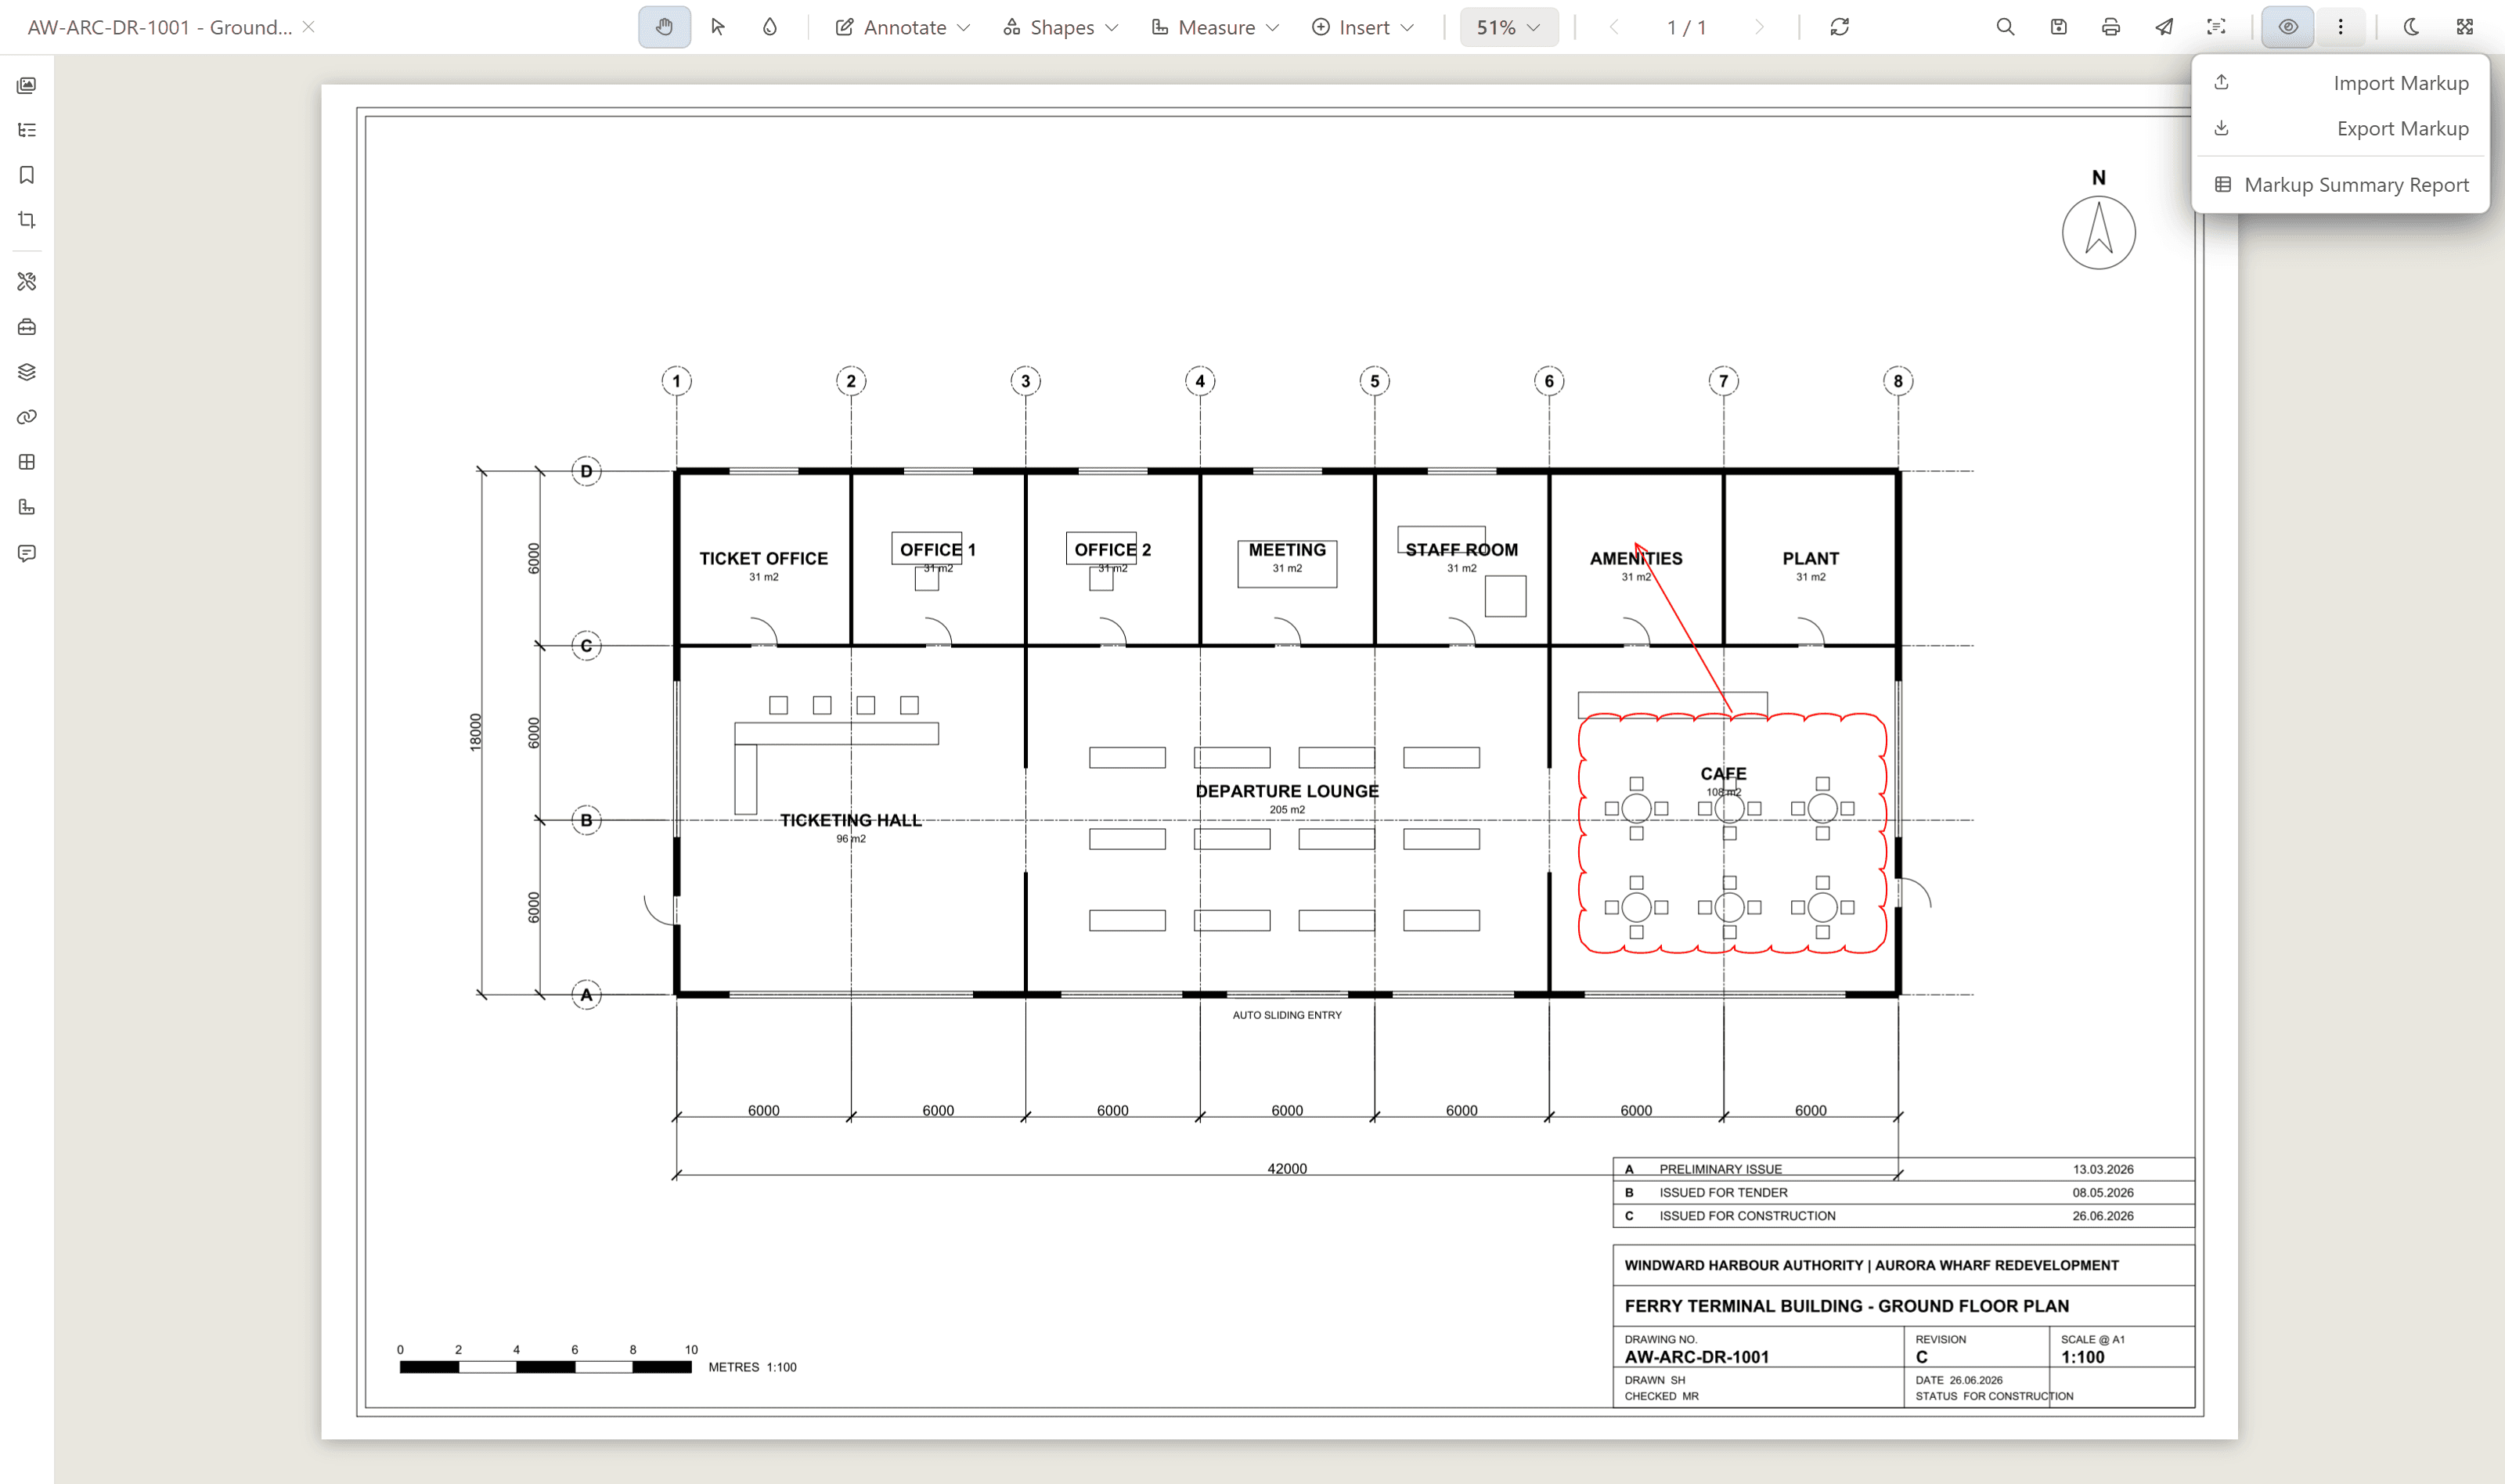
From the Markup file menu, use Export Markup and Import Markup to move markup between documents, and Markup Summary Report to produce a summary of every markup on the document.
Click Print to print the document. Choose With annotations to include your markup, or Document only for the fastest, highest quality print of the original PDF.
Keyboard Shortcuts
Quick Shortcuts
Press a single letter to pick a tool:
- P - Pan
- V - Select
- H - Highlight
- U - Underline
- K - Strikeout
- Q - Squiggly
- F - Freehand
- R - Rectangle
- O - Ellipse
- L - Line
- C - Cloud
- T - Text
- A - Arrow
- N - Sticky Note
- G - Callout
- D - Distance
- I - Stamp
- S - Signature
- M - Marquee Zoom
Other Shortcuts
- Hold Space to pan temporarily, then release to return to your tool.
- Ctrl+F - Search, Enter - Next match, Shift+Enter - Previous match
- Ctrl+C - Copy selected text, Delete - Remove the selected markup
- Ctrl+G - Group, Ctrl+Shift+G - Ungroup
- Ctrl+Z - Undo, Ctrl+Y - Redo
- Ctrl+D - Bookmark the document
- Ctrl+K - Command palette
- Ctrl+P - Print
- Ctrl+Shift+S - Save As
- F3 - Toggle the OSNAP object snap feature
Introduction
Access document metadata, audit history, comments, attachments, locations, references, validation results, and reminders, as well as view, annotate, download, and print document content through Lunr's integrated document viewer.
Word Documents
View, search, edit, review and print Word documents in Lunr's native browser-based viewer, while preserving the document's original layout, formatting and review features.