Introduction to Viewing
Access document metadata, audit history, comments, attachments, locations, references, validation results, and reminders, as well as view, annotate, download, and print document content through Lunr's integrated document viewer.
Overview
Select a document in the repository to open its page, which shows an overview and the document's metadata. The Tags view opens first.
Viewing Document Metadata
Tags
The Tags view lists the metadata tags linked to the document. To modify these tags, select the Edit button.
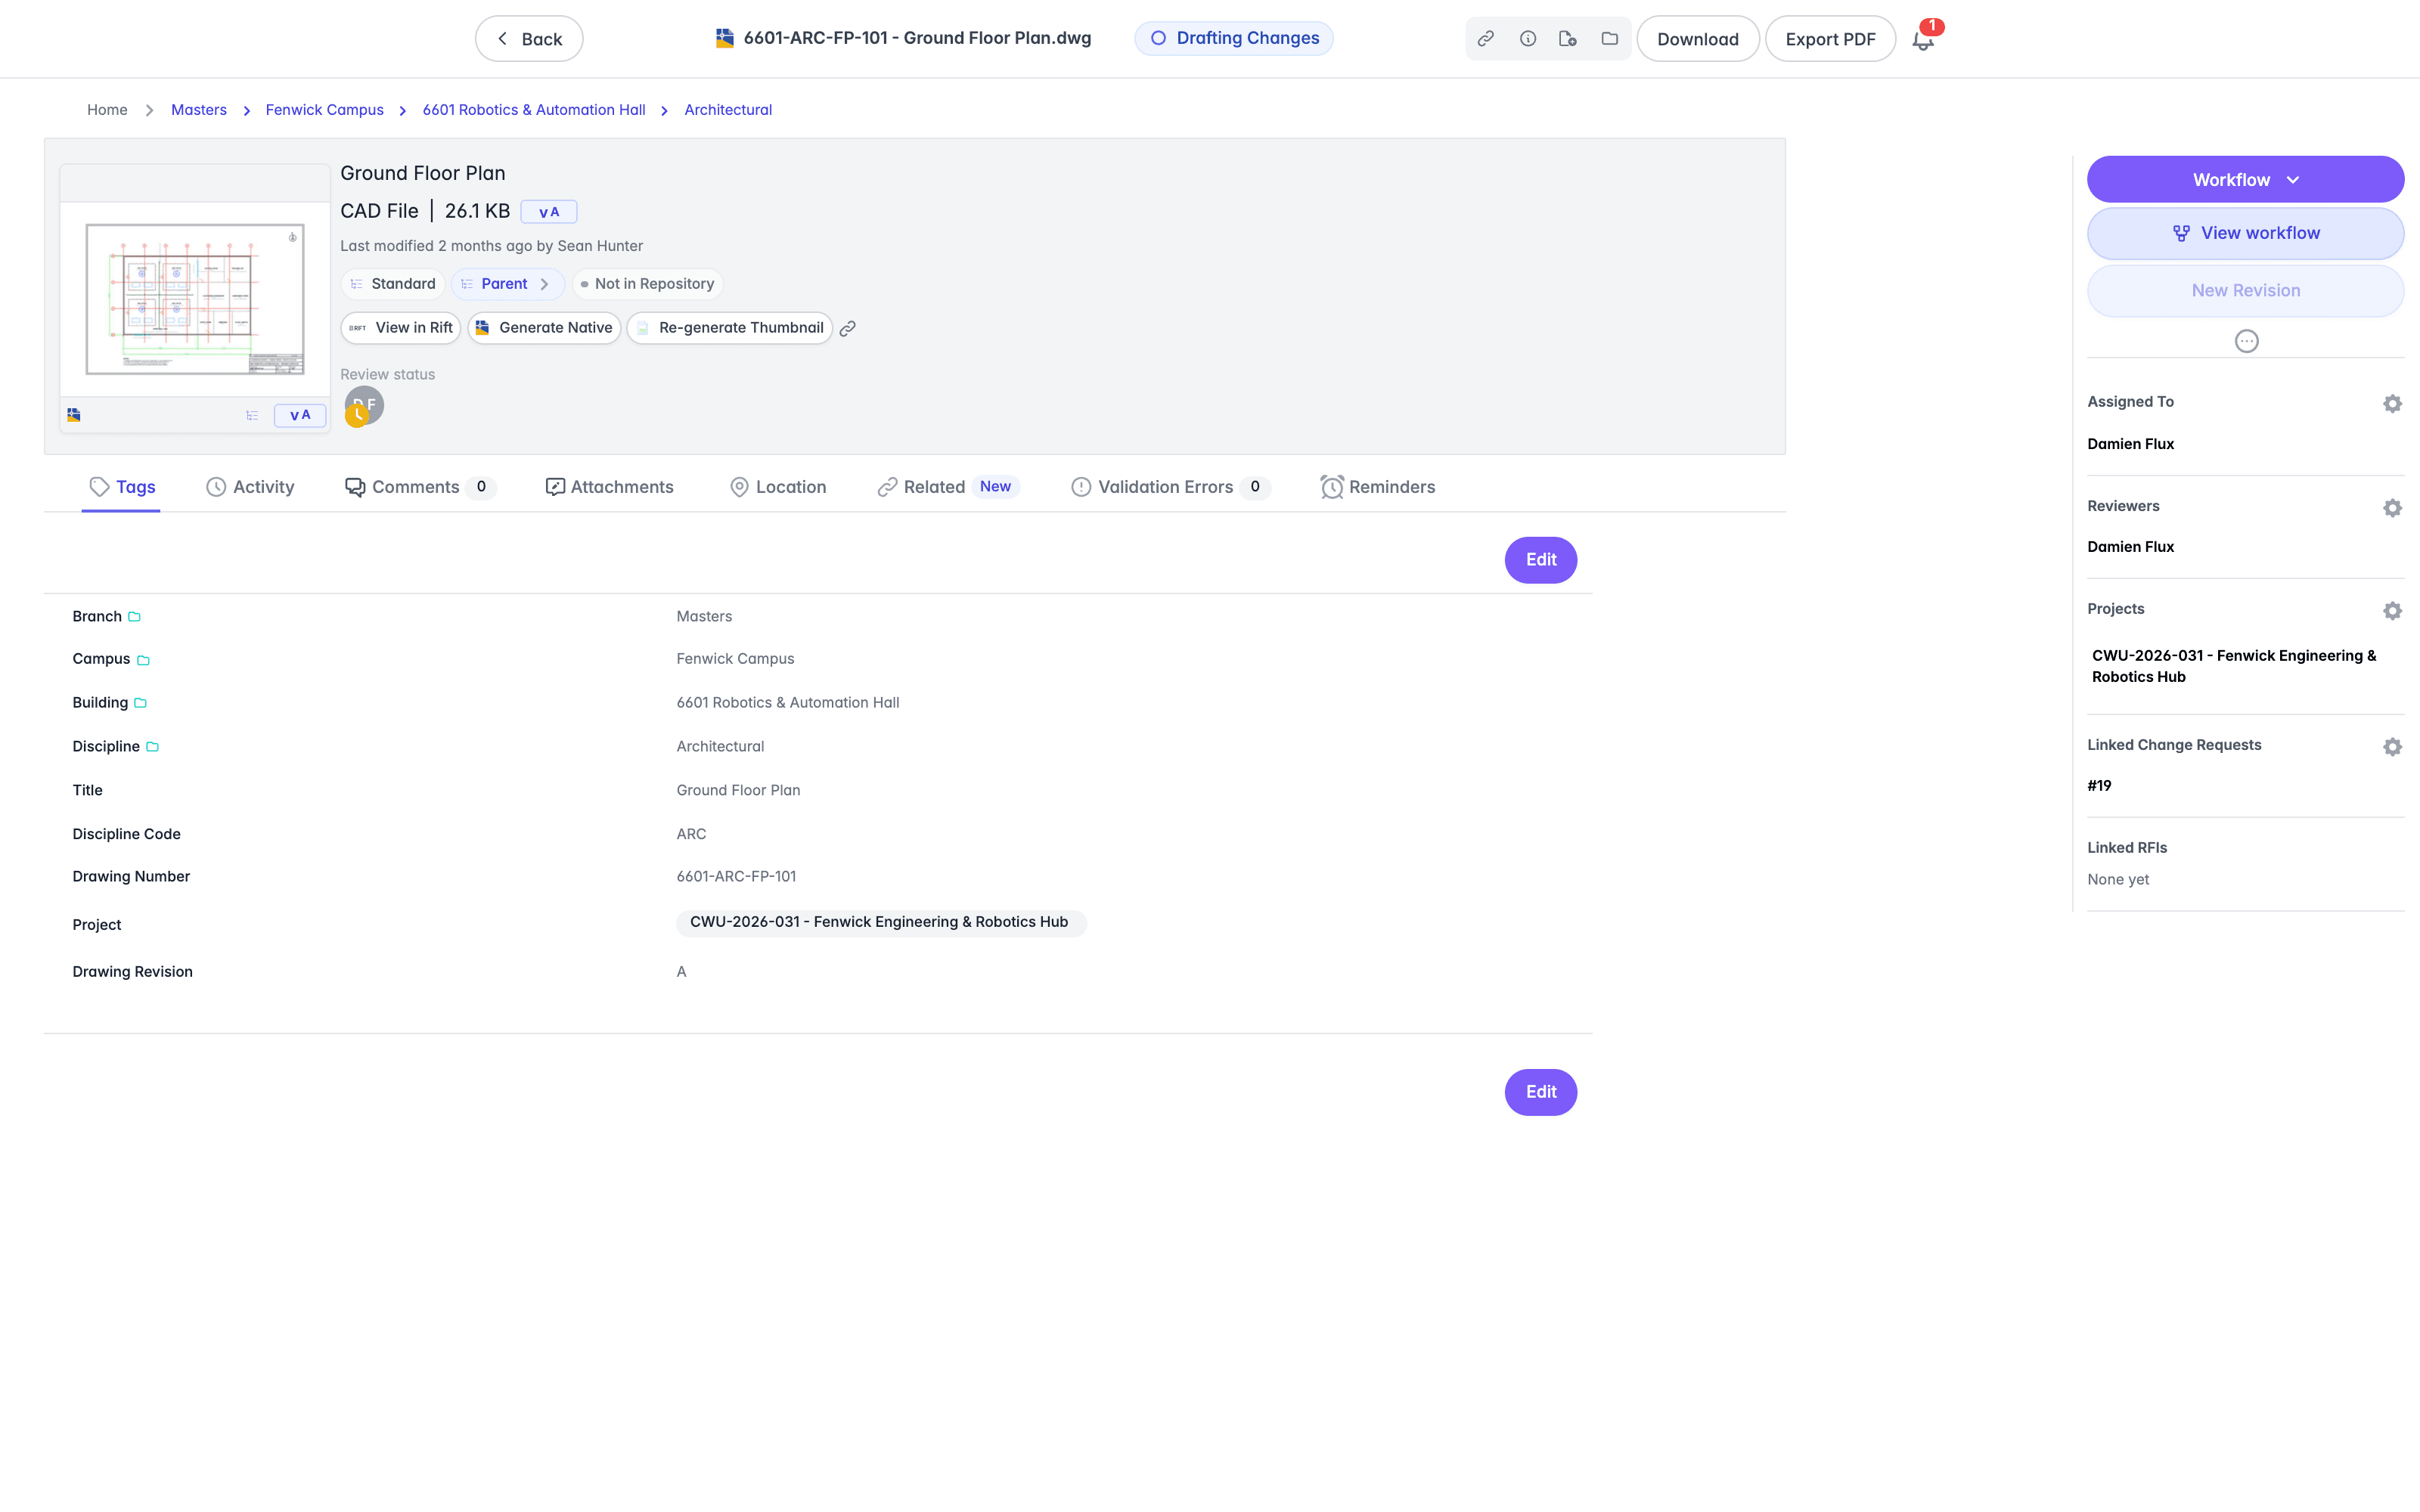
To edit tags you need to be allowed to edit documents or tags, and to edit restricted tags you need wider permission than for general tags. Unless you can release documents as master, you must also be an assignee or reviewer of the document. On a document at master status, only tags set up as editable at that status can be changed, and tags on a redline cannot be edited.
In edit mode, modify tags using the available dropdown lists and free text fields. Required fields carry an asterisk, and some fields, such as the discipline lookup, provide a typeahead so you can start typing to find a match. The asset field opens an asset picker that lists your recent assets when you select it, searches by name, number, or ID, and highlights the matching text in each result. Select Cancel to discard any changes, or Save to apply them to the document's metadata.
A mark before each field's label shows whether it holds a value: a check where it does, and an empty ring where it does not. Empty fields are drawn recessed, in light grey, until you select them. Checkbox fields, which always hold a value, and fields locked against your edits take no mark. Beside Cancel and Save, a count reads, for example, "7 of 12 filled", and counts only the tags shown on the details page. The tag editor in the preview drawer shows the same marks and count.
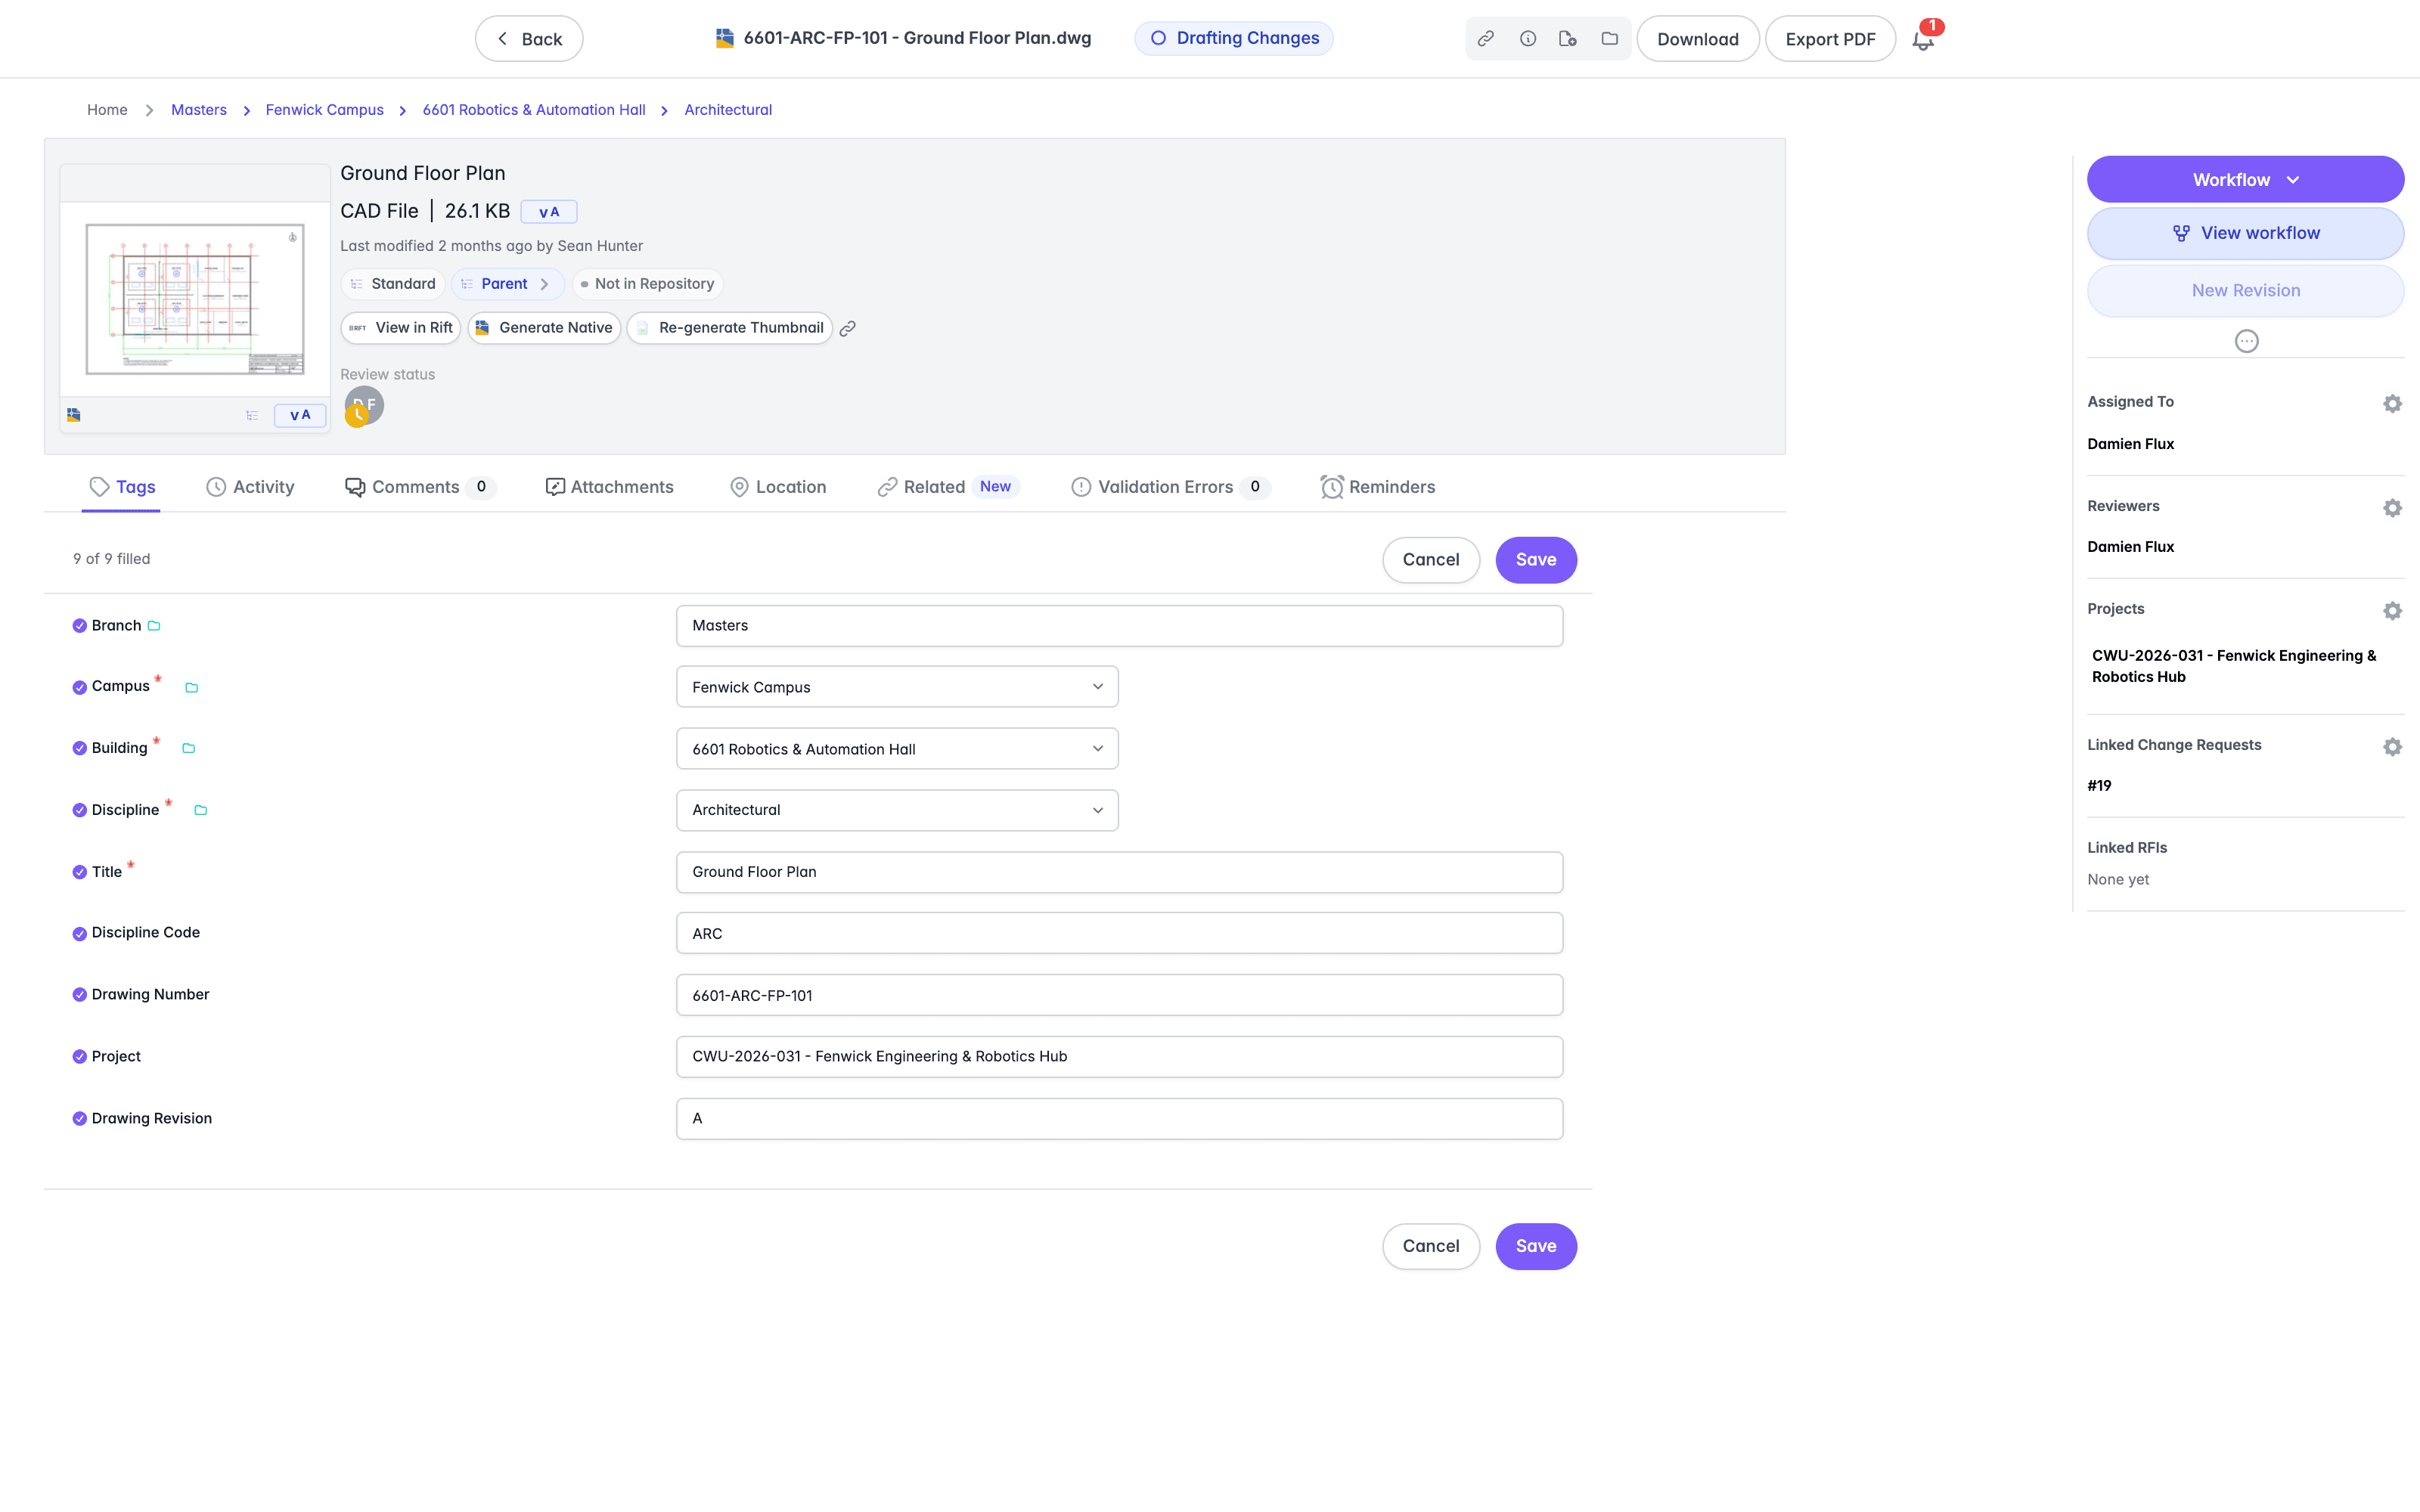
In edit mode, each tag label carries a fill mark. A lilac tick shows that the field has a value, and an empty ring shows that it does not. Empty fields have a lighter, recessed look until you select them. A count such as "7 of 12 filled" beside Cancel and Save updates as you type. It counts the tags shown on the details page that you can edit, so checkboxes and locked fields are not included. A multi-value field counts as filled once it holds a value, and text typed into a typeahead counts only after you choose a match from the list.
Where one lookup list depends on another, the options in the dependent field follow the value of the field it depends on, as you edit it. For example, with Discipline set to Mechanical, the Sub Discipline field lists only the sub disciplines for Mechanical. Options that have no parent value appear under every parent. Changing the parent updates the list immediately and clears a dependent value that the new parent does not offer, and clearing the parent shows the full list again. The same applies in the tags drawer of the preview dialog.
Lunr confirms before it discards a tag edit you have not saved. Selecting Cancel with unsaved changes opens a "Discard unsaved changes?" dialog, and submitting a workflow transition while still editing opens a "Tag editing in progress" dialog, warning that continuing may discard the changes. Navigating away from the document asks the same way.
Activity
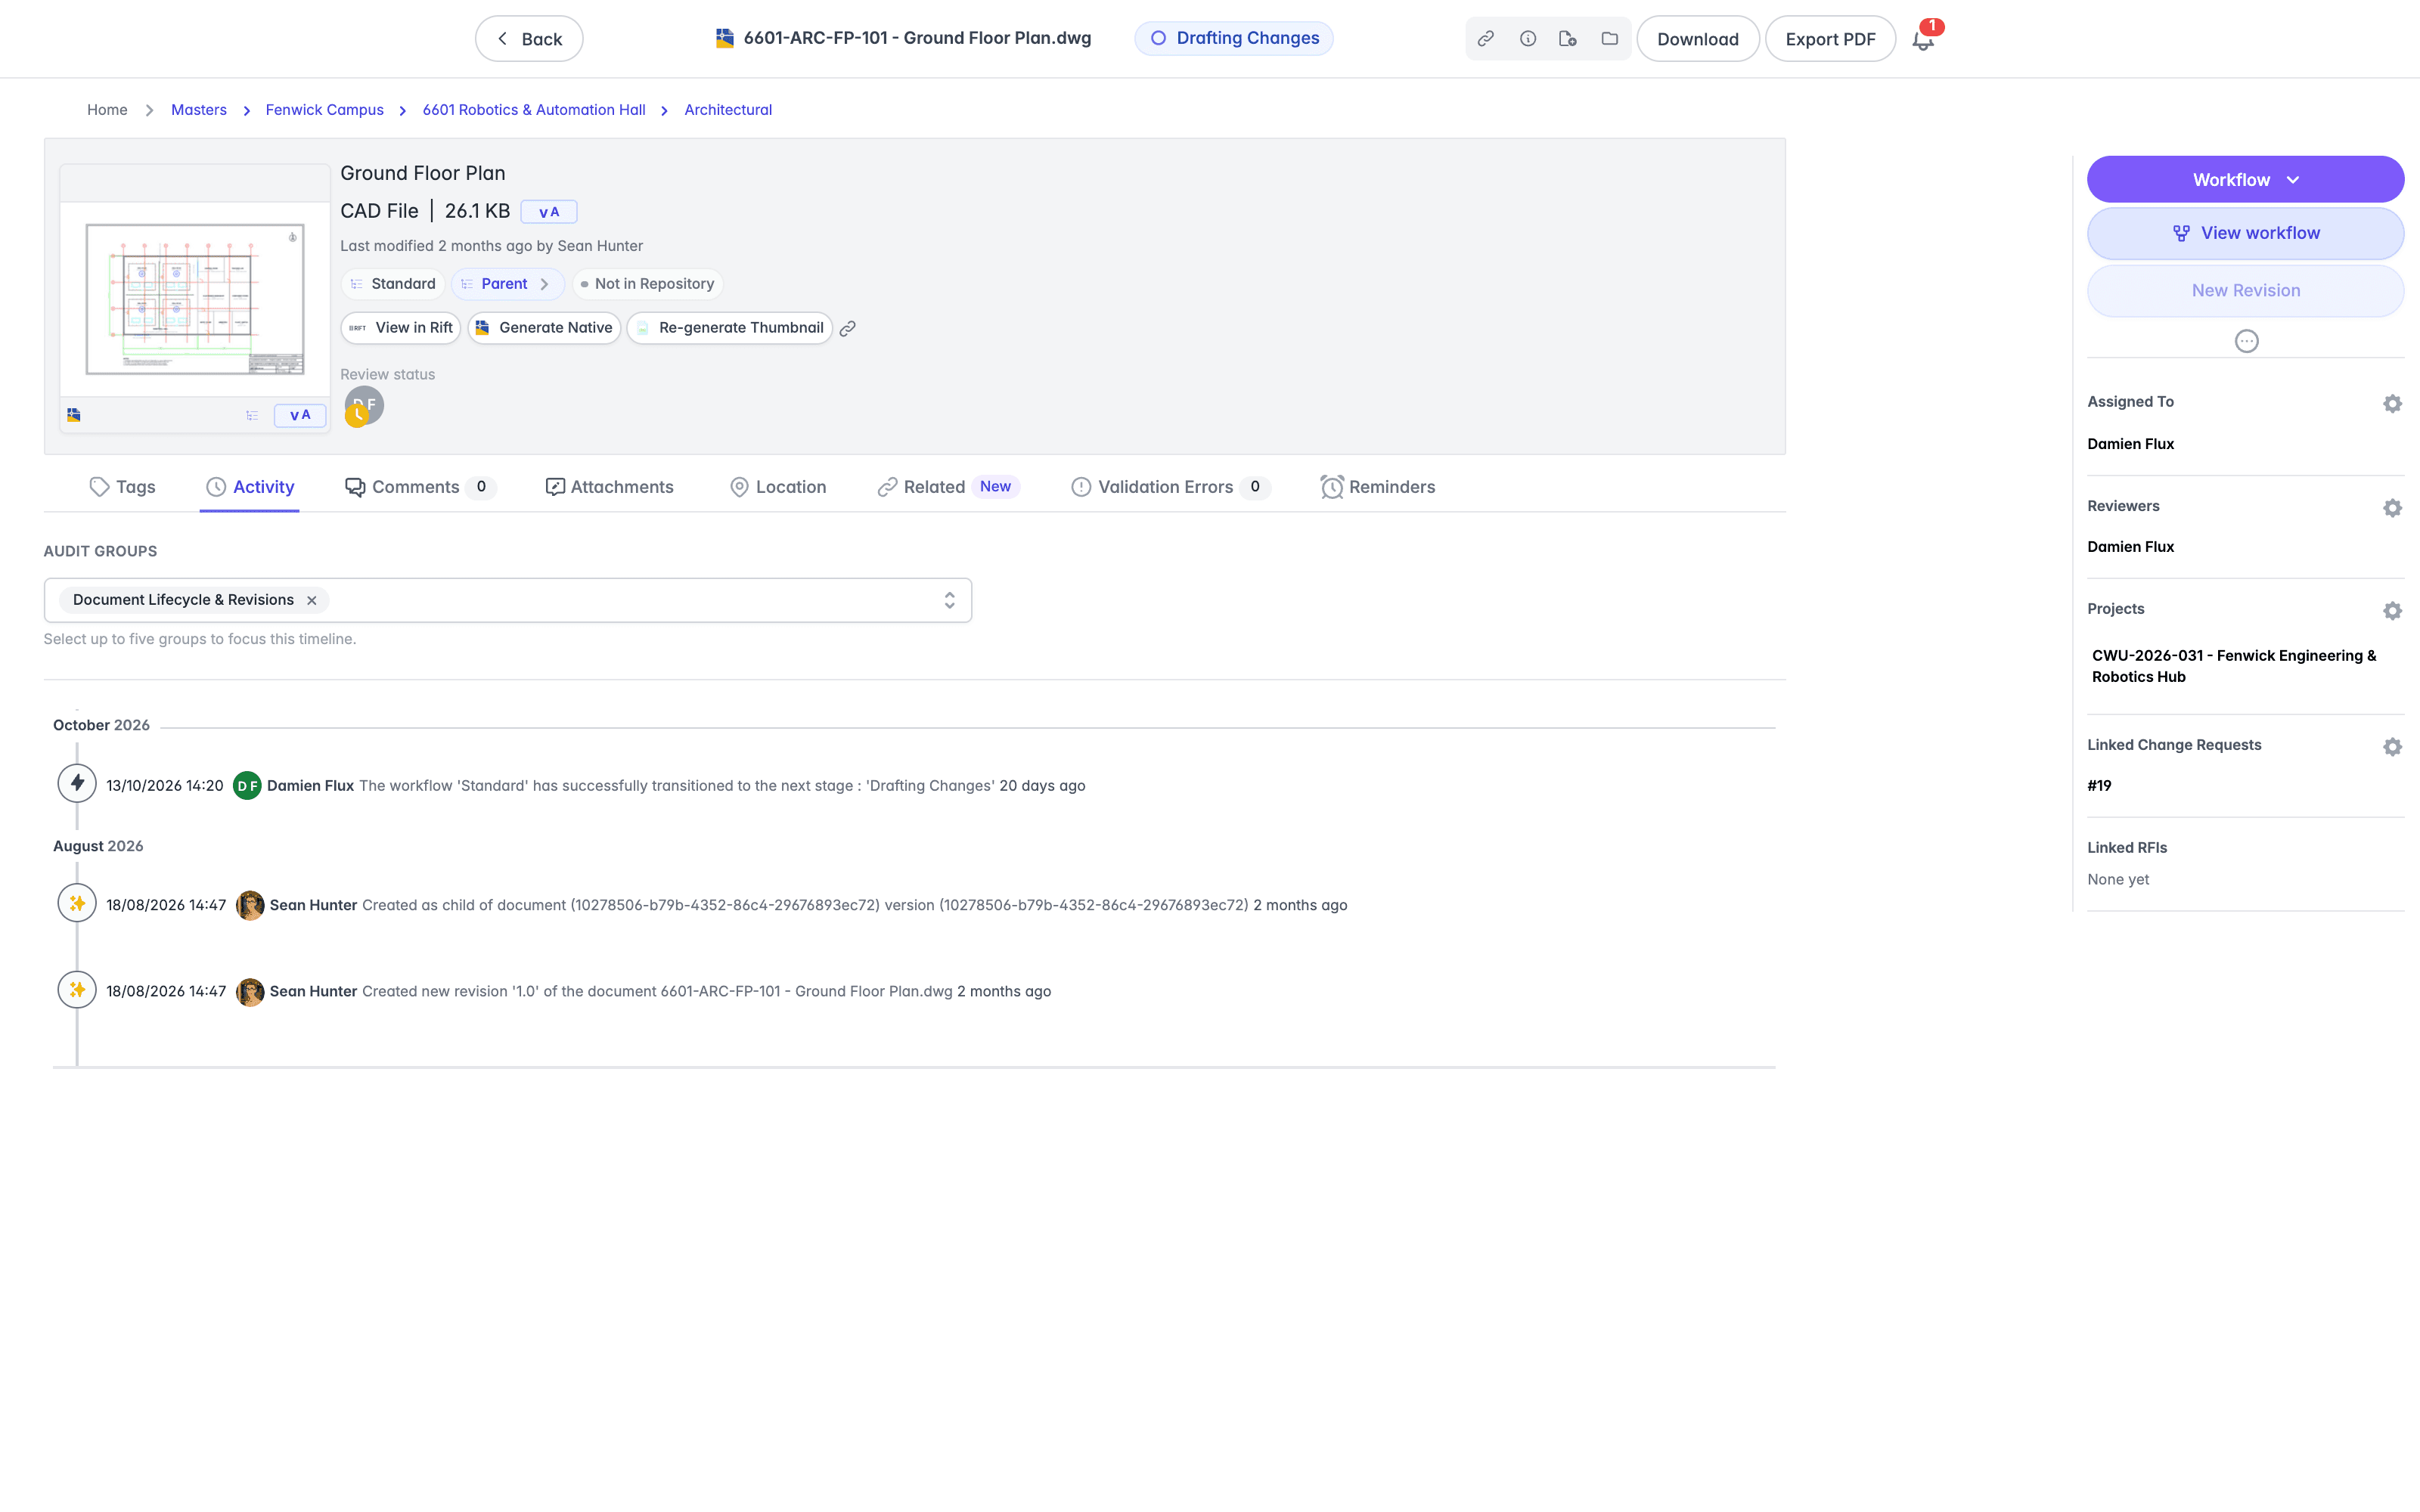
The Activity view gives an audit trail of user interactions with the document, including uploads, views, downloads, edits, and other actions.
Documents can accumulate activity quickly, so use the Audit Groups multi-select to filter out nonessential entries and focus on the records that matter. The view opens with only the Document Lifecycle & Revisions group selected. Select up to five groups; each group you add appears as a chip, and you can remove one by selecting the x on its chip. The timeline then shows only the matching entries, such as workflow transitions, dismissed validation issues, and tag updates, each with the actor and a timestamp.
Comments
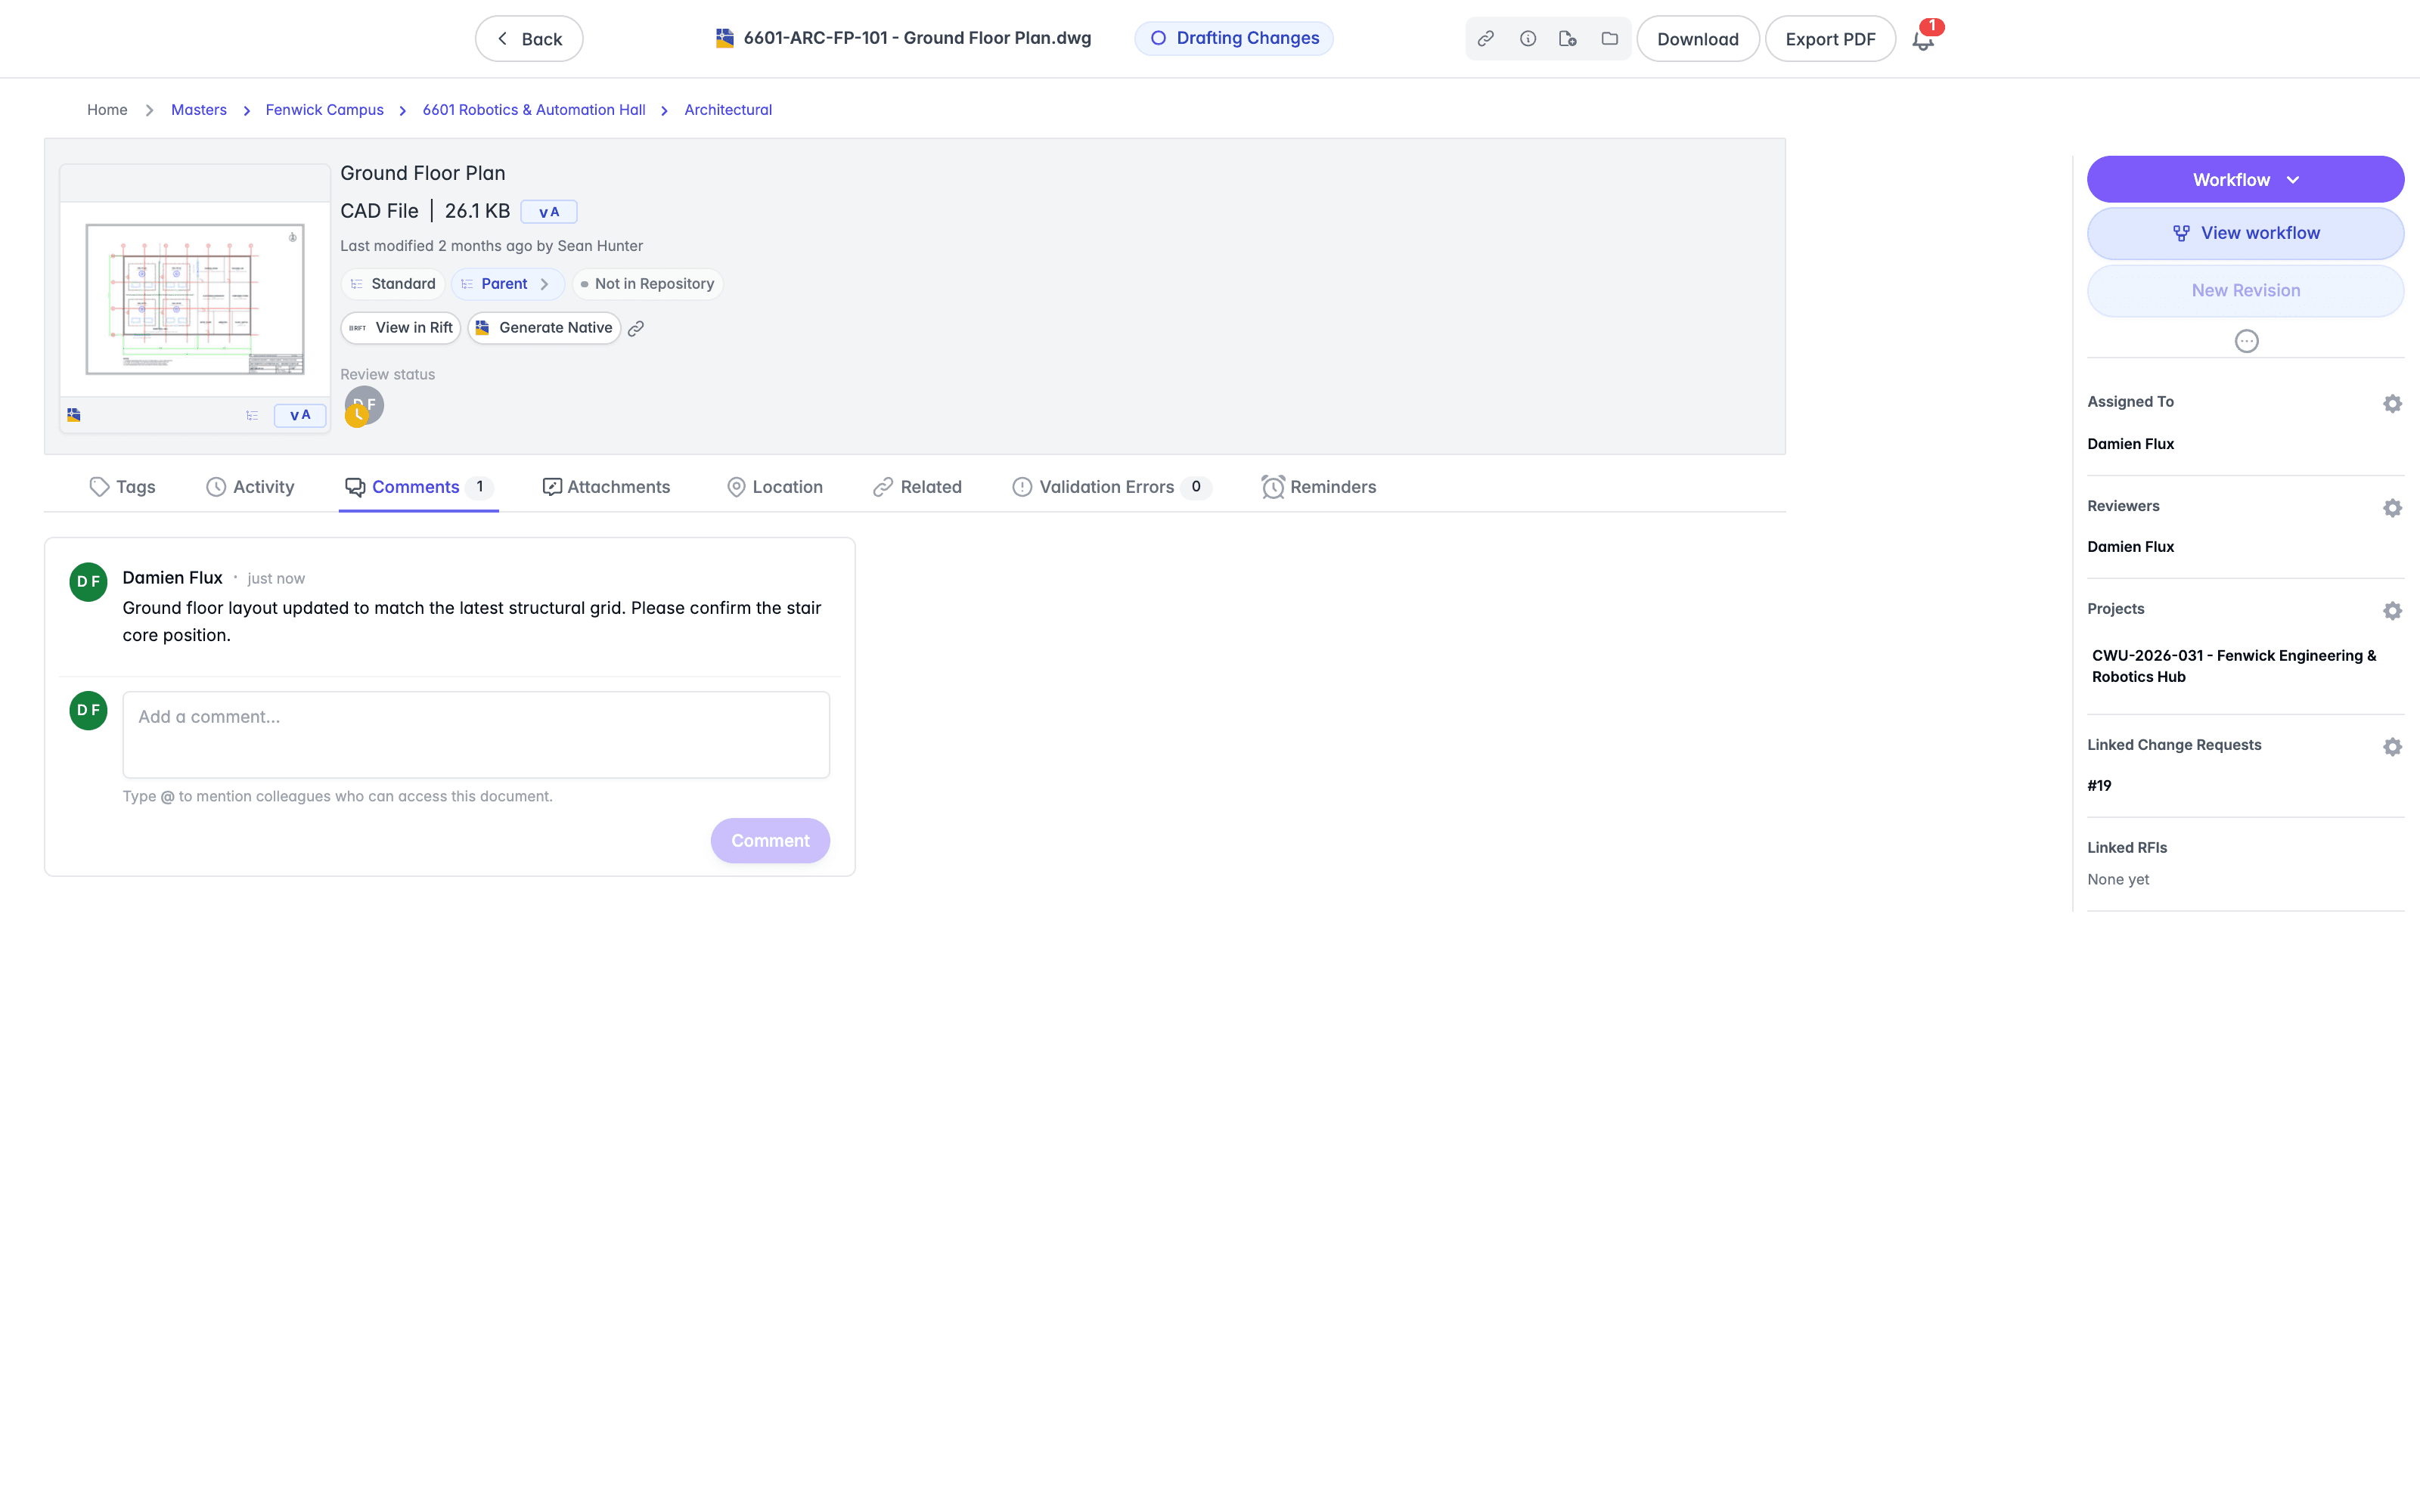
The Comments view shows every comment linked to the document, including those added during workflow steps, those left while revising or approving the document, and those entered directly on this page. Enter a new comment in the Add a comment box at the bottom and select Comment to post it. Use @mentions to notify specific people; mentions appear highlighted in the thread.
Attachments
The Attachments view lists the markup files attached to the document, typically PDFs added through a comment. The tab shows a count.
Location
The Location view holds the geographic location of the document and the assets it covers. A map band sits at the top of the view and stays in place as you scroll, with the assets listed in a table beneath it.
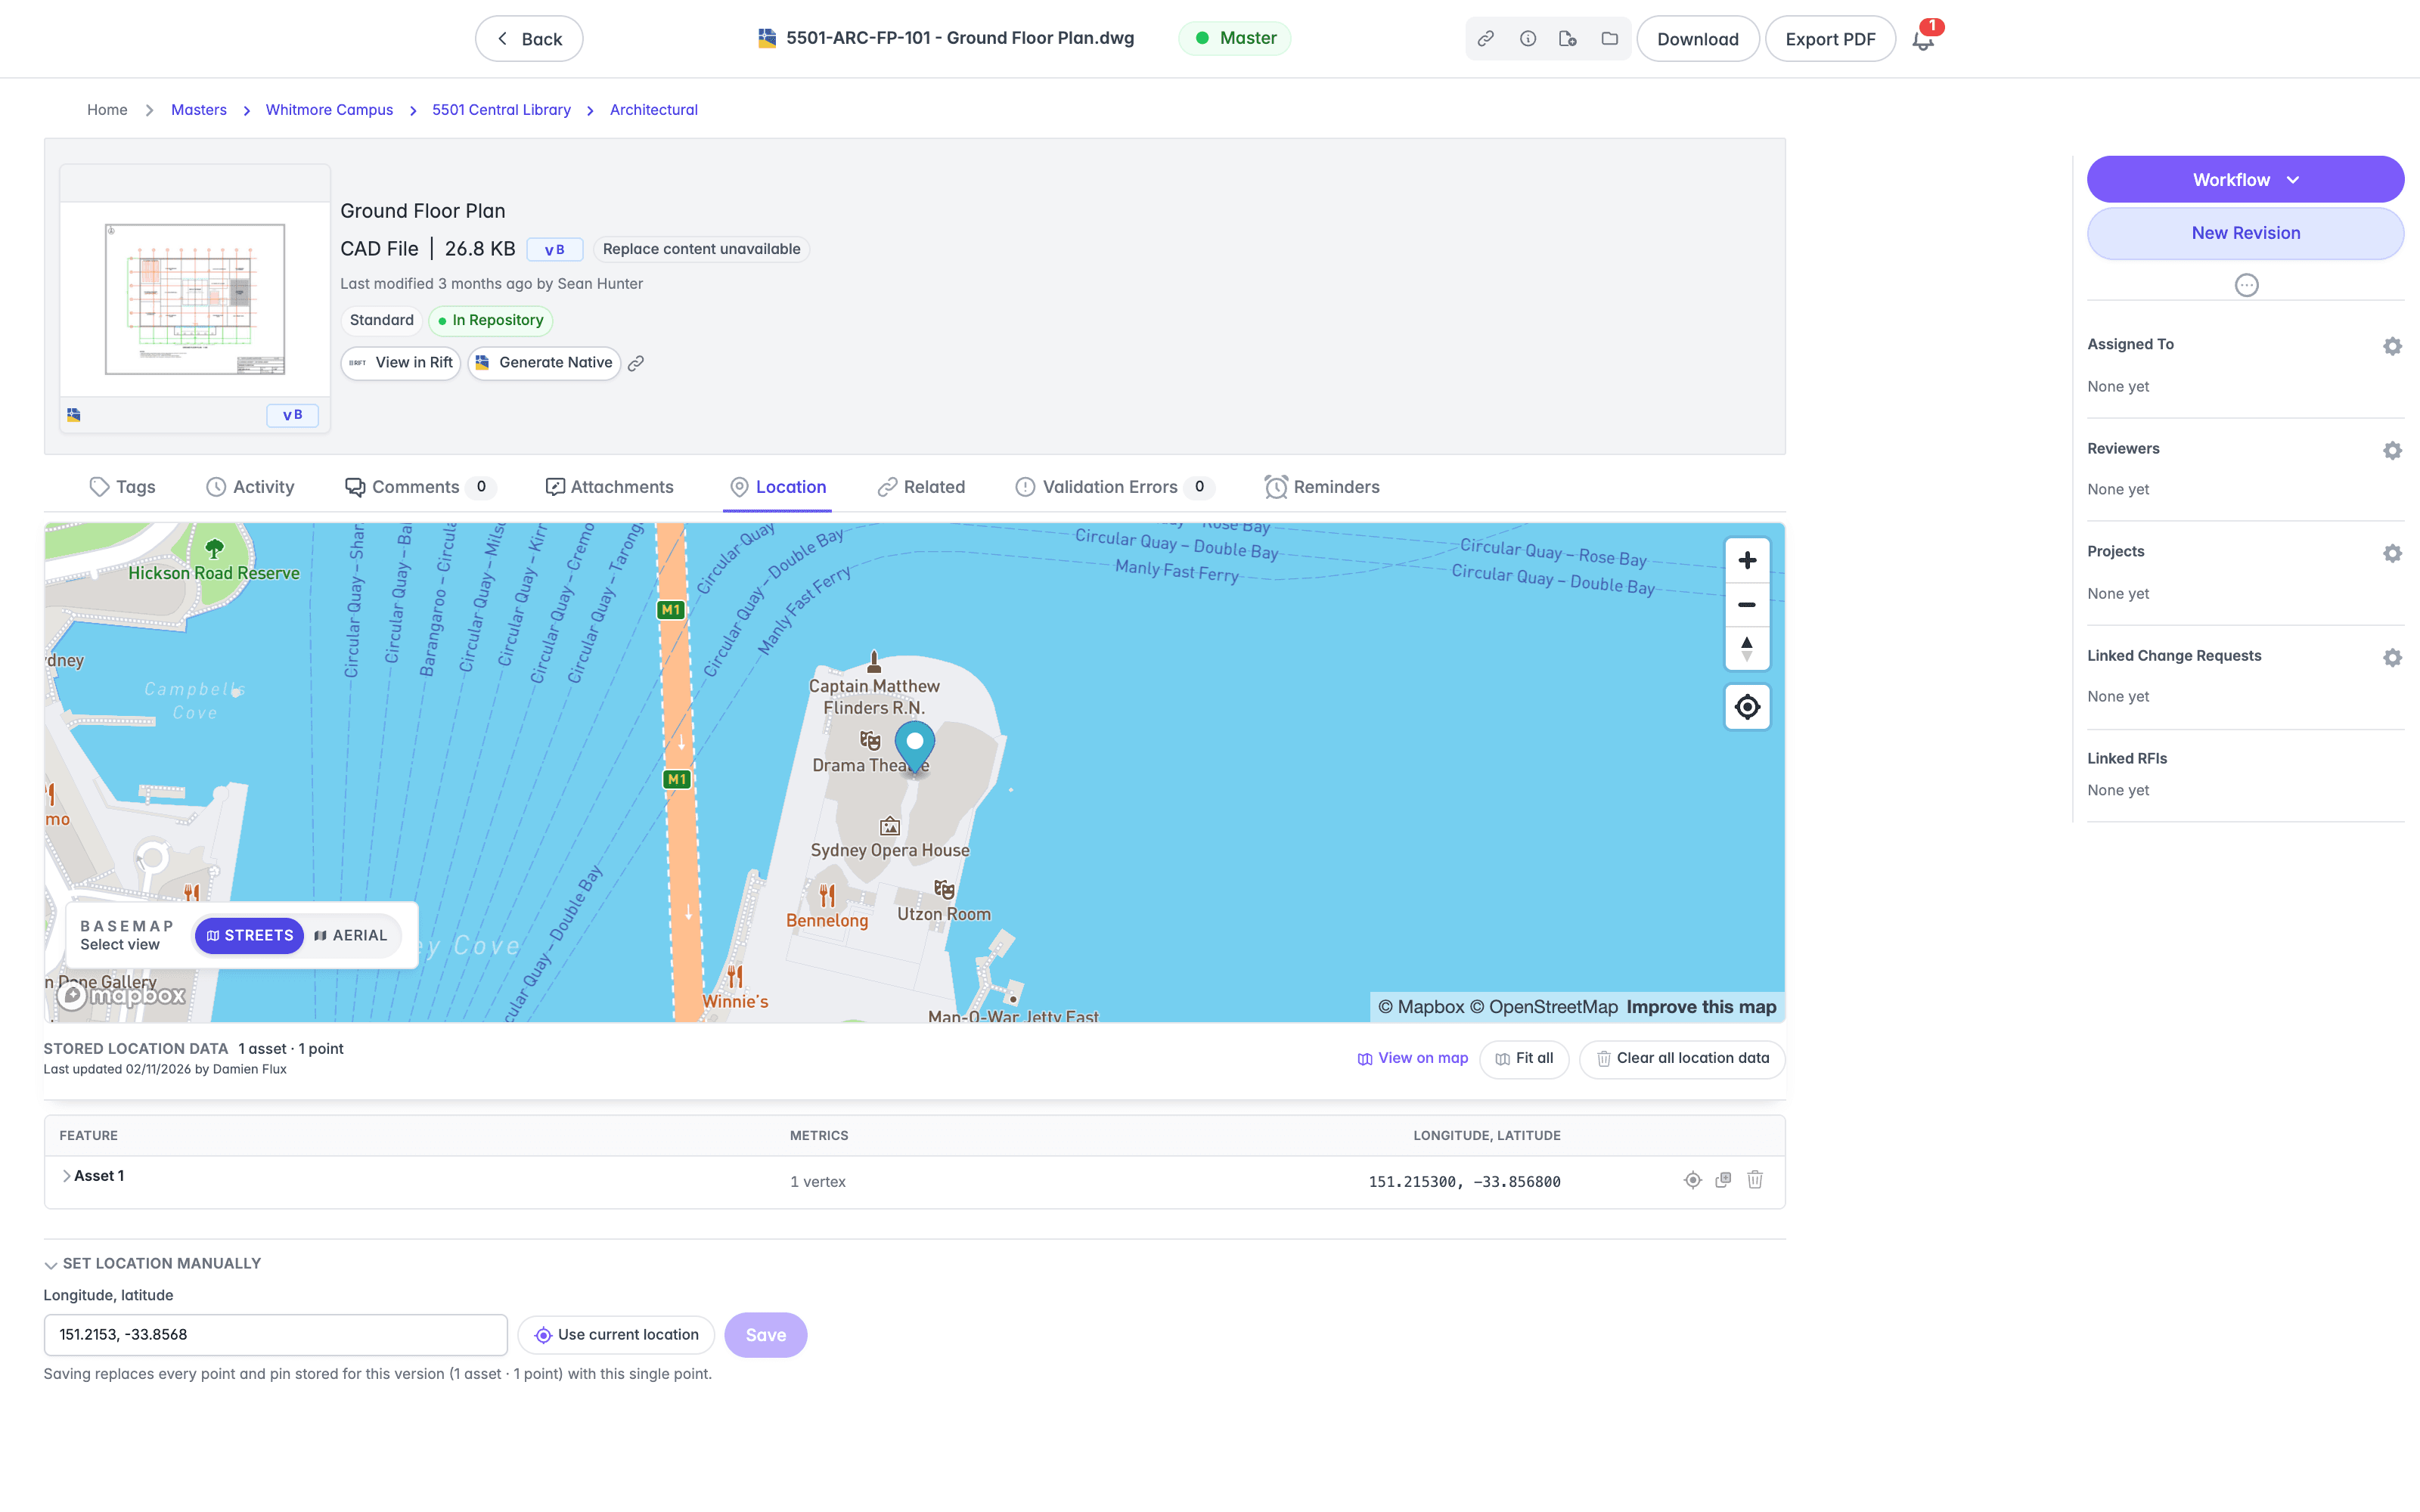
Where location data came from an external GIS system, the table lists one row per asset rather than a single point for the whole document. Each row shows the asset name, a copyable identifier when the source system's identifier differs from the name, a metrics line such as "25 vertices · 412 m", and the asset's own pin coordinates to six decimal places, with the full precision in the tooltip. A ring reports a perimeter rather than a length, and a single point reports no distance.
- Select a row's disclosure chevron to list the asset's individual vertices, each numbered and shown as a longitude and latitude pair. Use Copy all coordinates to copy the set out.
- Point at a row to highlight that asset on the map, and select one to move the map to it. Press Esc to clear the selection.
- Each row also carries actions to locate the asset on the map, copy its coordinates, and delete it. Deleting an asset removes its vertices and its pin.
- Select Fit all to refit the map around every asset, which is the way back after you pan or zoom.
- Every asset has its own pin, so a document spread across several assets shows each location rather than a single averaged pin.
To work on several assets at once, select the box at the start of each row, or the box in the table header to select every asset shown. The toolbar then offers these actions:
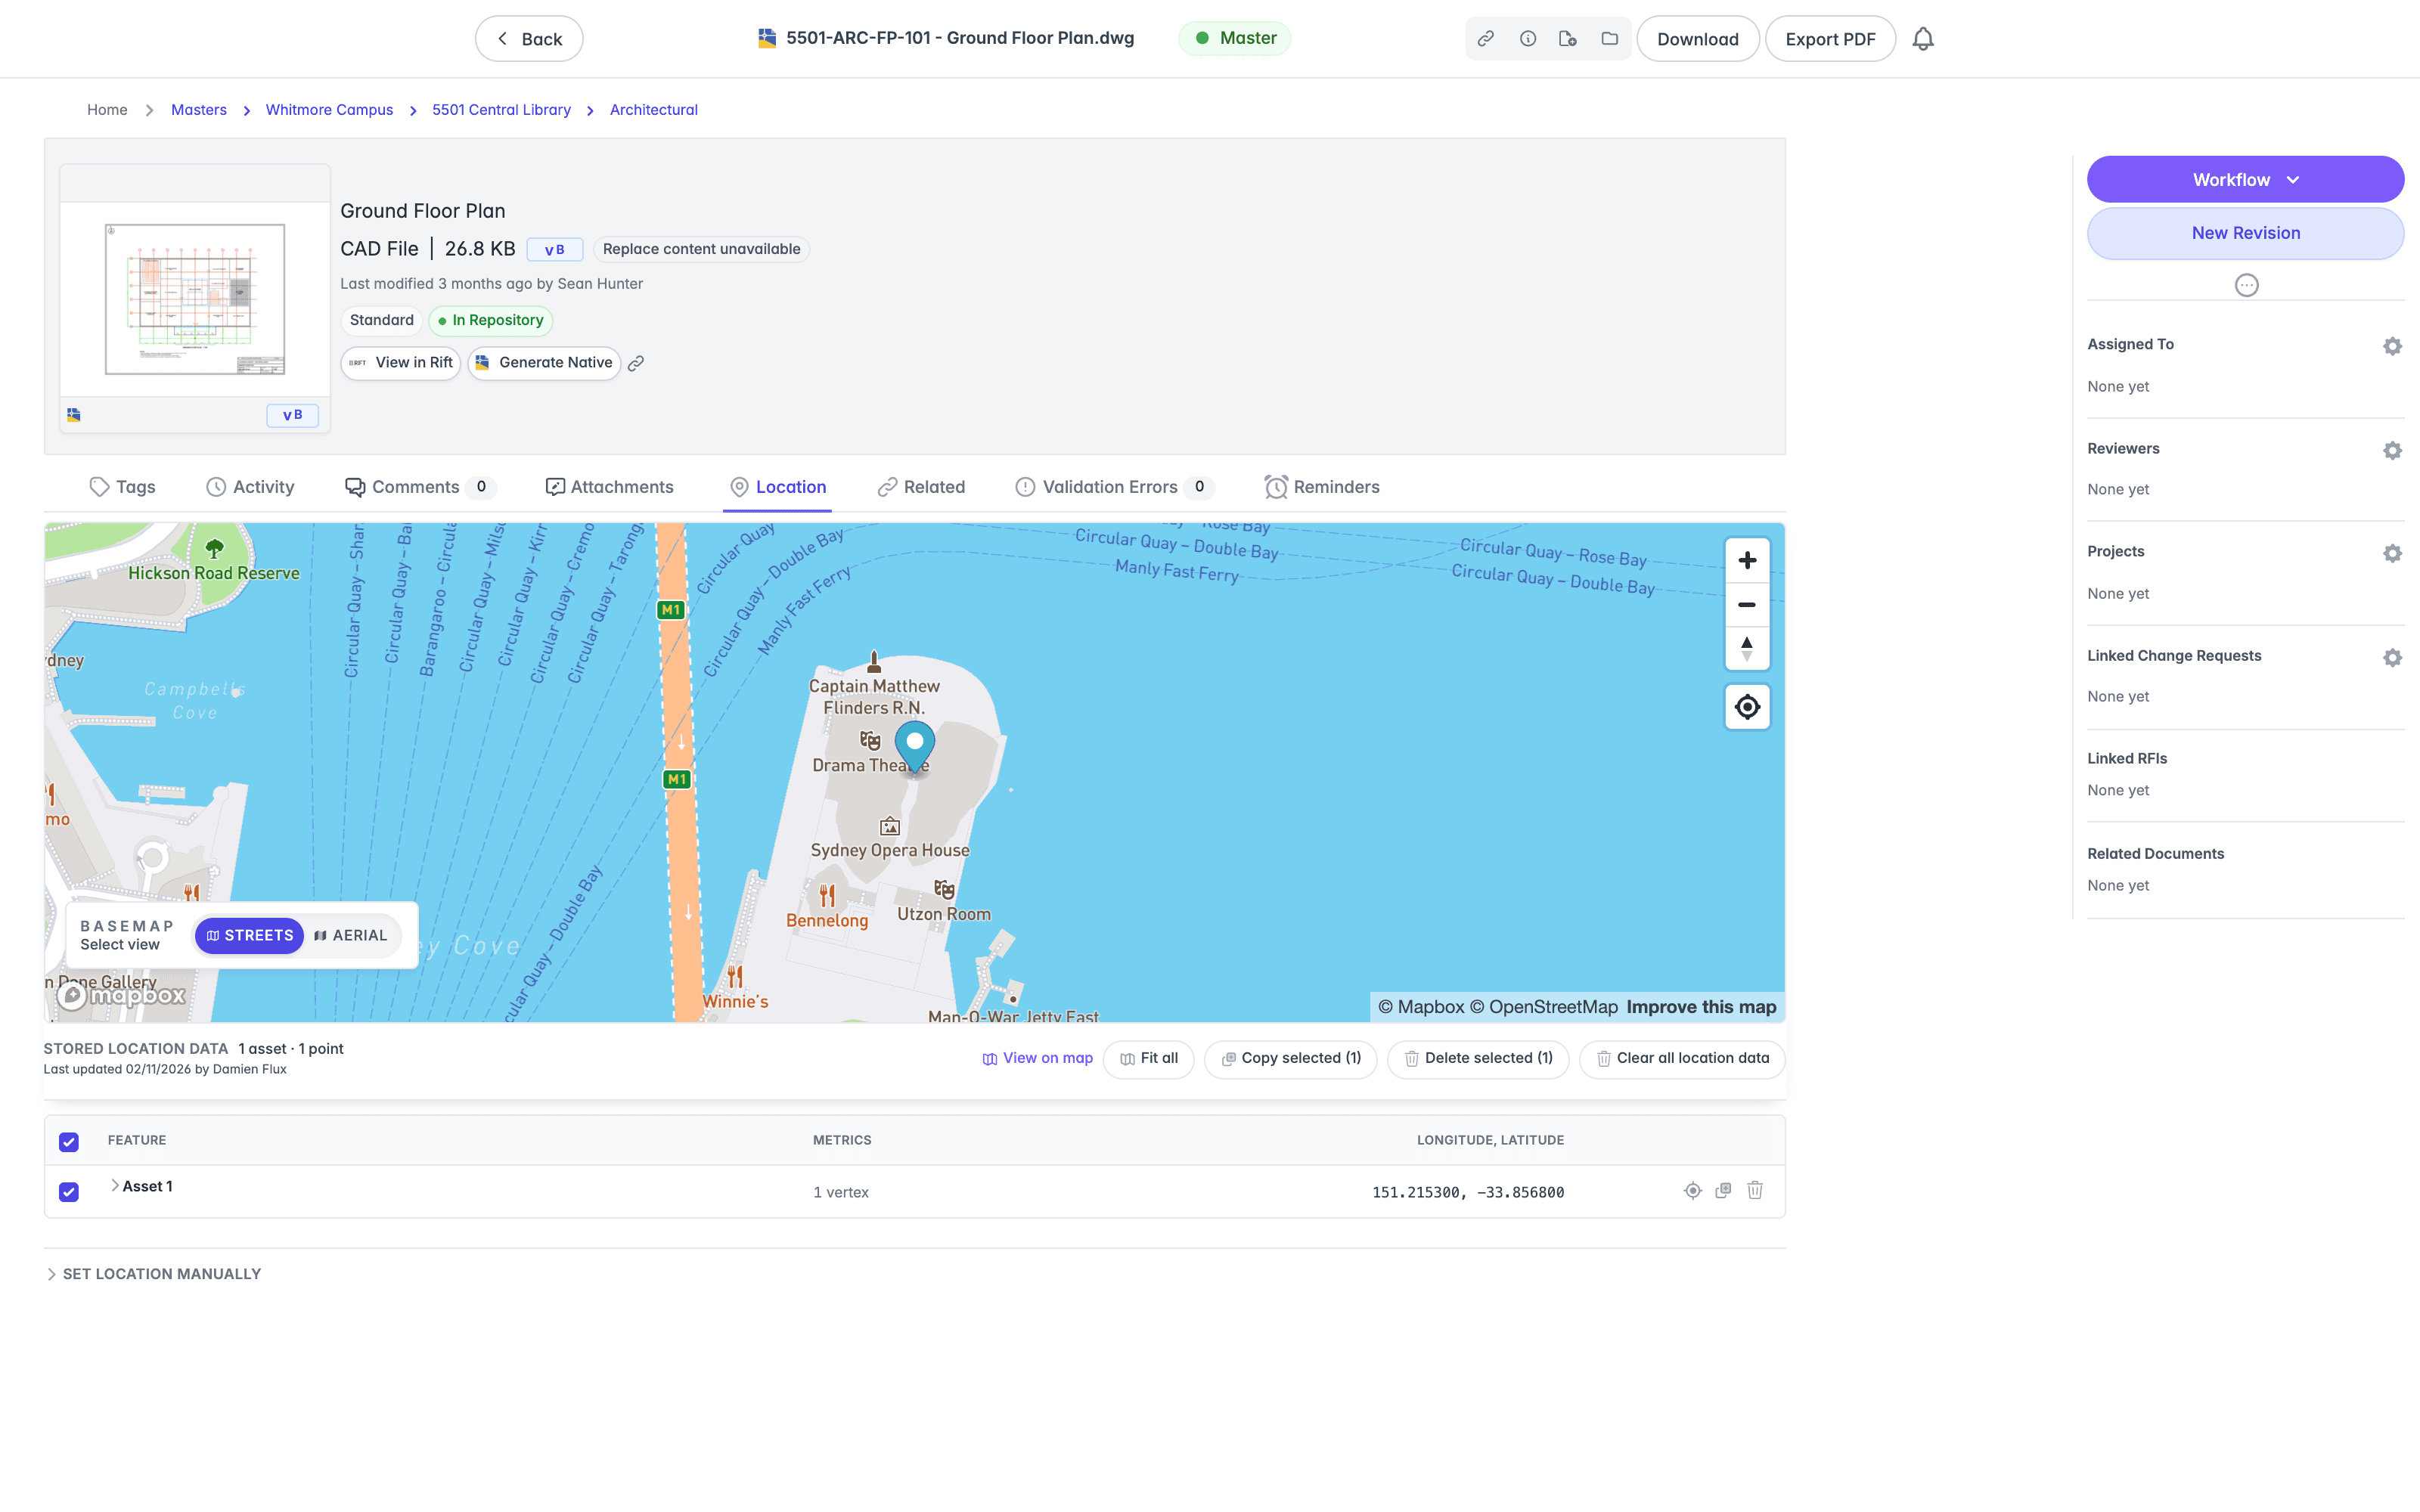
- Copy selected (n) copies the selected assets, where n is the number selected. With nothing selected the button reads Copy locations and copies every asset, or Copy shown (n) when a filter limits the rows.
- Delete selected (n) removes the selected assets, with their vertices and pins, from the document in one step.
- Paste locations (n) adds the n copied assets to this document. It appears on another document once you have copied assets, and the same action is available as Paste Locations in the document options menu, with the number of copied assets beside it.
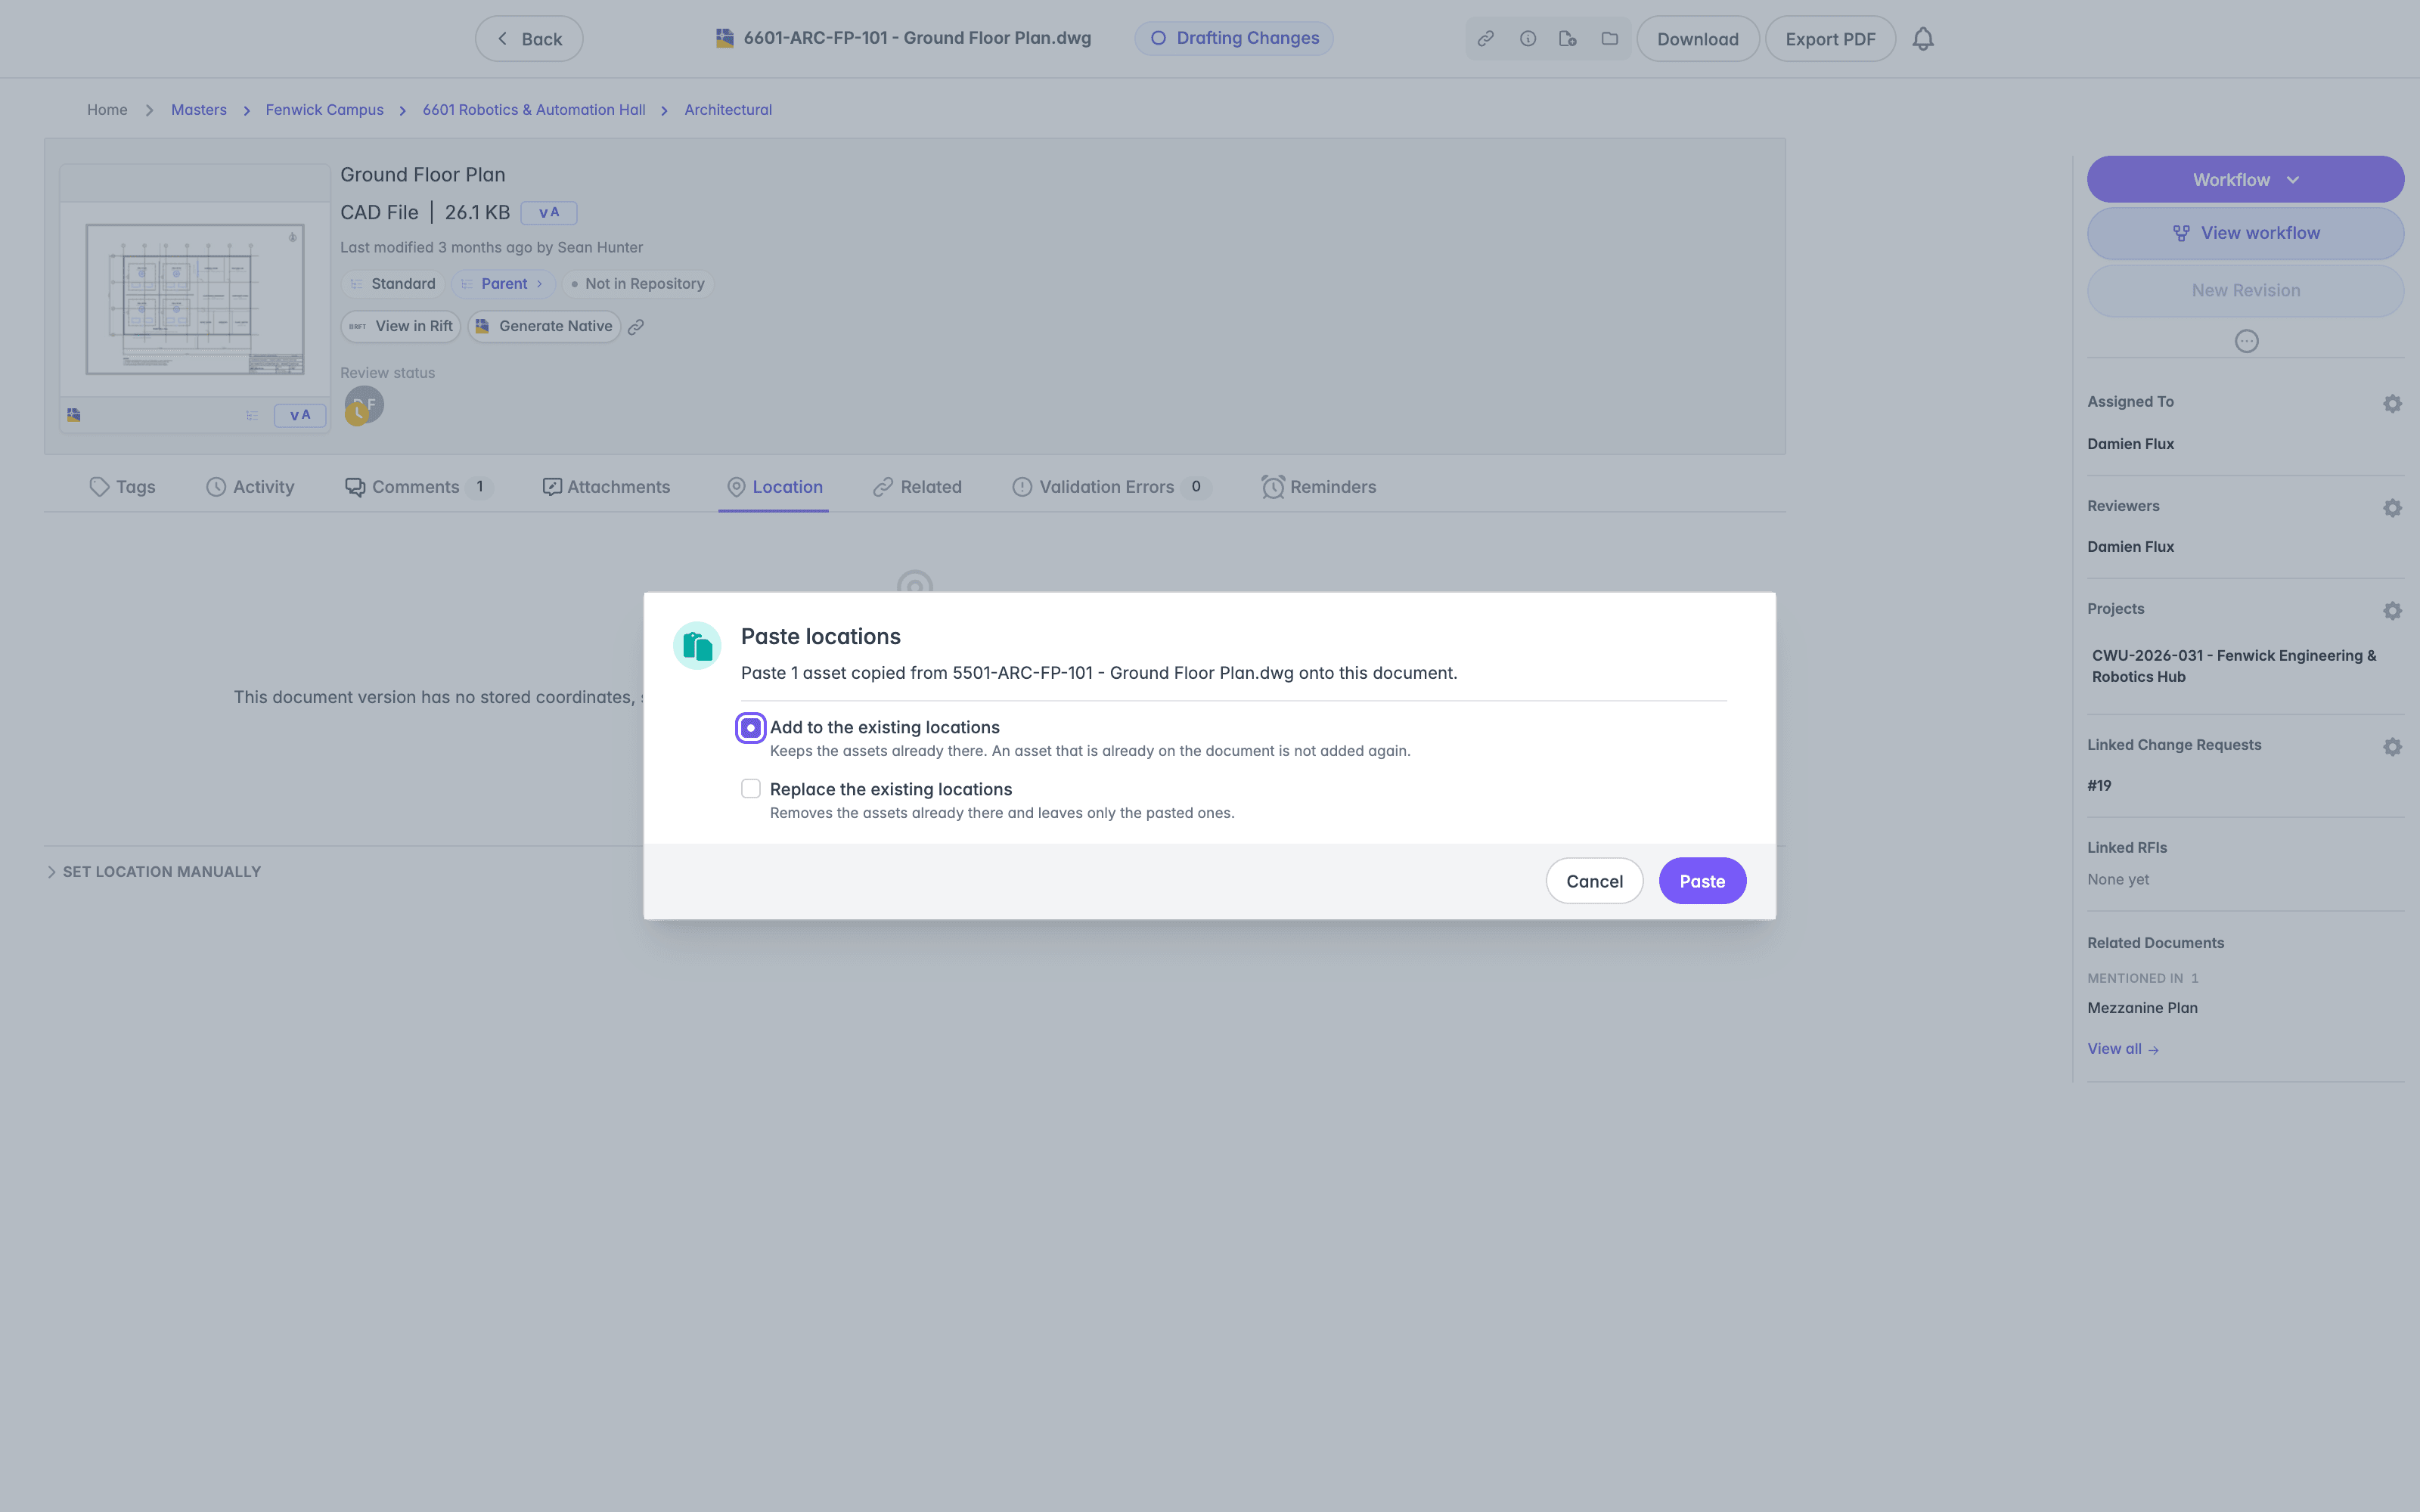
The Paste locations dialog names the document the assets came from and asks you to choose one of two options. Add to the existing locations keeps the assets already there and does not add an asset that is already on the document. Replace the existing locations removes the assets already there and leaves only the pasted ones. Select Paste to apply your choice.
Below the table, a Set location manually section holds the manual coordinate entry, closed by default. Enter a longitude and latitude, or select Use current location, then select Save. Both values must be numbers within the valid range, and Save stays unavailable until they are. Where the pair is unambiguously the other way around, Lunr reads it as a latitude and longitude and tells you so. Saving a location manually replaces the stored assets, and a warning beside Save says so.
Where a document has no stored location at all, the view reports "No location data" and explains that location data normally arrives with the GIS sync and can also be set by hand. Select Set location to open the manual entry ready to type into.
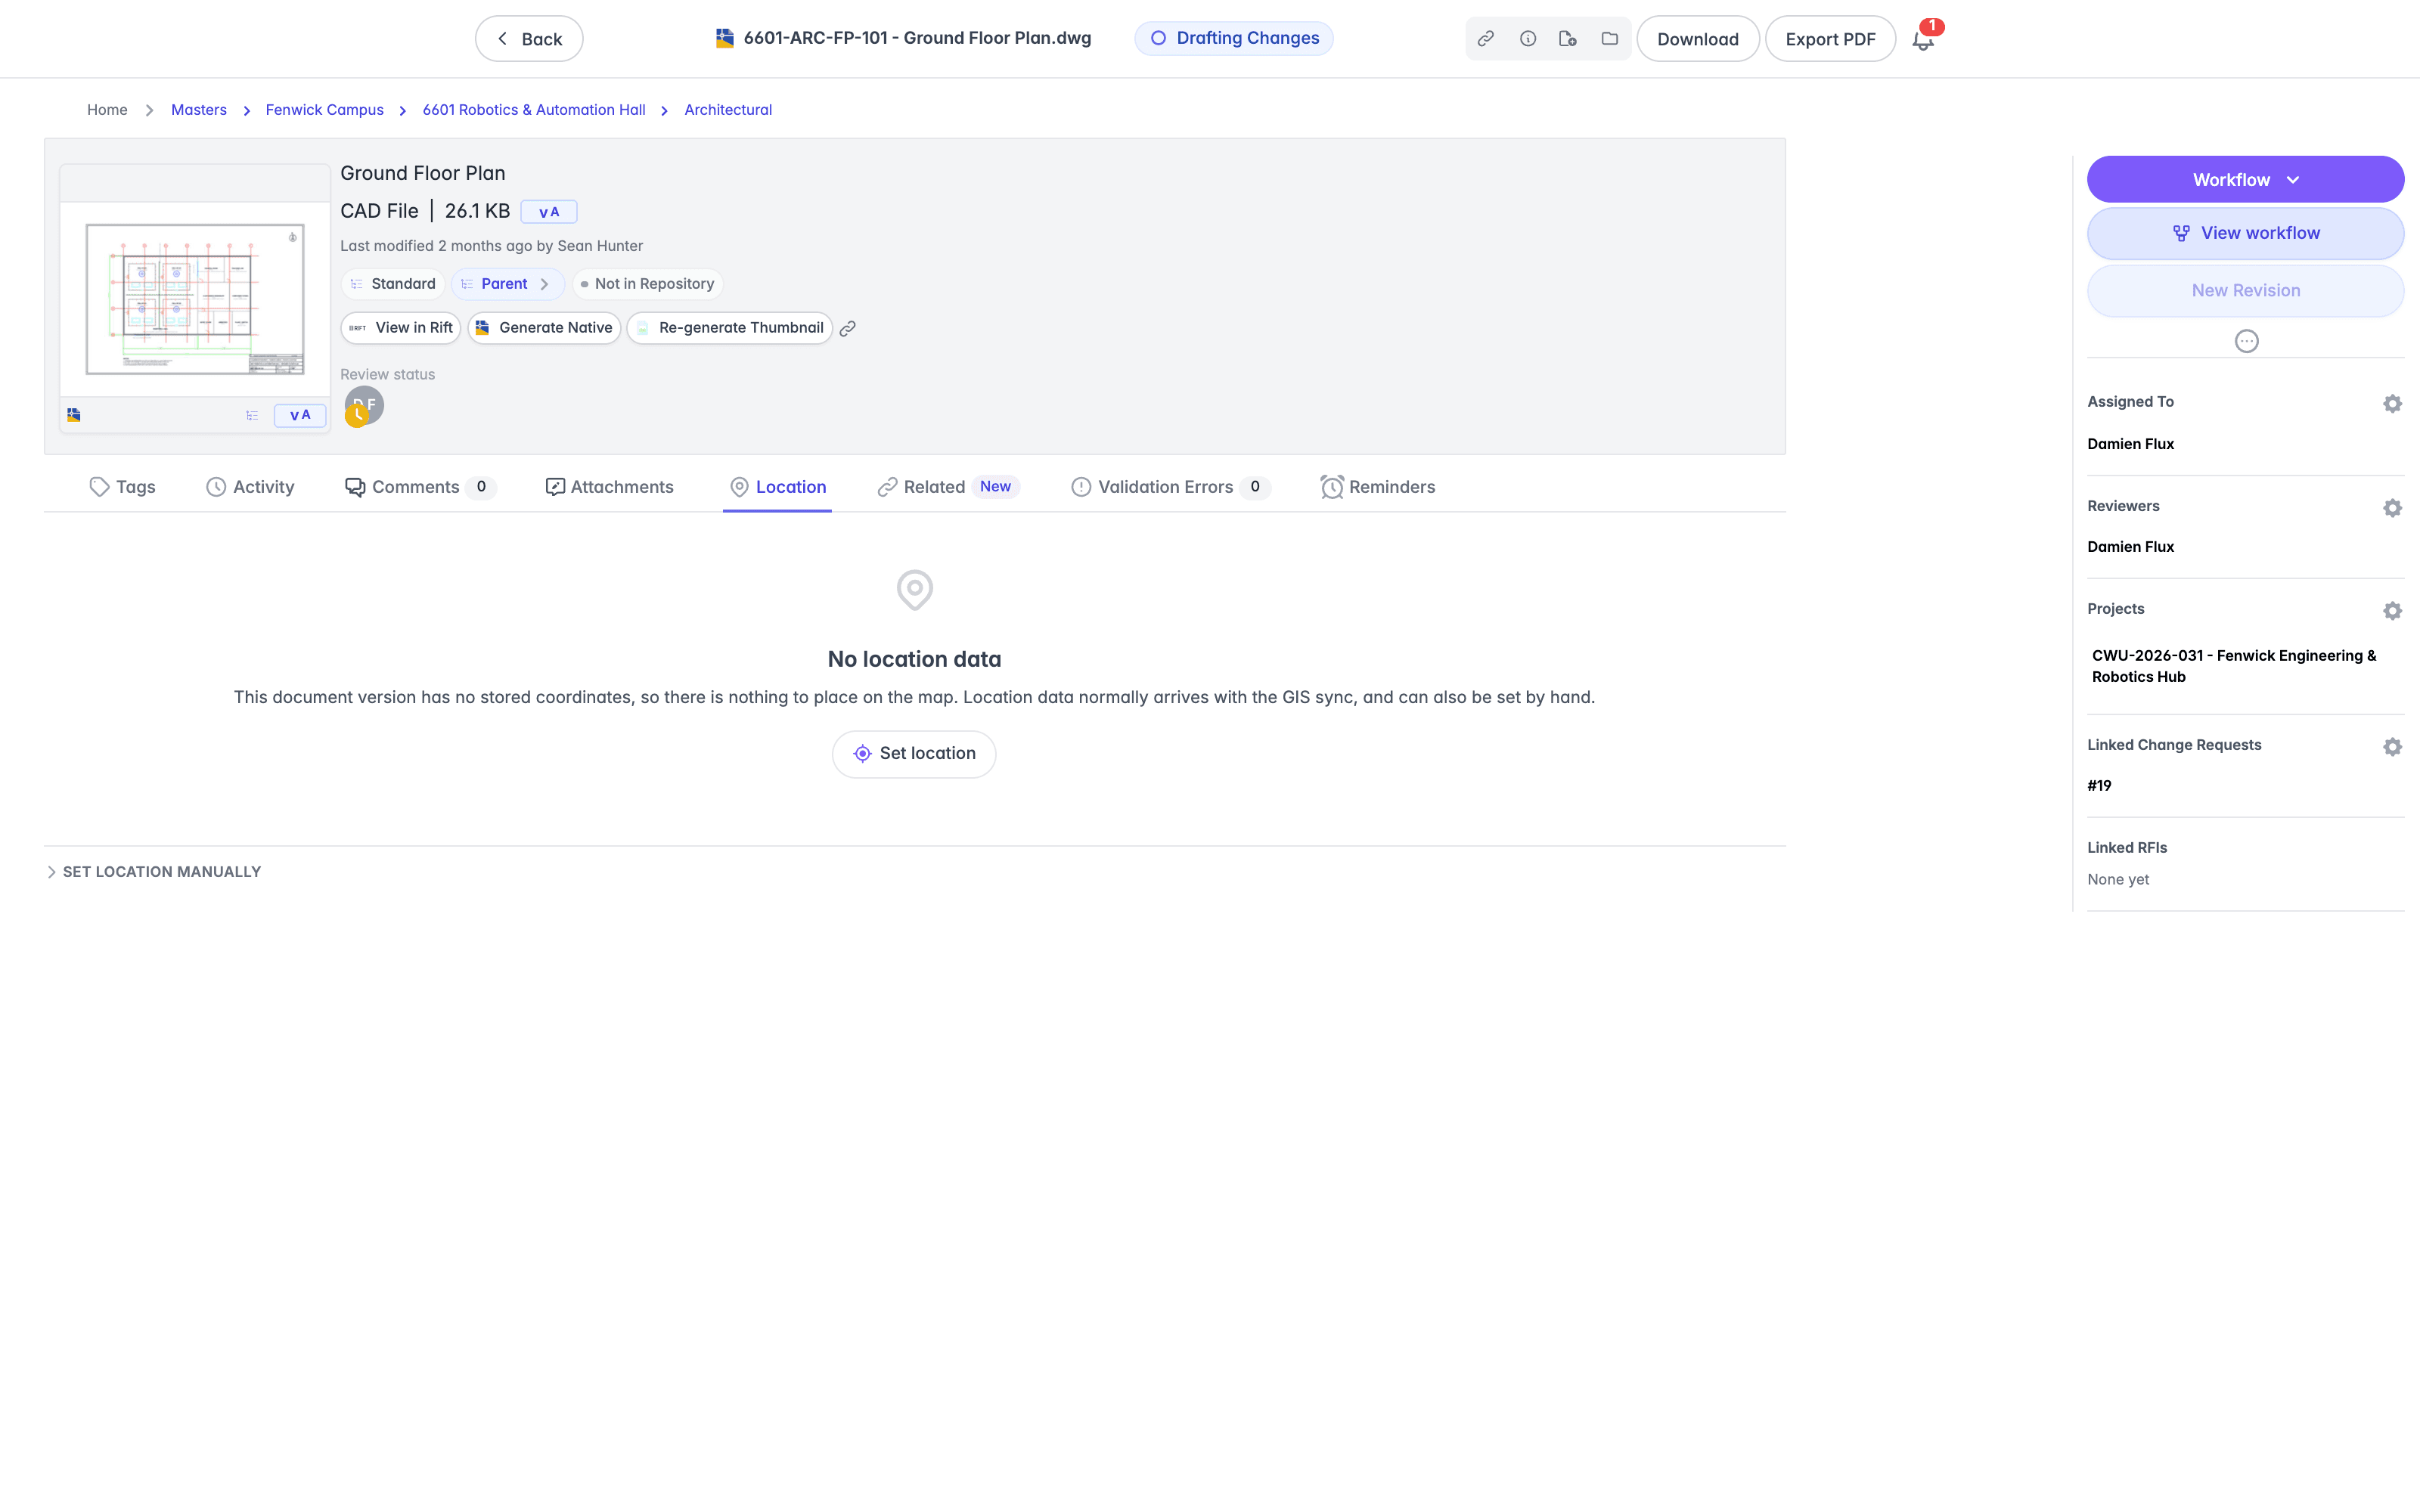
Select Clear all location data to remove every stored location from the document at once.
Editing a location is not available to everyone, and a document at master status needs further permission. The view is read-only without that permission, and for archived and deleted documents. When you type a single pair into the manual entry, put the longitude first.
If someone else changes a document's location while you have the view open, a delete refreshes the list instead of failing, and reports that the list has been refreshed. Check the table before repeating the action.
Related
The Related tab shows the documents connected to this one. It replaces the former Xrefs tab, and a bookmark to the old Xrefs address opens Related. Up to four sections appear, and three more where drawing references are enabled.
- References lists the external references (xrefs) the drawing uses. Each row shows the file name and a Rev number, with a Newer revision badge where a newer revision of the referenced document exists. A reference with no matching document in Lunr carries a Not found badge and reads "No document has this name. Upload one, then link xrefs again." A reference to a document you cannot open reads "A document you can't open".
- Used in lists the drawings that use this document as an xref. Each row shows the revision it uses, with an Older revision badge where that is not the current one. A document no drawing uses reads "Not used anywhere."
- Links lists the documents linked to this one, grouped by link type, covered under Linking Documents. It appears where your organisation has set up link types or the document already has links.
- Redlines lists your personal redlines of the document, with a My redlines link. It appears where your organisation has enabled personal redlines.
- Mentions lists the drawings this drawing names by number in its own text, with how many times each is named. Several drawings match appears where more than one drawing holds a number, and Older revision appears where the text quotes an earlier revision. Mentioned in lists the drawings that name this one, with the revision of each, and Numbers not found lists the numbers no drawing holds. These three sections appear where your organisation has enabled drawing references, covered in Drawing References.
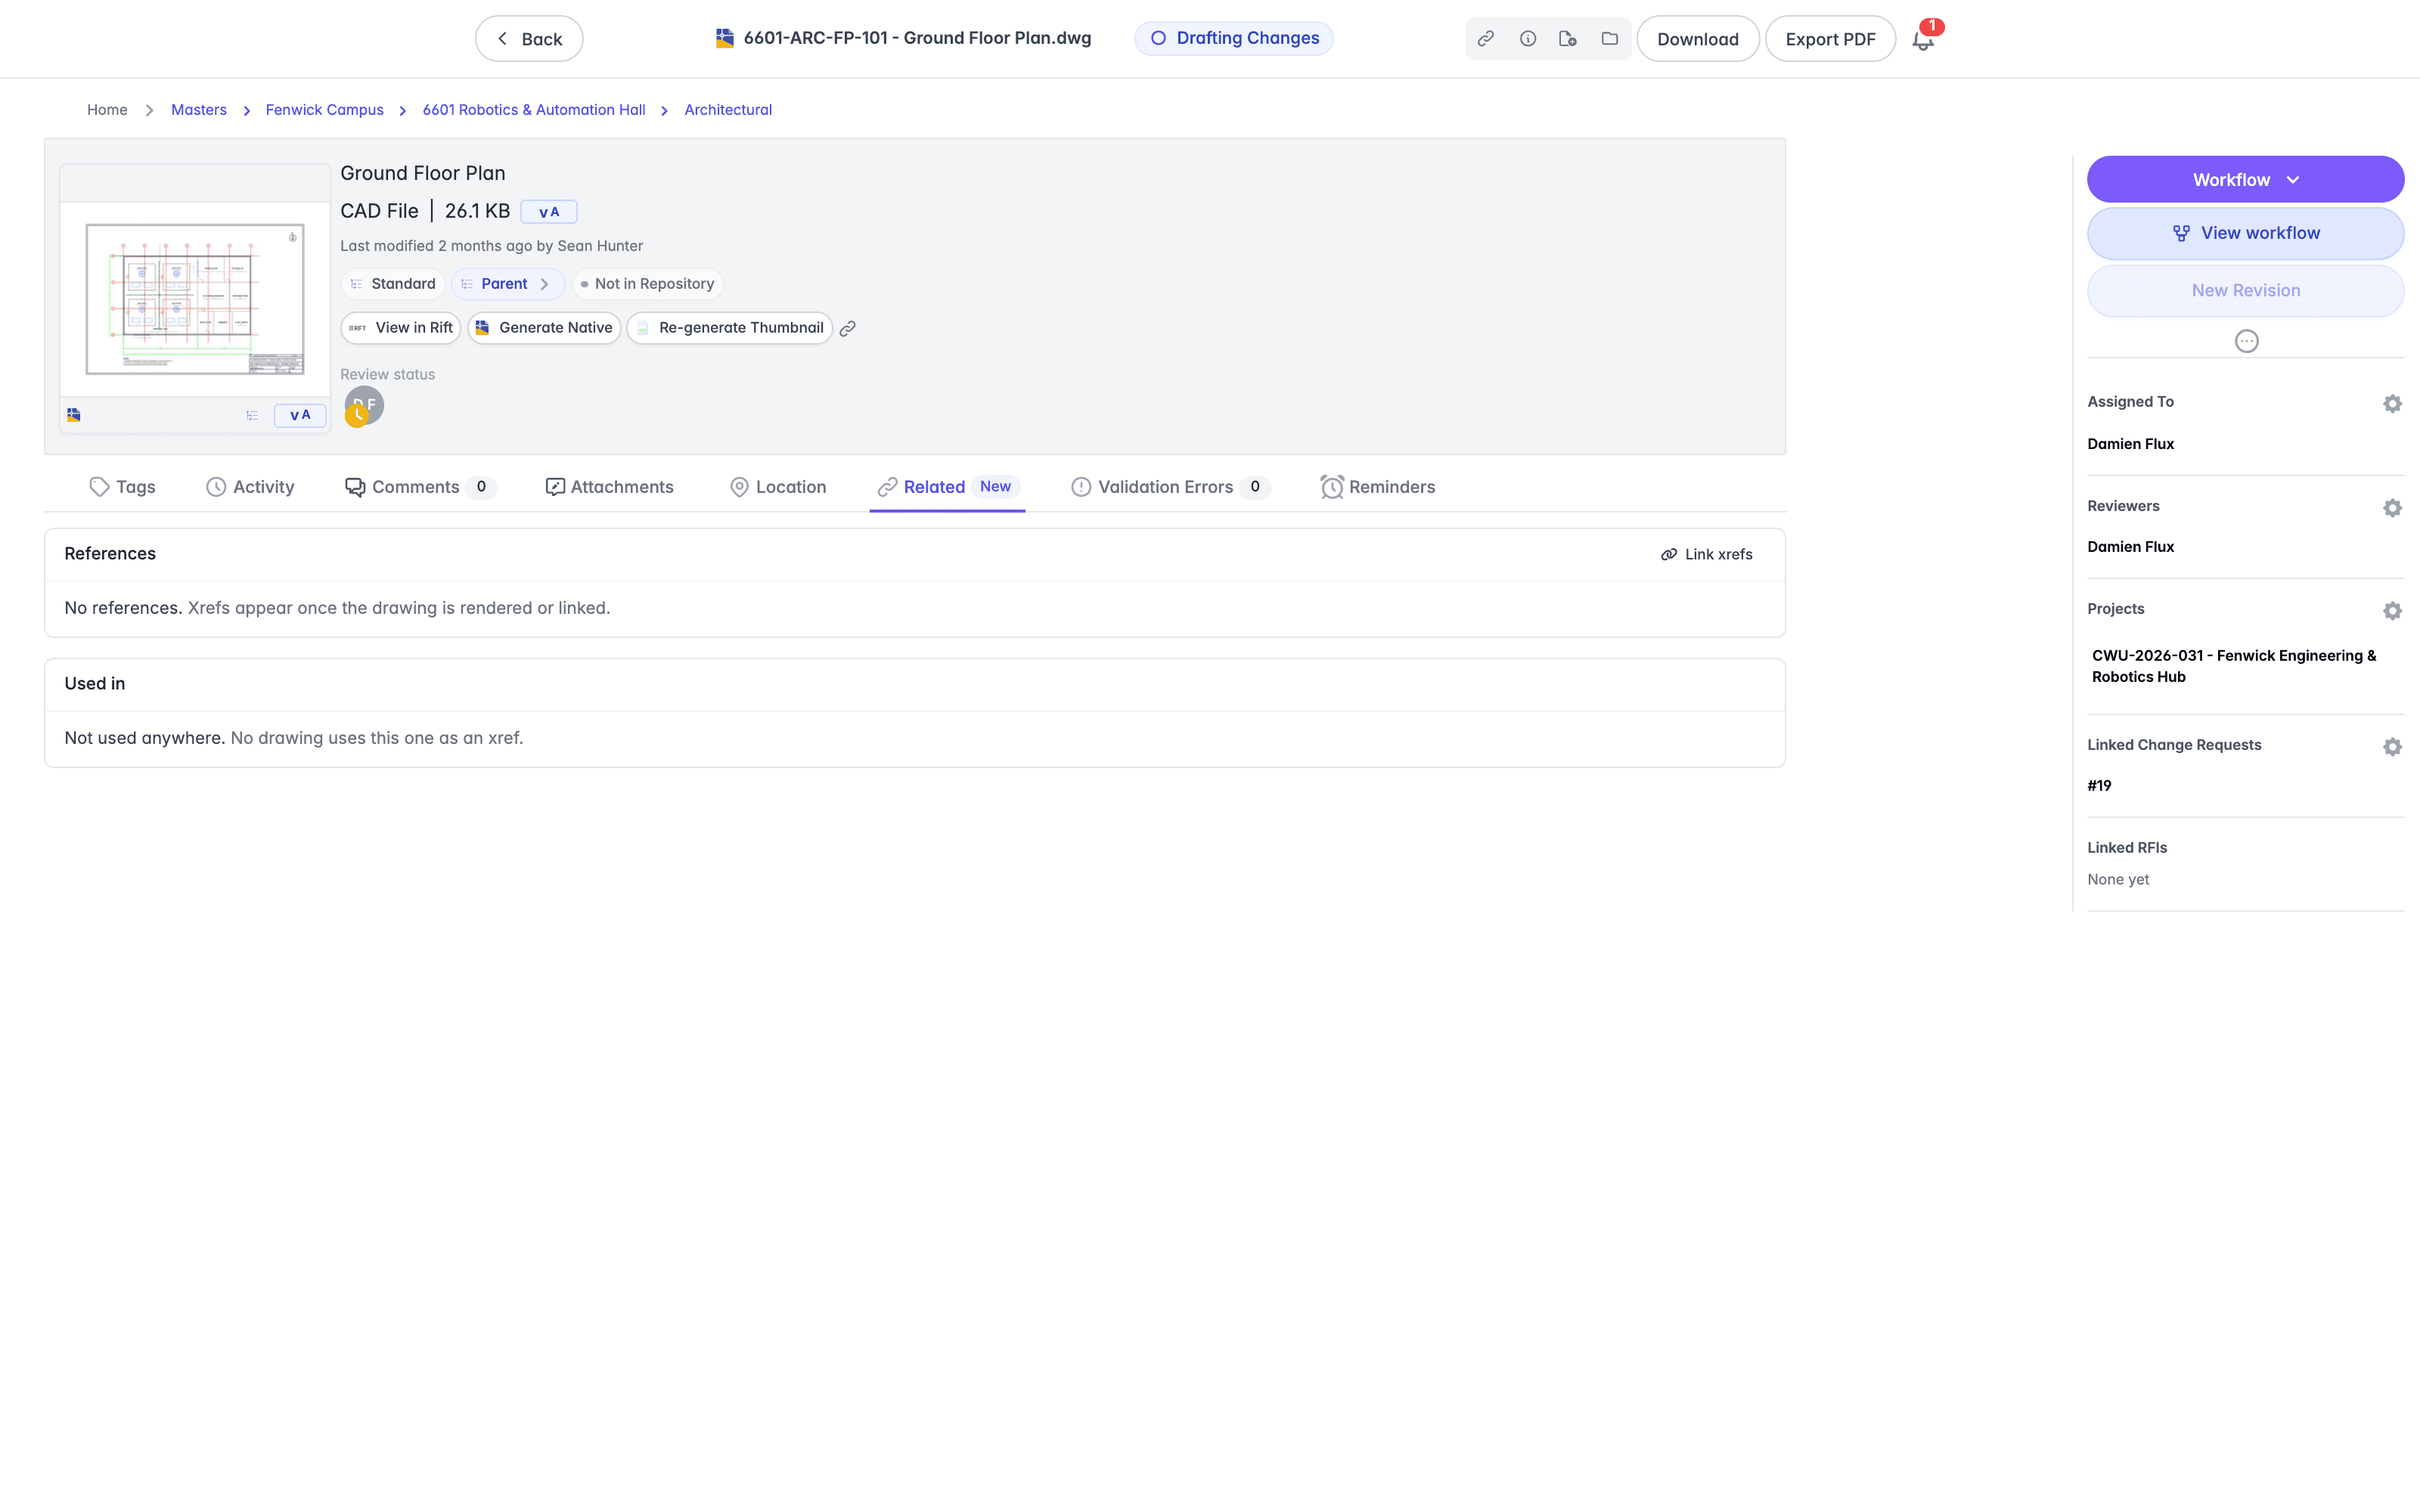
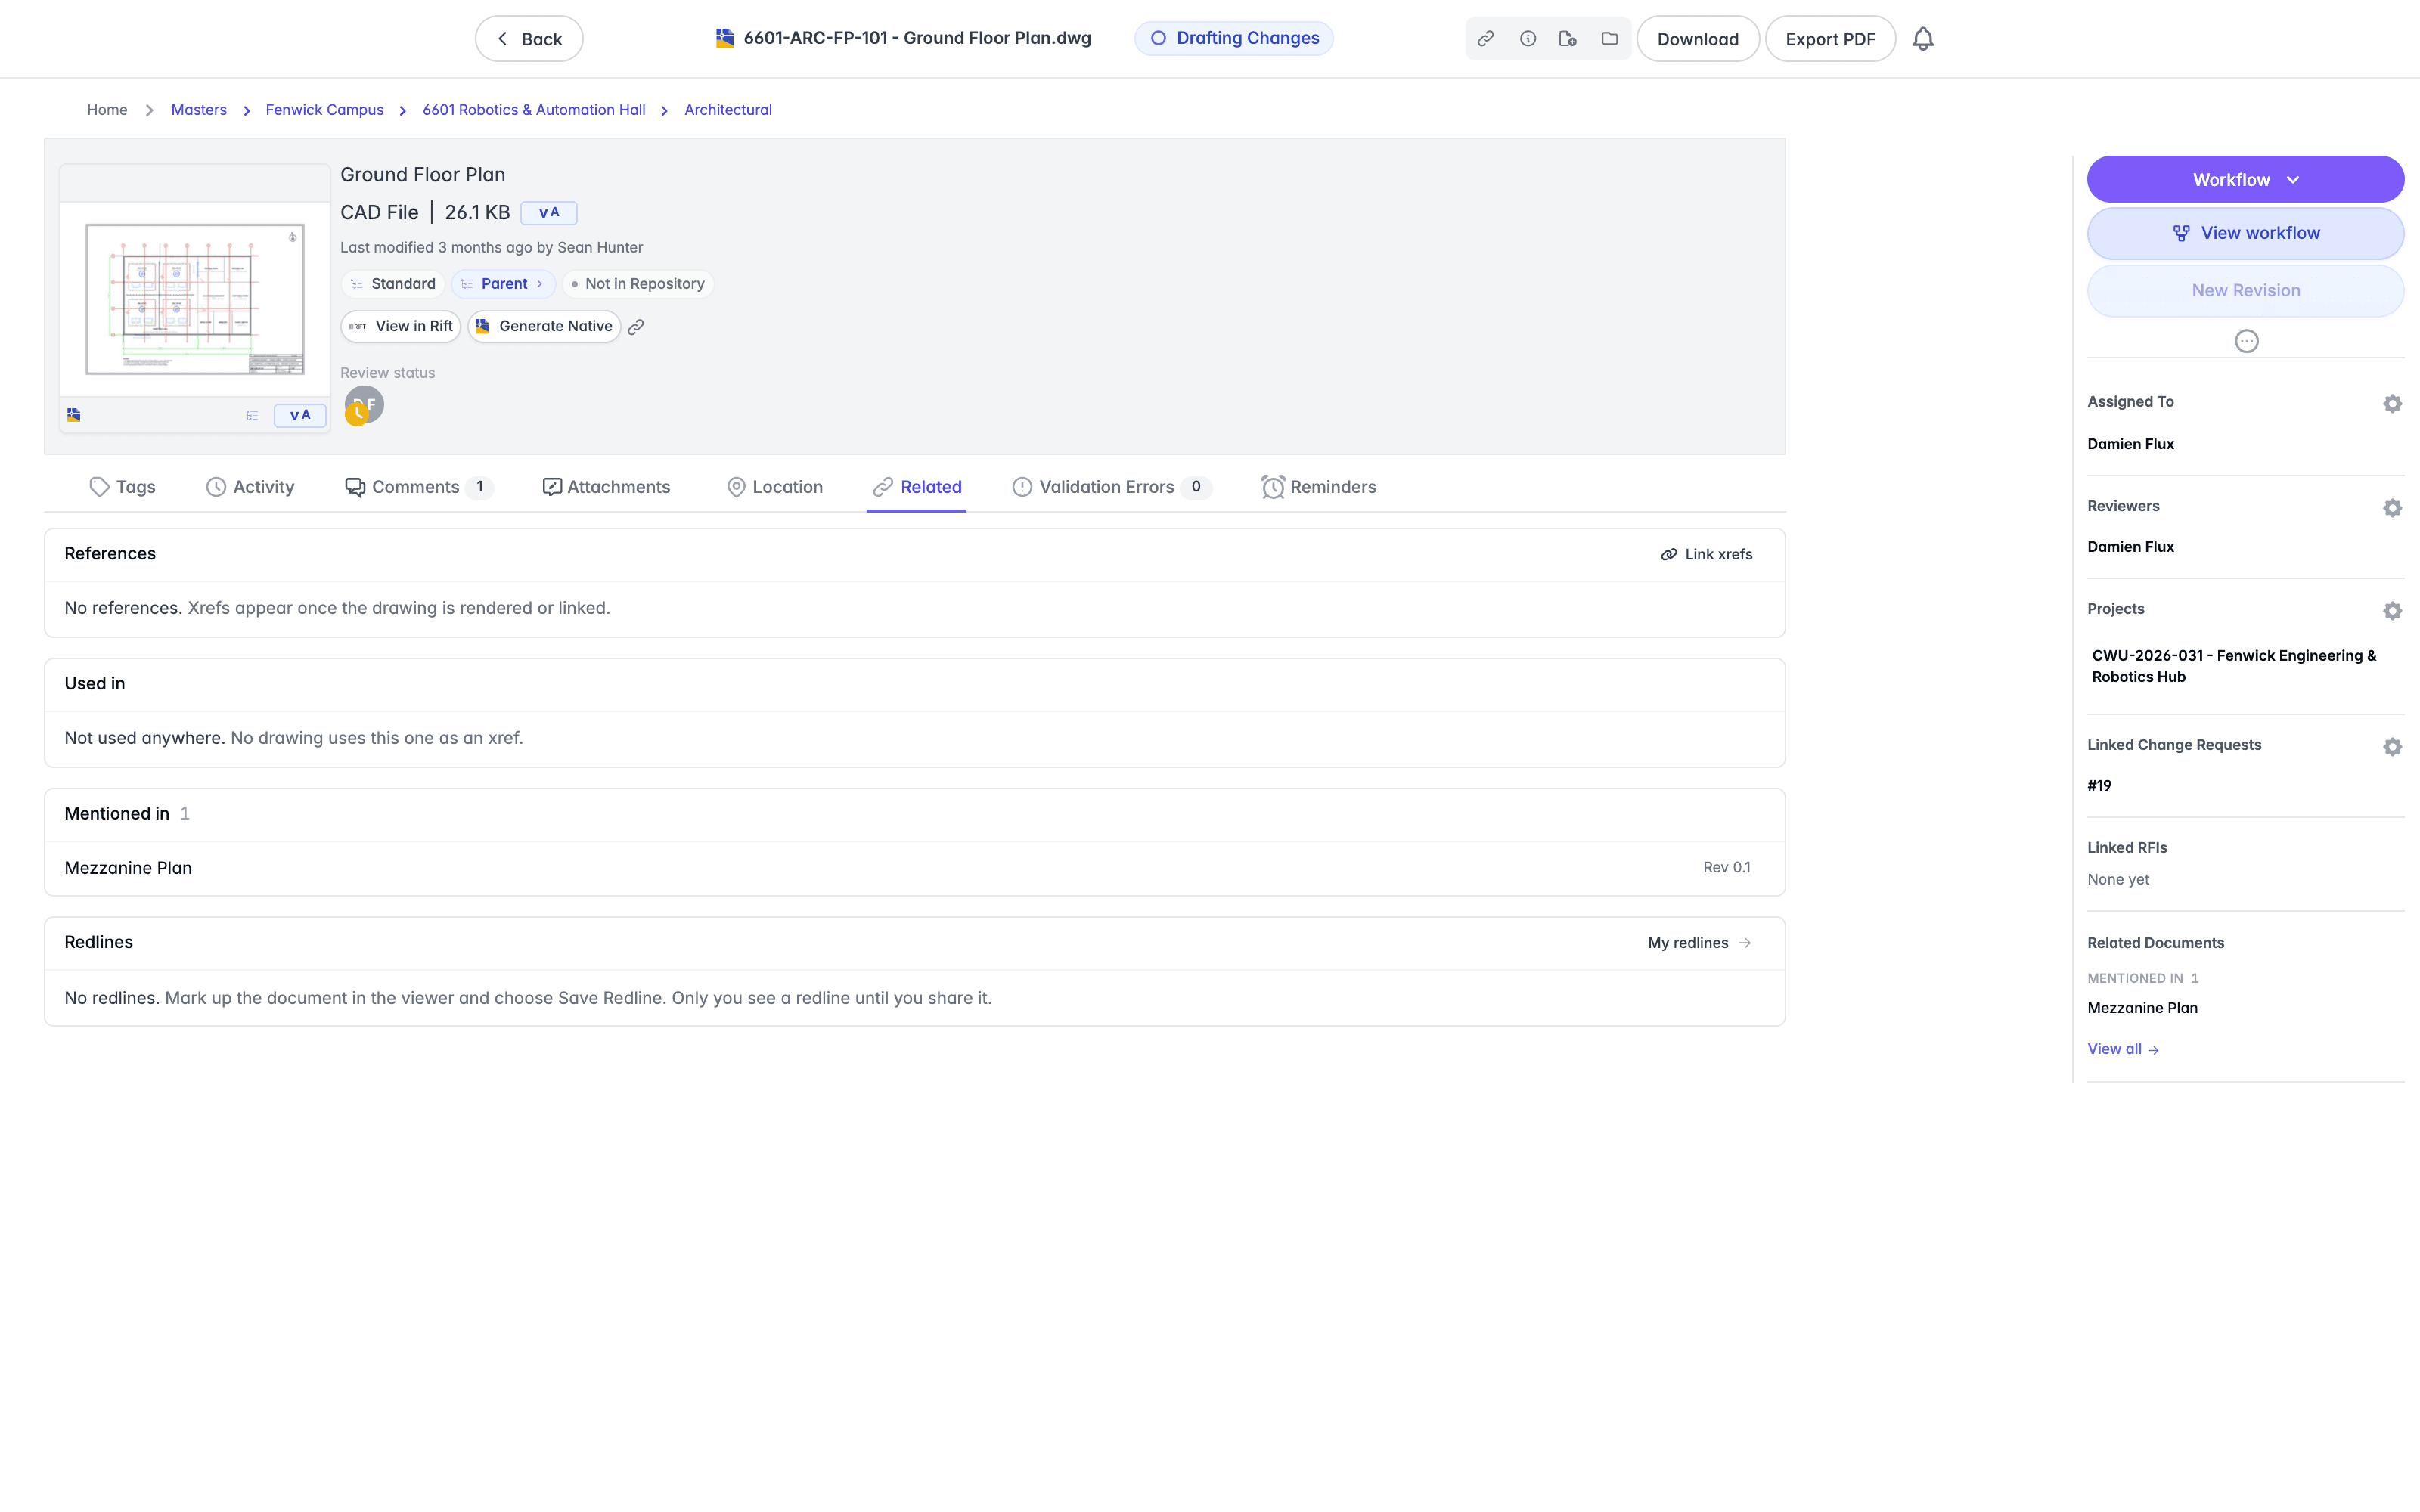
To update the References list, select the document in the repository or a project, then choose Link Xrefs from the Cross-references group of the More menu, covered in Document Actions. On a DWG, the Link xrefs button in the References section does the same, and is not available to everyone.
To remove an xref, select the trash icon at the end of its row, or select Remove all, which appears when there is more than one reference, to remove every xref from the drawing. Both are limited to administrators and ask you to confirm, because Lunr regenerates the drawing's rendition without the xref.
Related Documents Panel
The Related Documents panel on the right of the document page is a compact version of the Related tab. It groups the document's References, Used in, one group for each link type, and Redlines, and a View all link opens the Related tab. A document with nothing related reads "None yet". The panel appears only where the document has something related, your organisation has set up link types, or personal redlines are enabled. It is hidden for redlines, archived documents, and deleted documents.
View all appears only when something is related. Each group shows its first five rows, with a "Show N more" link for the rest, and the Redlines group appears only when the document has redlines. An outdated reference shows an amber Rev marker rather than a Newer revision badge.
Linking Documents
A link ties two documents that belong together, such as an approval PDF and the drawing it approves, so that workflows can copy tags between them. Each link has a link type, which your administrator sets up and which names the relationship.
To add a link, select Add link in the Links section of the Related tab, or the plus button in the Related Documents panel. It appears only where at least one link type is available to the document and you are allowed to edit documents or tags.
- In the Link a document dialog, choose a link type from the Link type dropdown list. A type the document already uses reads "(already linked)" and cannot be chosen. Where only one type is available, Lunr selects it for you, hides the dropdown list, and the dialog reads "will be linked as" followed by the type.
- Choose the other document. Before you search, the list is headed Suggested and offers documents from the same folders whose names start the same way, with a Best match badge on the one that shares the most of its file name. To look elsewhere, enter at least two characters of a file name or title in the search field, and the list is headed Results and shows the top ten matches. Link stays unavailable until you choose a document.
- Select Link. A message reads "Document linked."
Where nothing in the same folders matches, the list reads "Nothing in the same folders starts with the same name. Search for the document instead."
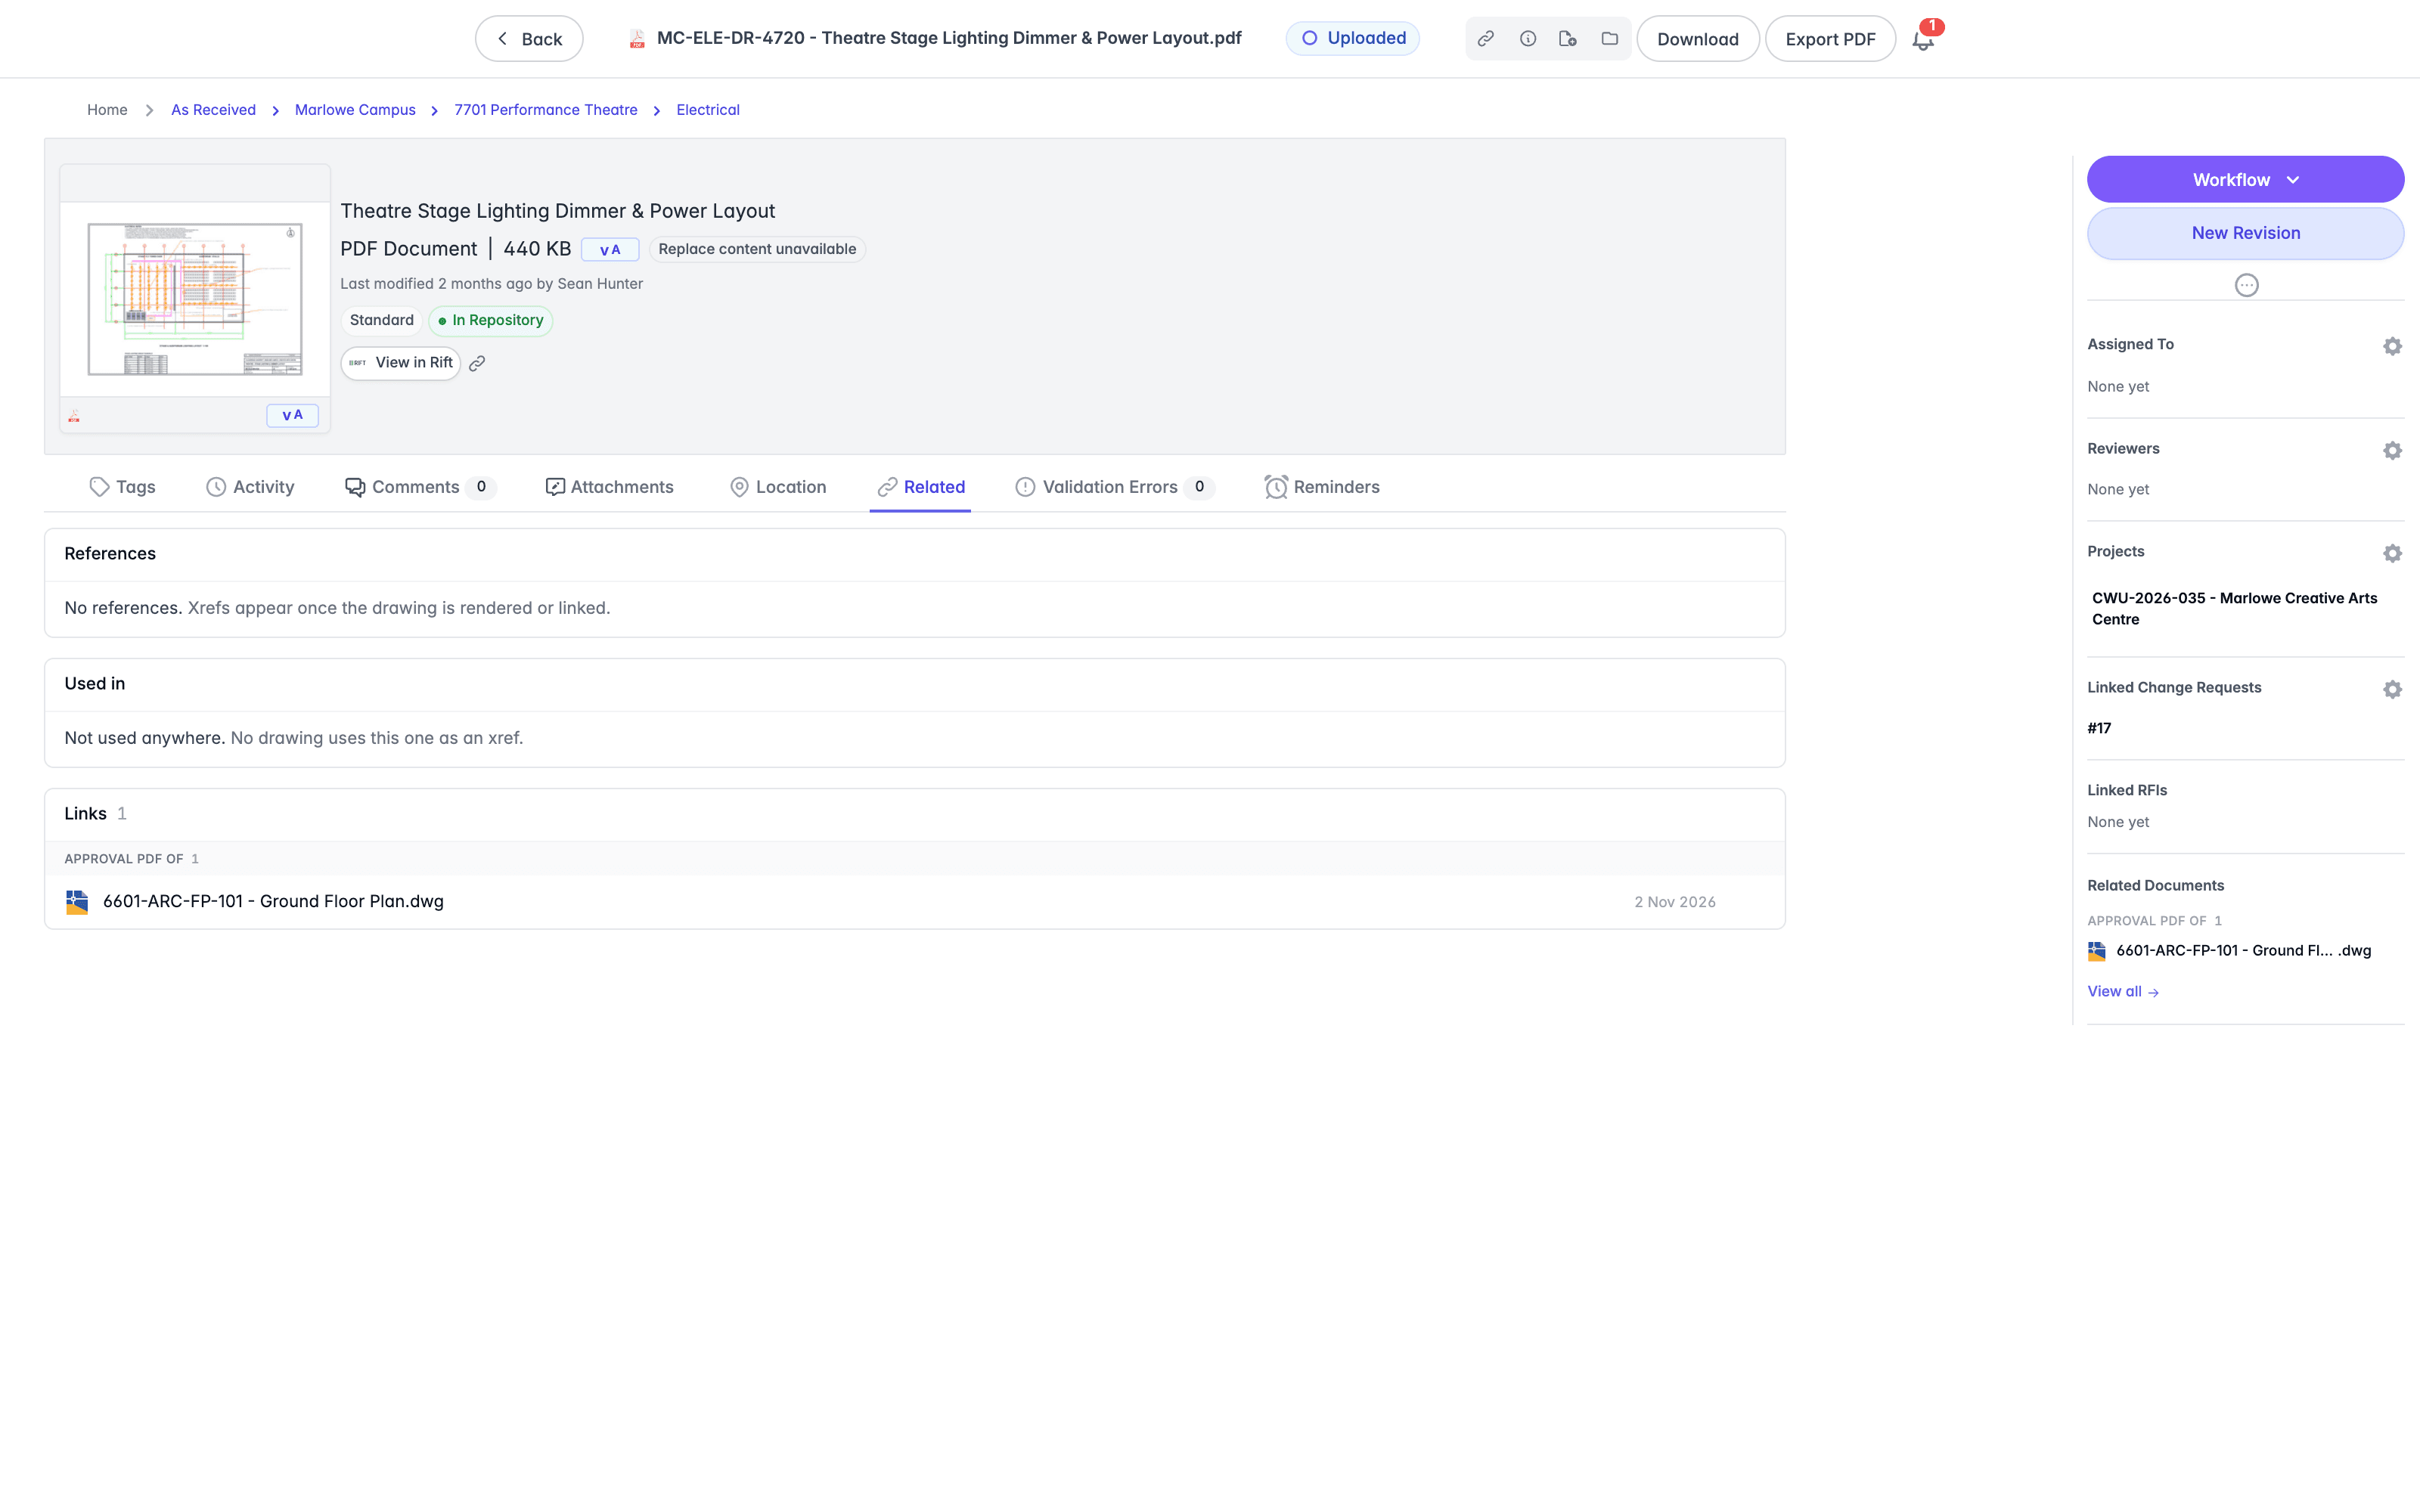
The Links section groups links under a heading that names the link type, with a count. On the document that holds the link, the heading reads, for example, "Approval PDF of", and each row lists the other file. On the other document, the heading reads "Approval PDF of this document". On the Related tab, each row also shows the date the link was created.
To remove a link, select the remove icon at the end of its row, then confirm. Neither document changes, and only the link between them is removed.
Validation Errors
Lunr checks a document against your organisation's validation rules, and the Validation Errors tab reports the result. The tab carries a count, so a badge reading 0 tells you the document is clean without opening it.
With nothing outstanding the tab reads "Compliant" and "This document is compliant with the Lunr validation rules."
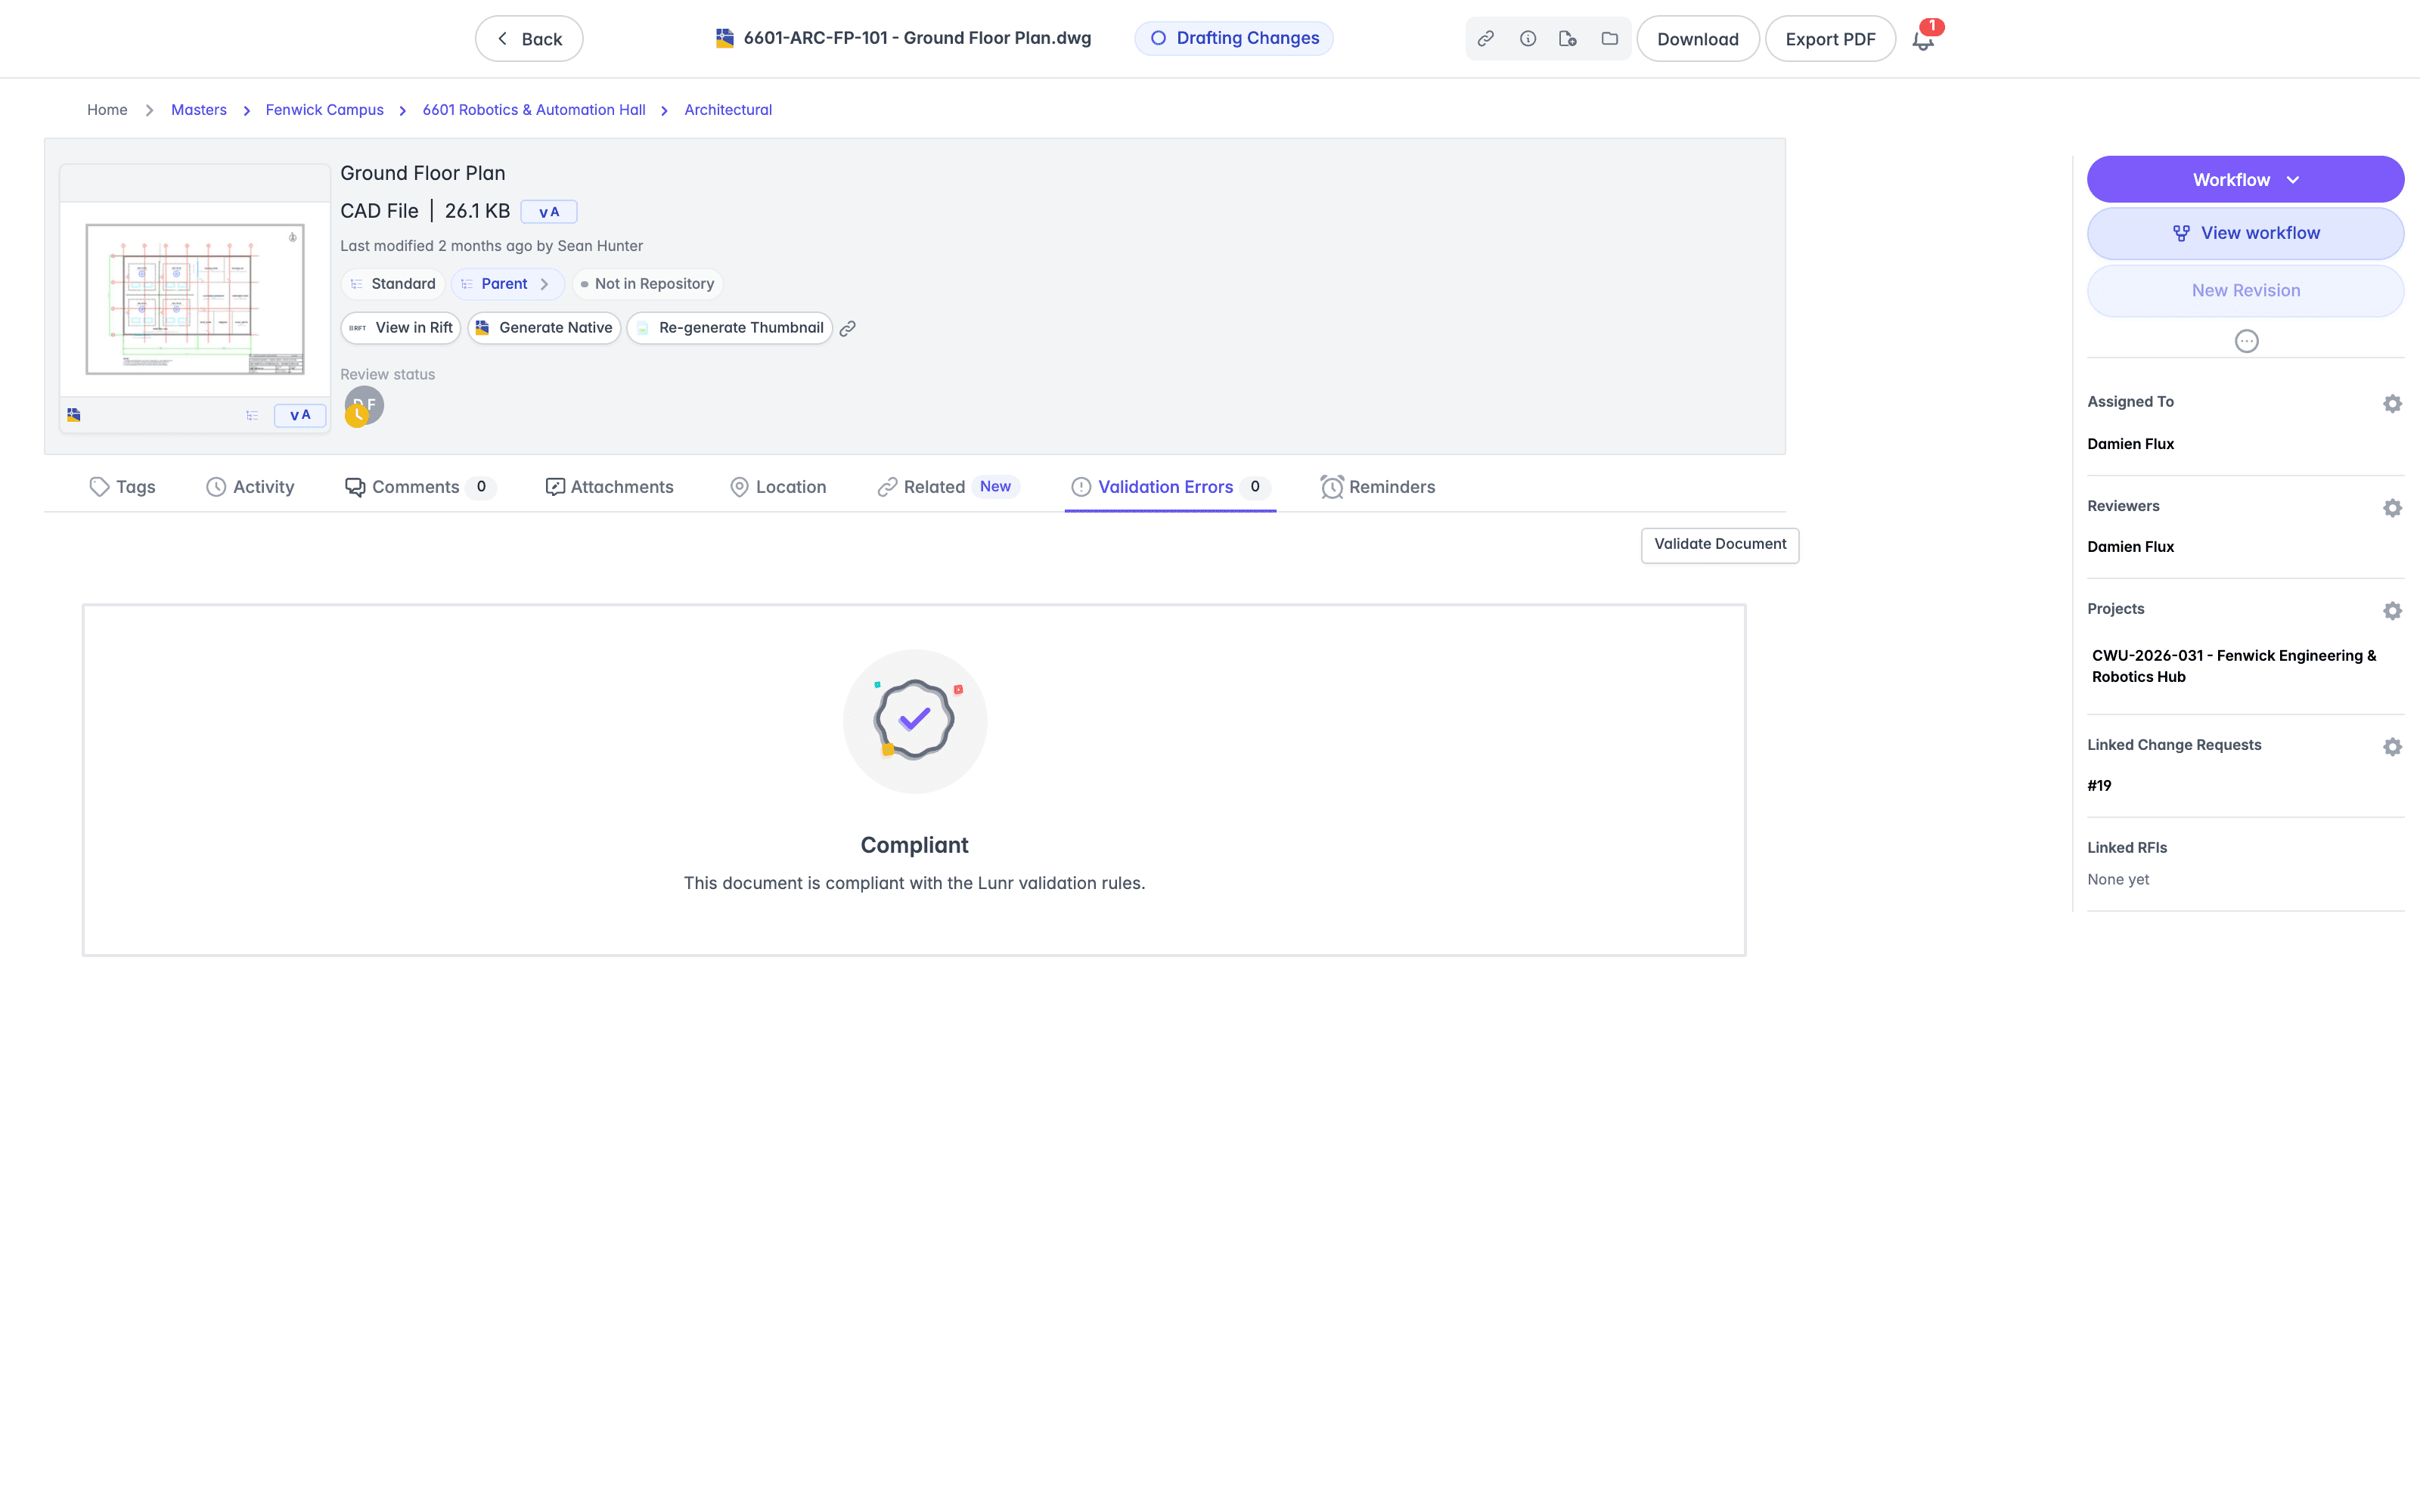
Where a document falls short, each issue is listed against the tag it concerns. An issue with no explanation of its own reads "Please supply a valid" followed by the name of the tag that needs a value.
Validate Document runs the checks again, for example after you supply a missing tag value. Dismiss All clears the outstanding issues. It appears only for people who can release documents as master, when there are issues to clear, and asks you to confirm because the dismissal is permanent. To clear them across several documents at once, select the documents and choose Dismiss Validation Issues from the Archive & Delete group of the More menu, covered in Document Actions.
Reminders
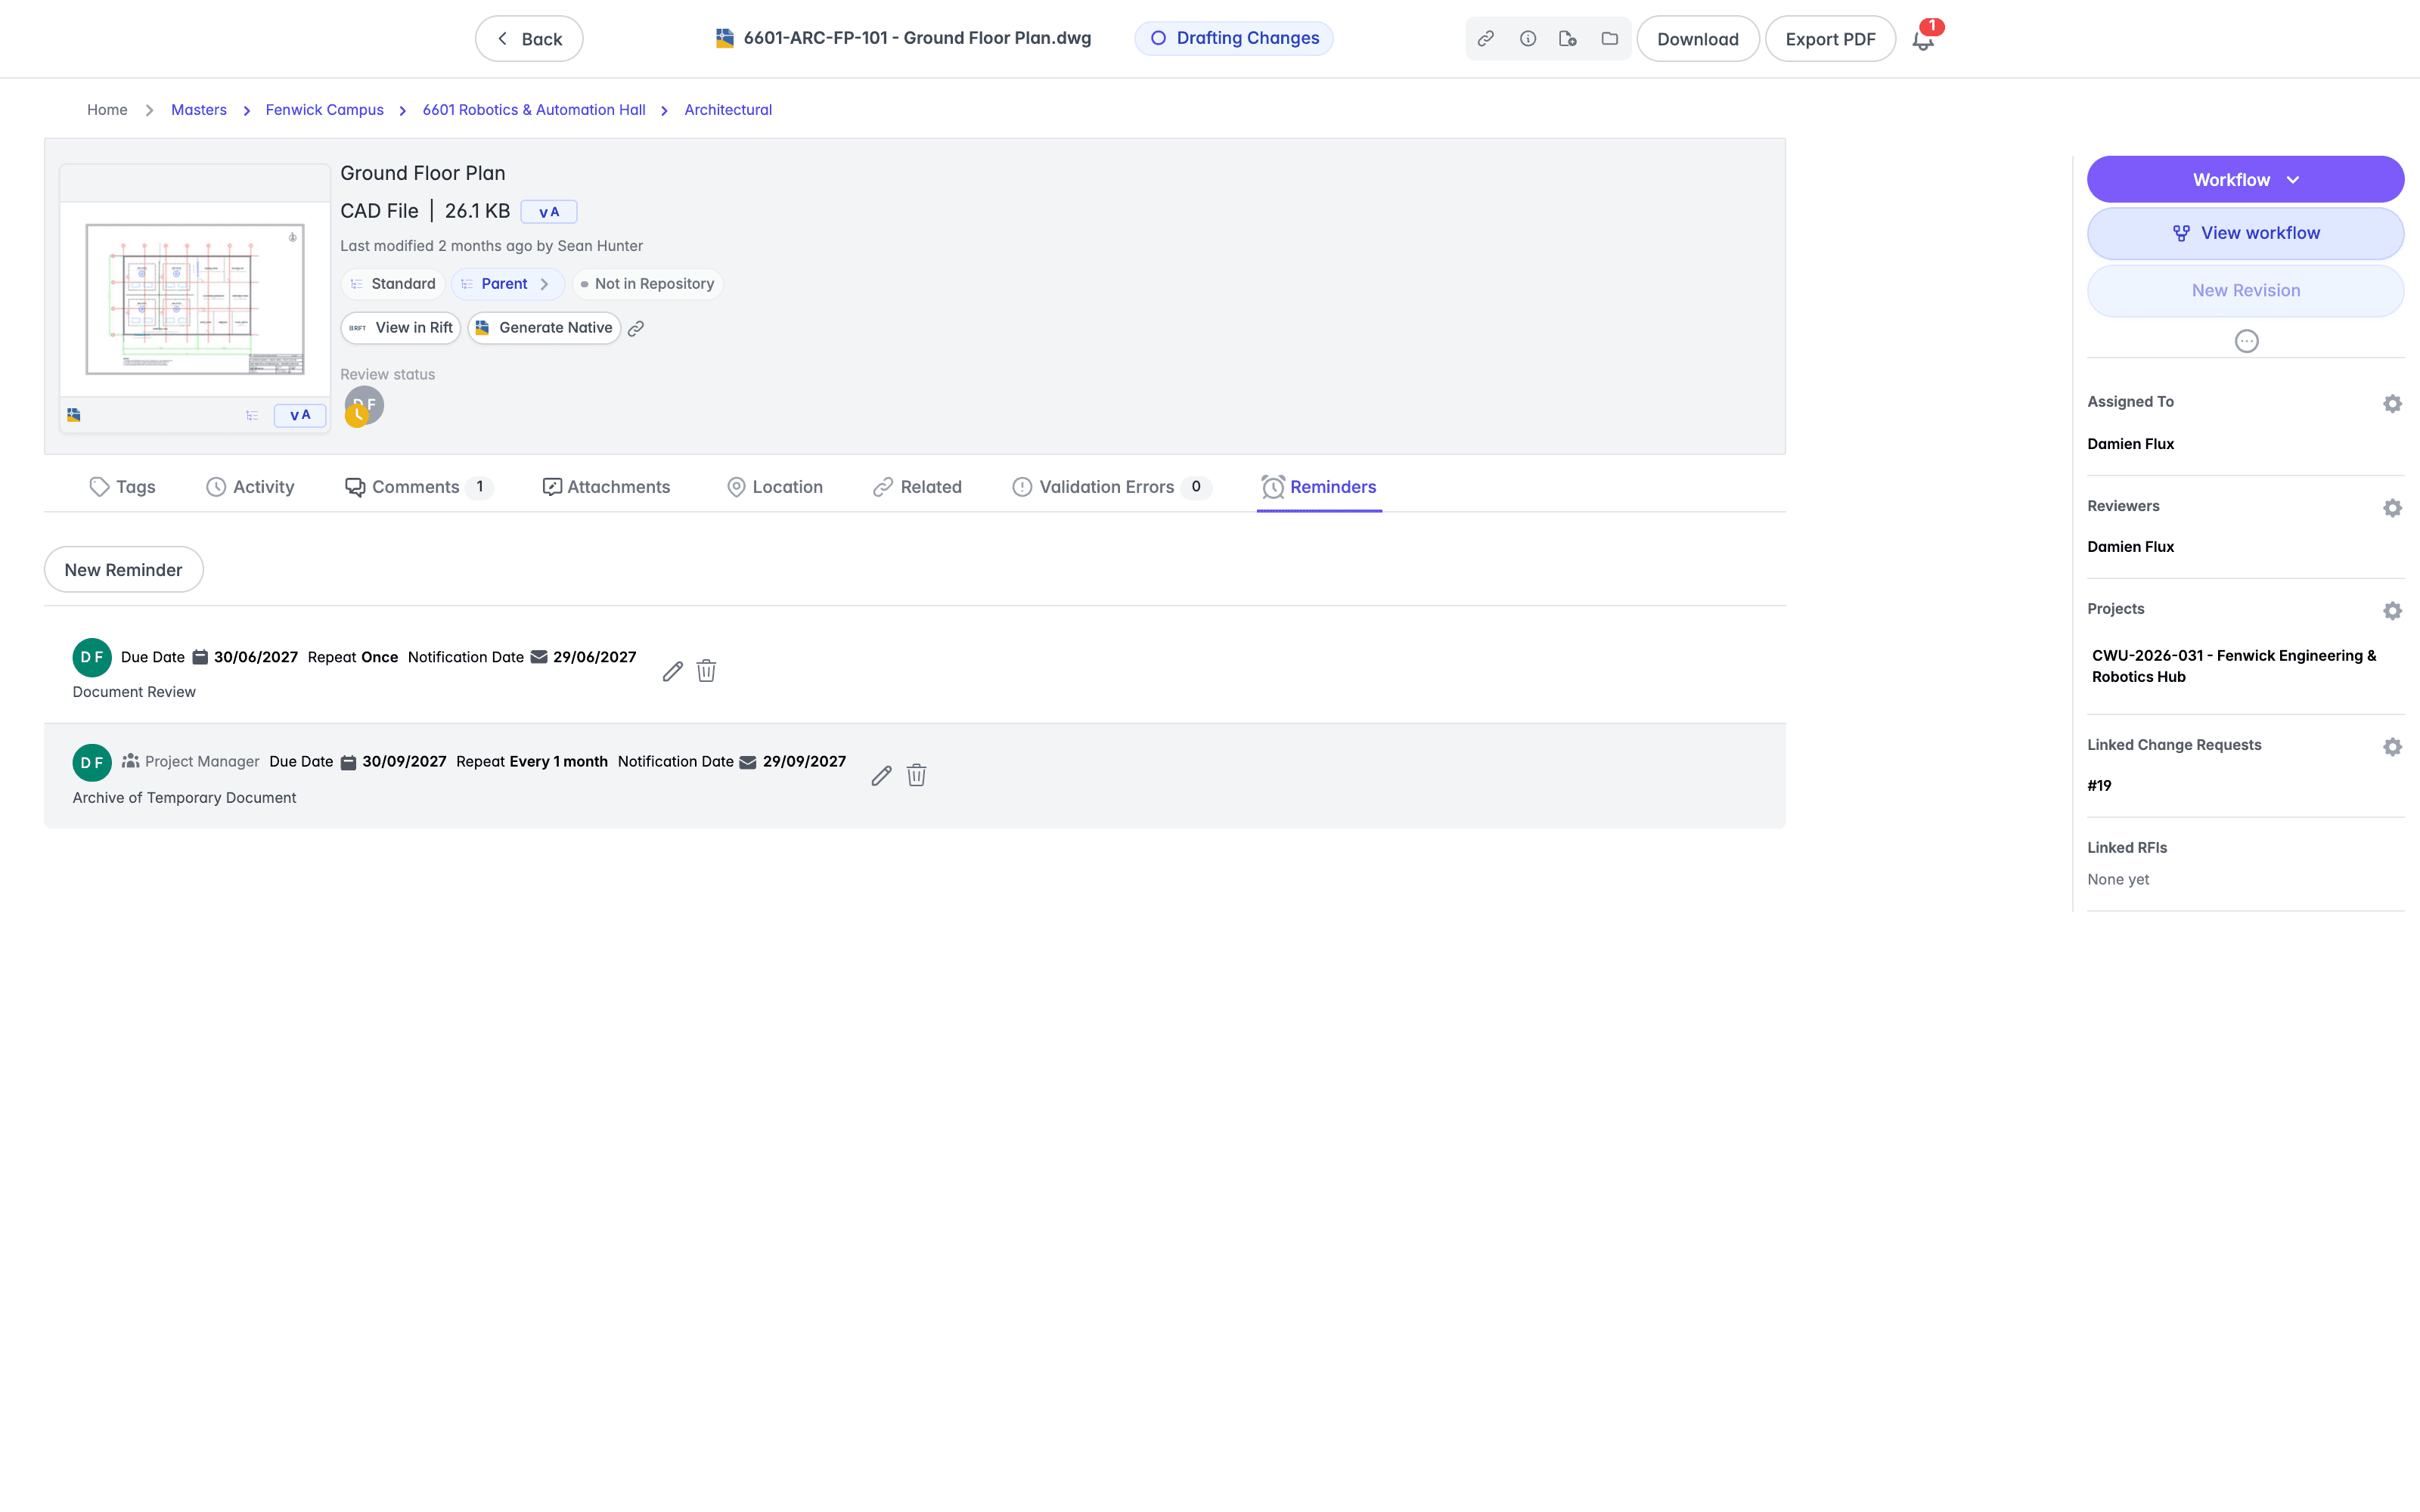
Where reminders are available, a Reminders tab lists the reminders set against this document. Select New Reminder to add one.
The New Reminder dialog asks for a Due Date, a Comment, and who the reminder is for. The Due Date can be no earlier than tomorrow, and Comment is a dropdown list of standard reasons, where Other… lets you type your own. Add people under Users and groups under Groups, using the add icon beside each. To make the reminder recur, select Repeat, then enter a number from 1 to 365 under Every and choose days, weeks, or months. Select Create to add the reminder.
Each entry shows the people the reminder is for as avatars, and any groups by name, then its Due Date, its Notification Date, the date Lunr emails about it, and Repeat, which reads "Once" for a single reminder or, for example, "Every 2 weeks", with the reminder's comment beneath. An edit and a remove icon sit at the end of the row, with the tooltips Edit reminder and Remove reminder. Editing is available only if you are allowed to change that reminder.
With none set, the tab reads "Reminders" and "No reminders have been added to this document."
For the list of every reminder waiting on you, across all documents, see My Reminders.
Viewing Document Content
Select a document's thumbnail to open it in the viewer. The viewer's tools depend on the type of document, covered in Viewing PDF Documents, Viewing Word Documents, Viewing Excel Spreadsheets, Viewing BIM Models, Viewing CAD Models and Assemblies, Viewing Point Clouds, and Viewing Video Files.
Printing Documents
For best print results, download the document and print it with your preferred PDF viewer, like Adobe Acrobat Reader.
Printing From the Viewer
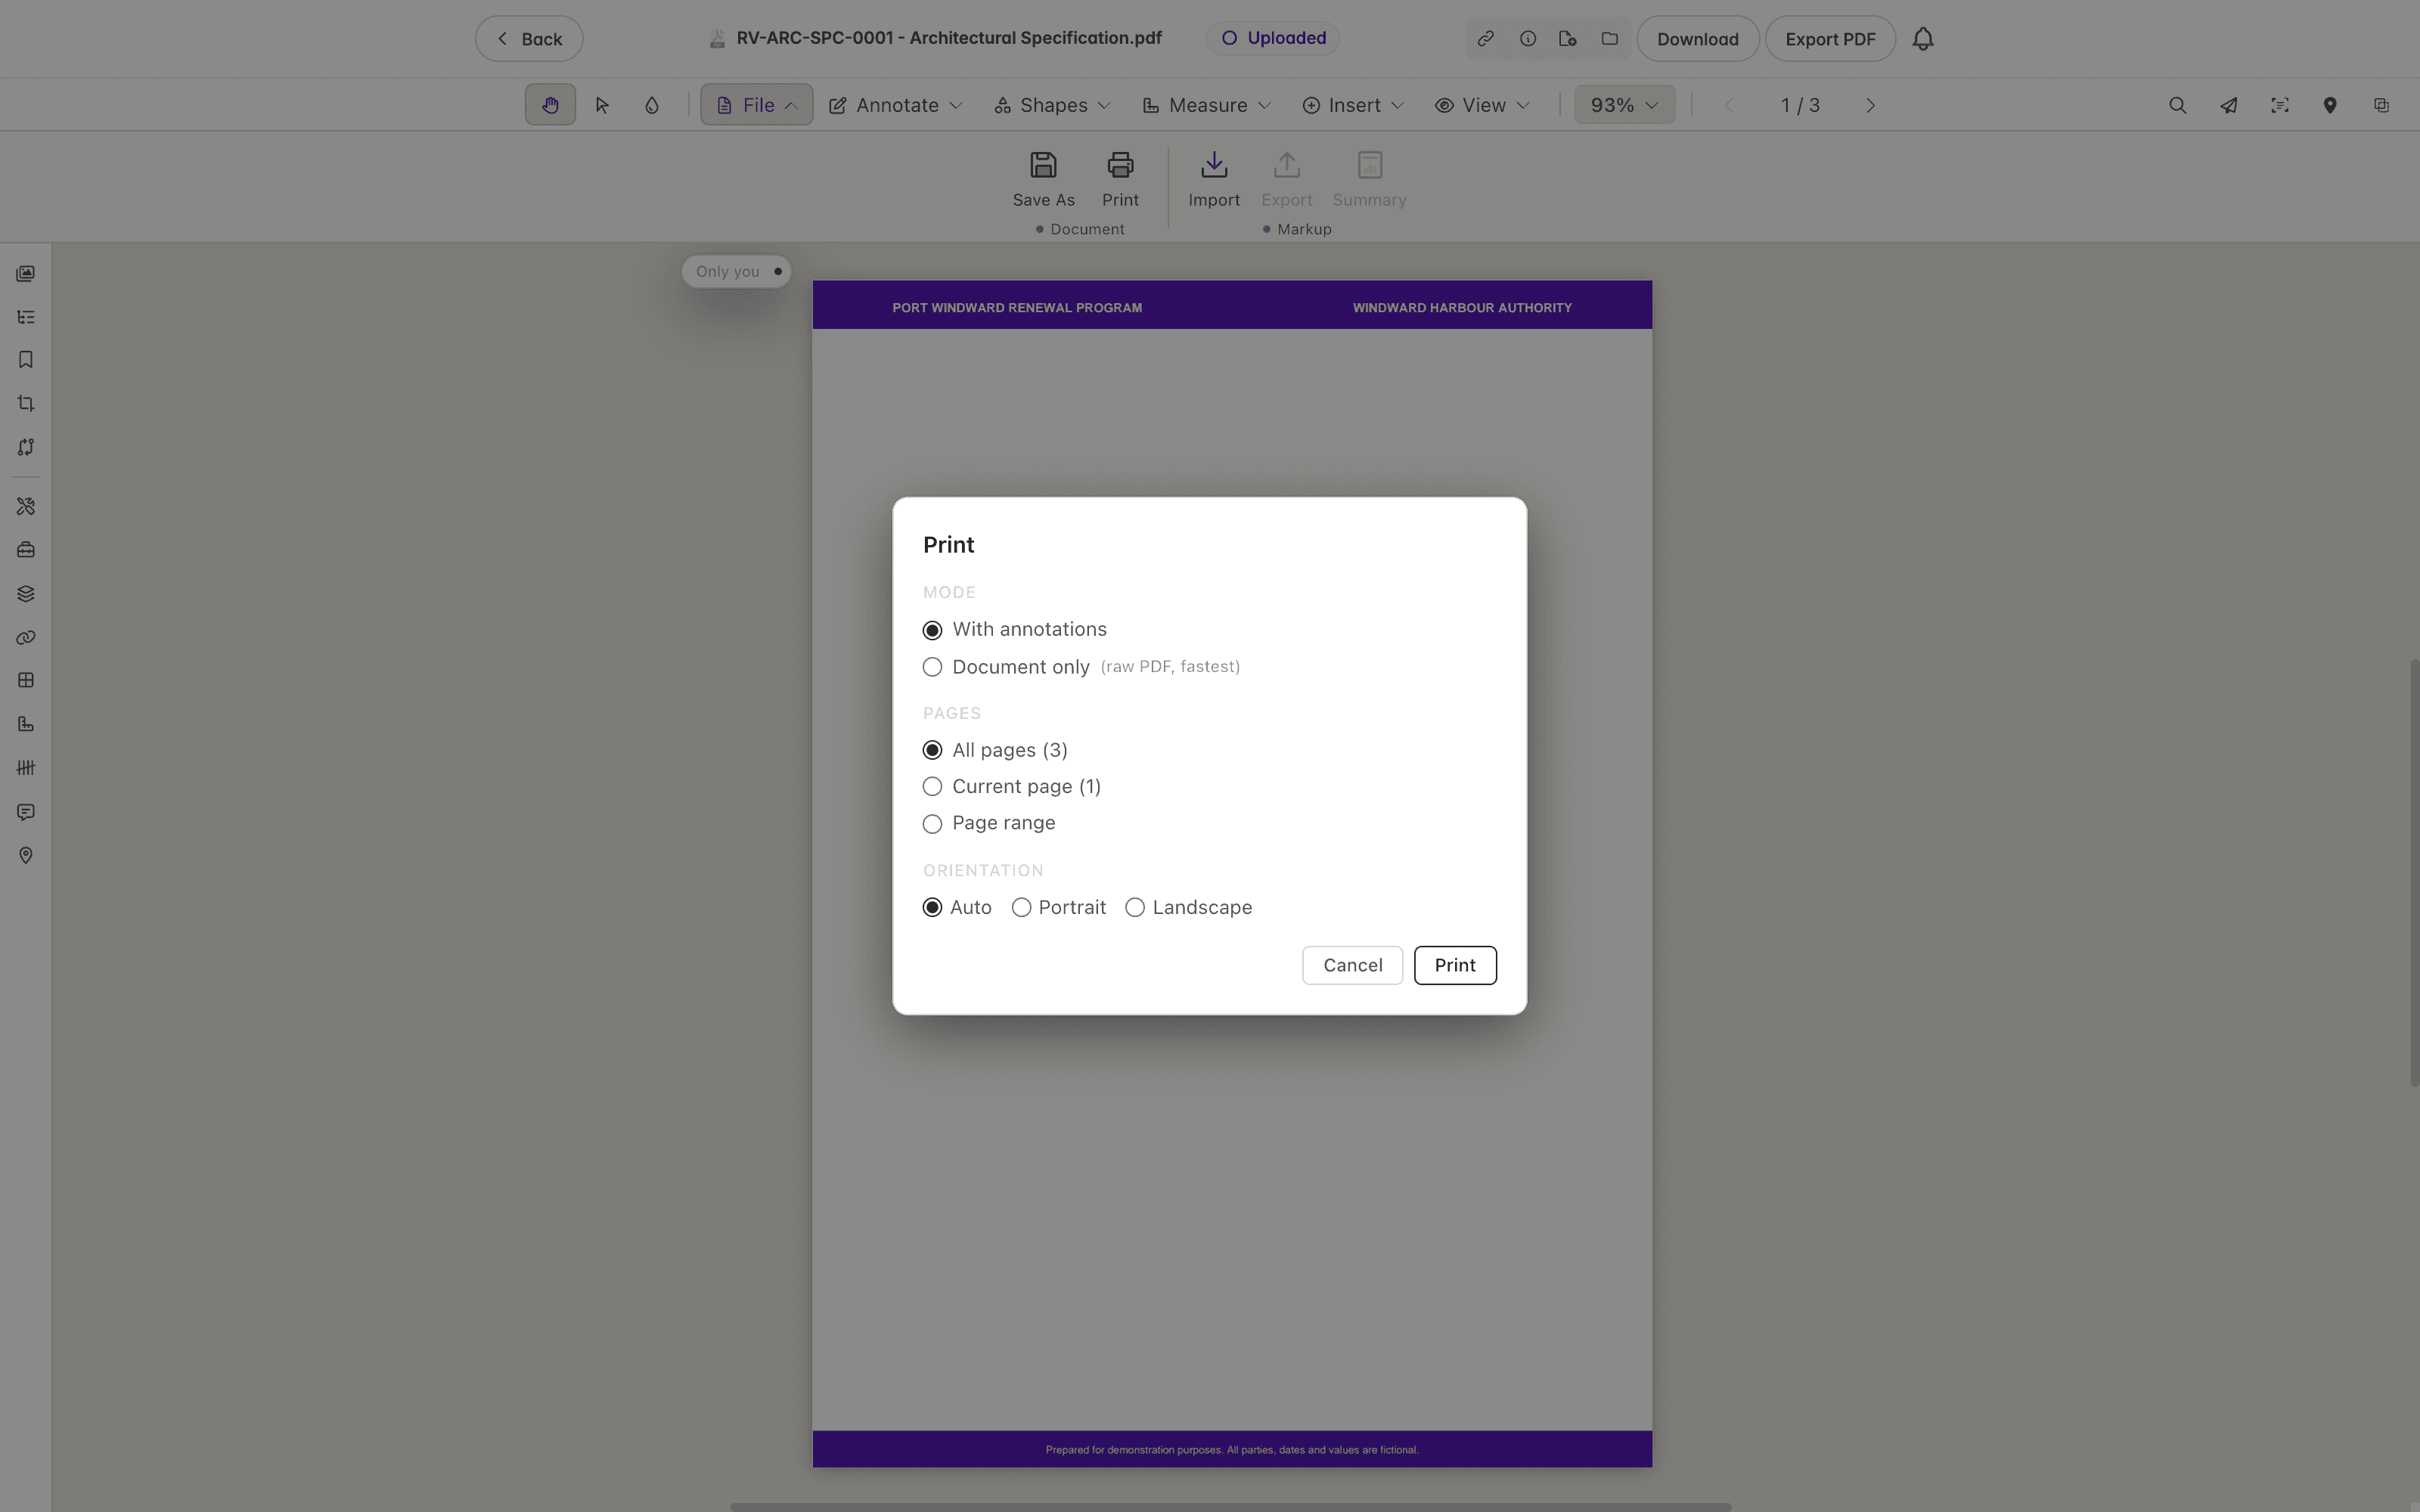
To print directly from Lunr, open the document in the Rift viewer, open the File ribbon, and select Print. The Print dialog offers three choices:
- Mode: select With annotations or Document only (raw PDF, fastest). With annotations rasterises the page in the browser and is needed when annotations or stamps must print. Document only sends the original PDF to the print driver for the highest quality but without annotations or stamps.
- Pages: select All pages, Current page, or a Page range.
- Orientation: select Auto, Portrait, or Landscape.
Select Cancel to close the dialog, or Print to continue.
Troubleshooting
| Message or Symptom | Likely Cause | Resolution |
|---|---|---|
| The PDF toolbar has no Save button. | You have not been allowed to mark up documents, or the viewer is in read-only mode. | Ask your administrator to allow you to mark up documents; mark-ups cannot be saved without it. |
| An Unsaved Annotations prompt appears when you leave the PDF viewer. | Your latest annotation changes have not finished saving, or the last save failed. | Select Stay on Page and let the save finish. If it failed, select the save icon in the viewer toolbar to try again. Leave Anyway discards the changes. |
| "Failed to load rendition. Invalid file." | The rendition could not be loaded for this version. | Confirm the source file is valid; re-upload or regenerate the rendition. |
| "Generating document preview. Try back later." | The document is still queued for rendition generation. | Wait a few minutes and try again. |
| View in Rift button is missing | The Rift viewer is not available to your organisation. | Ask your administrator whether the Rift viewer can be made available. |
| View in Forge button is missing | The button appears only for Revit and Navisworks models. The Forge viewer may not be available to your organisation, or the model has not been prepared for it. | Ask your administrator, and check that the file is a Revit or Navisworks model. |
| Compare Documents is greyed out or hidden. | You have not selected exactly two (non-folder) documents. | Select precisely two documents to compare them. |
| "OUTDATED RENDITION" watermark is displayed. | The rendition is out of date. | Regenerate the rendition to clear the watermark. |
Downloading
Download native documents and PDF renditions individually or as packages, understand the PDF Export options, track packages on the My Downloads page, and know the permissions, retention, and limits that apply.
Comparing Documents
Compare two documents, or two revisions of one document, in Lunr to see what changed, with side by side, overlay, and pixel diff views in the Rift viewer, a Changes panel, and downloadable comparisons and summaries.