Working in a Project
Open a project and work in it, covering the tabs it offers, the Action Pane, project folders, and subscribing to a project.
Select a project's number or name to open it. The header reads, for example, "Project - CWU-2026-031 - Fenwick Engineering & Robotics Hub #8": the word "Project", the project number, the project name, and the internal ID prefixed with a hash. Below the title sits the description; select Edit to turn it into an editable field with Cancel and Save buttons. Beside it, a Members label with an avatar stack and a gear icon opens the Project Members popover, covered in Project Members and Access. If the project is a template, archived, or deleted, a badge for each appears in the header.
A project opens on a row of tabs that varies with your organisation's settings. Documents and Activity always appear, as does Change Requests, though your organisation can choose to put Change Requests first instead of Documents. Document Number Requests appears if you hold the View DNRs access right, Overview appears when the project dashboard is enabled, RFIs appears when RFIs are enabled, Transmittals appears when transmittals are enabled, and Checklist appears when checklists are enabled.
The Action Pane
A panel of actions sits to the right of every project page. At the project root, it offers a Create dropdown for an RFI, an AutoCAD Drawing, an Image, a Microsoft Excel, PowerPoint, or Word document, a MicroStation Drawing, or Multiple documents at once, followed by New RFI and New Change Request. Below that sit the Project Manager and Document Controller names and avatars, then Document Workflow (greyed out until you select one or more documents), Generate QR, Export to Excel, Create Folder, Role Access, and a More menu.
Open a folder and the panel adds Settings, Share folder, and Delete folder for that folder; see Project Folders below. If your organisation has subscriptions enabled, Subscribe or Unsubscribe also appears; see Subscribing to a Project below.
Select one or more documents and the panel switches to batch actions: Add to Collection, Assign to Project, Download, Export PDF, Export to Excel, Share, Update Tags, Document Workflow, Generate QR, Role Access, Discard from Project, and More. The list header shows a count, for example "Name (1 selected)", with Clear selection and Preview buttons.
Create Folder needs the Manage Projects access right and is hidden while documents are selected. Role Access needs the Administration Pages access right. Once a project is archived or deleted, an Archive & Delete group appears in the More menu with Unarchive or Undelete. Restoring a project opens a dialog titled "Unarchive Project" or "Undelete Project" with an optional "Create a role for this project" box. Archiving or deleting an active project is only possible from the projects list, not from inside the project; see Archiving or Deleting a Project.
Project Tabs
The sections below describe each tab in turn.
Documents
The Documents tab lists the project's documents using the repository's browsing tools. A "Filter documents" search field with a filter icon, alongside a Filter button, narrows the list, and Upload adds documents. Two toggles, Show my reviews only and Has queued items, refine it further, and a Sort By dropdown orders results by File Name, Date Created, or Queued Items, alongside an ascending and descending direction button and four view modes: list, thumbnails, cards, and table. A breadcrumb starting at Home shows where you are in the folder structure.
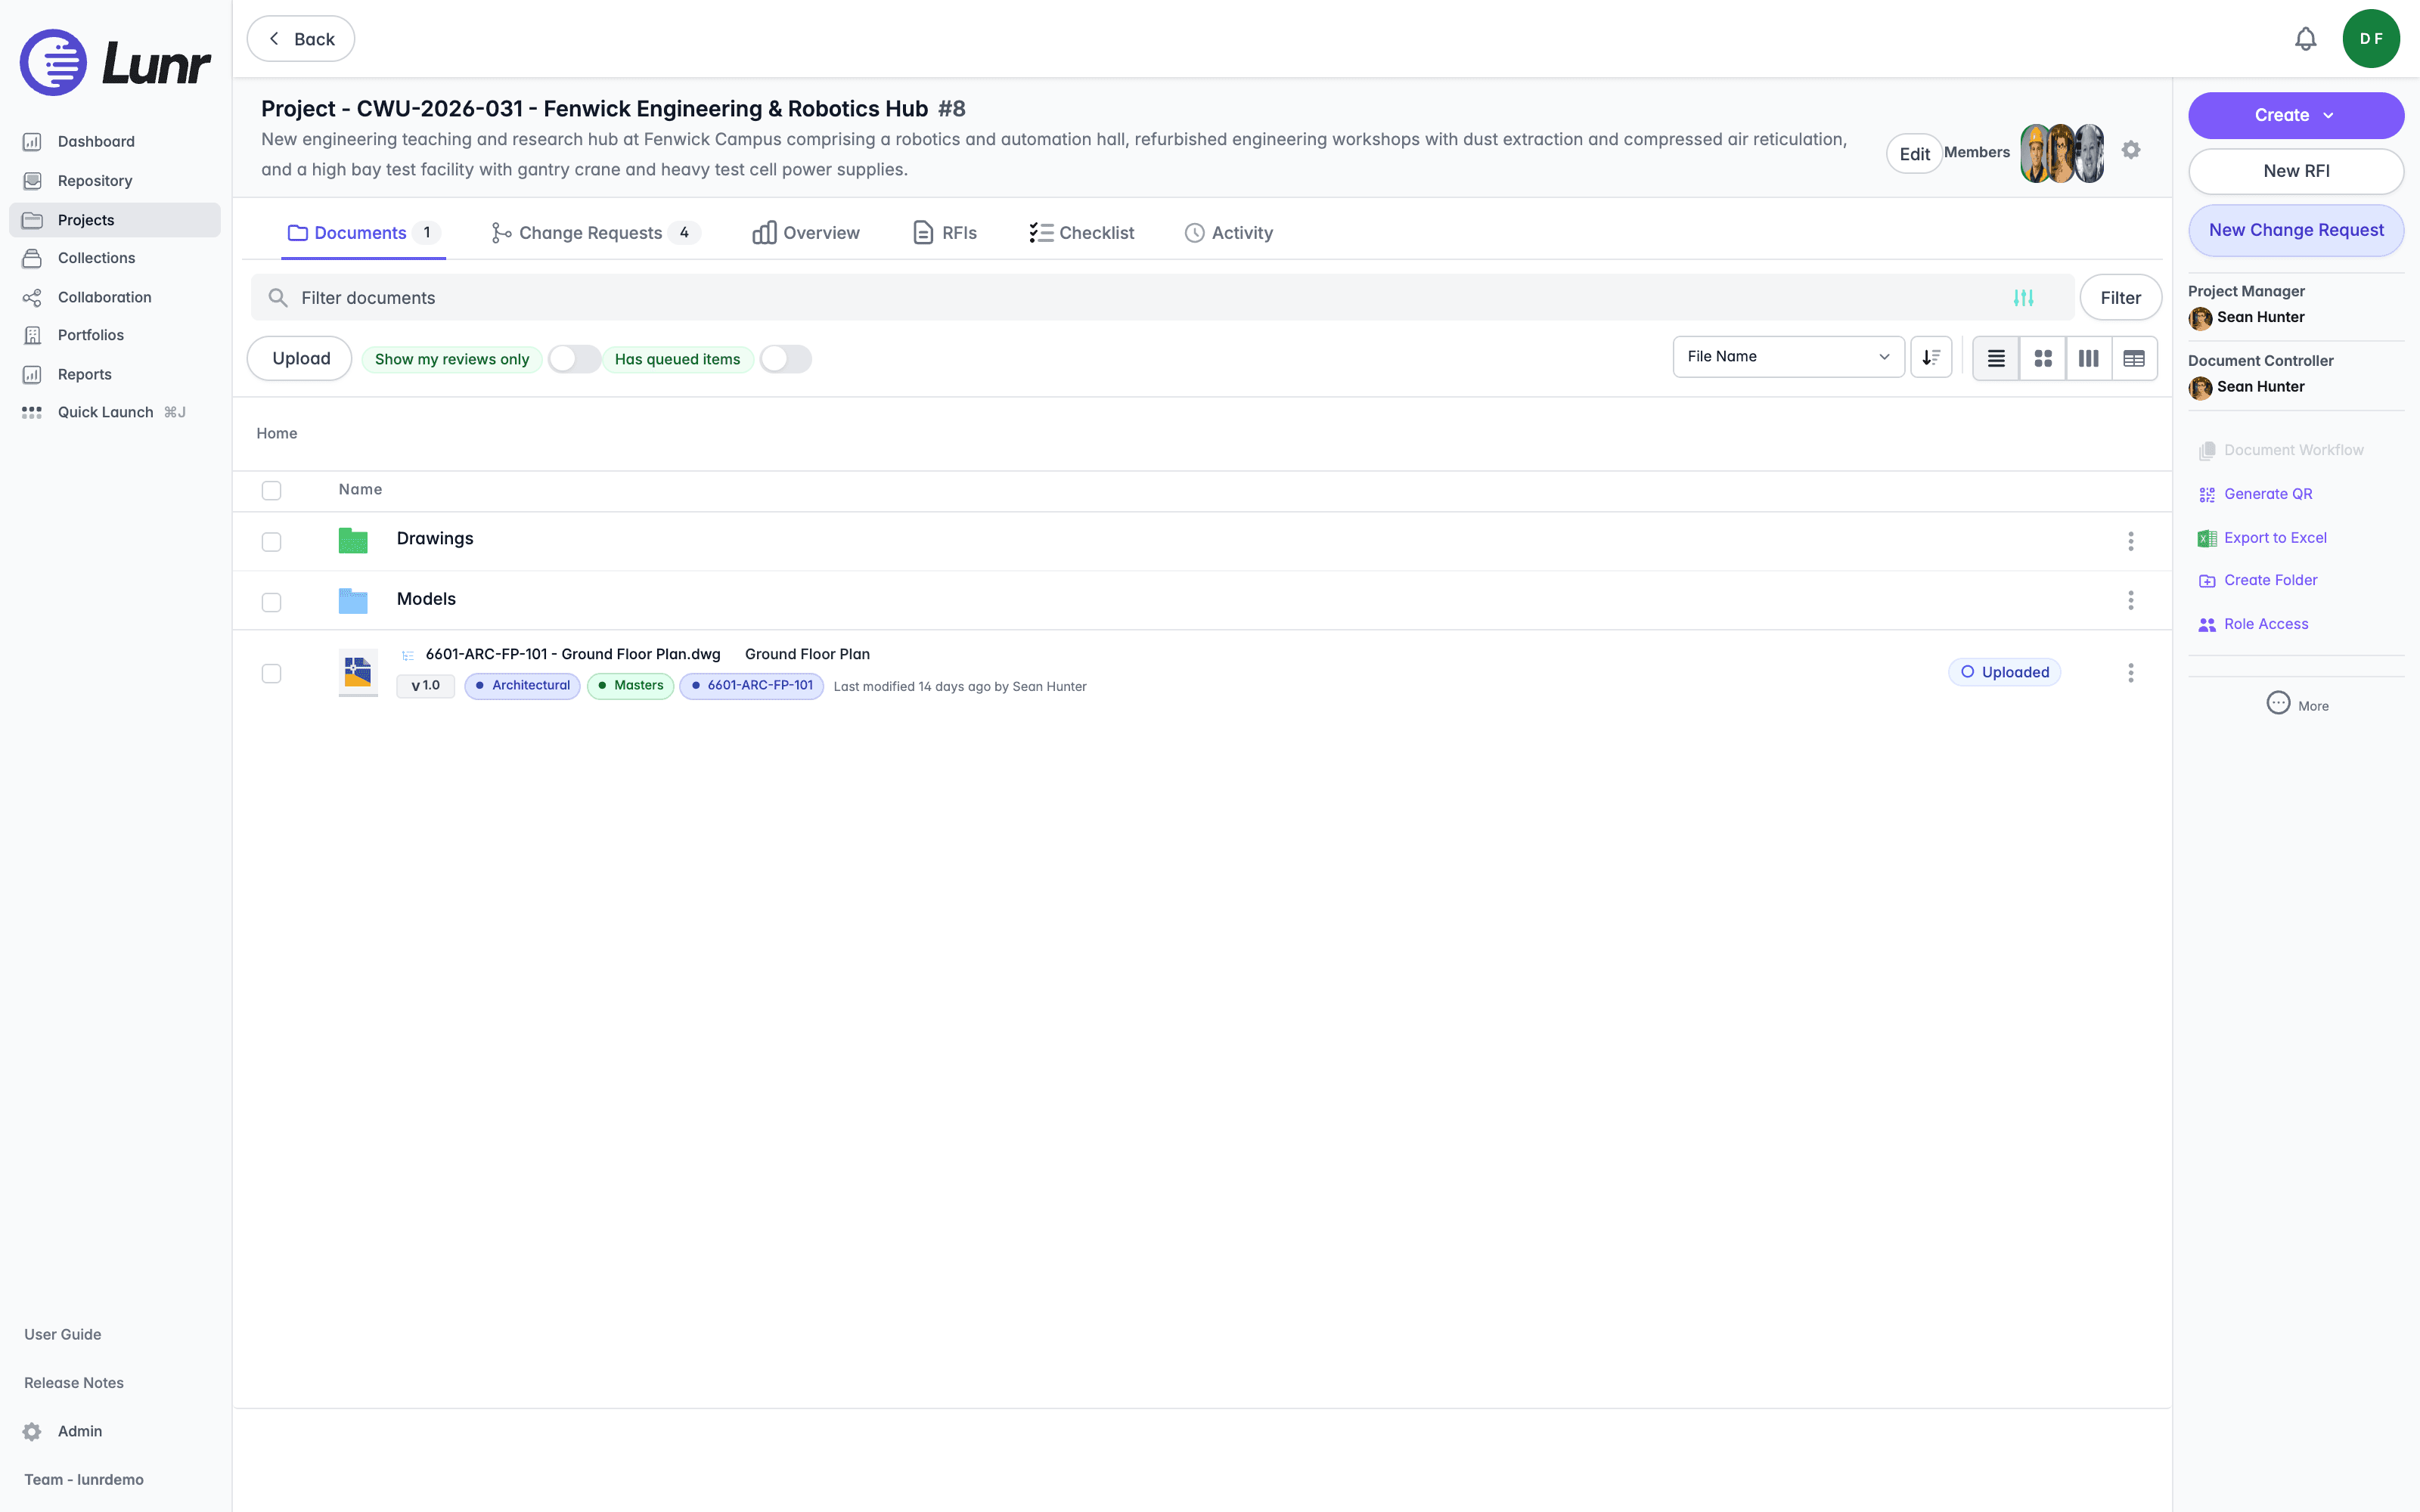
Each row carries a selection box, a folder or file-type icon, the document's name and title, a version badge, tag pills, "Last modified details", a status badge such as Uploaded or Master, and an Options menu, opened by selecting the three dots at the end of the row.
Select a document's name to open it, where its metadata, version history, and content are presented exactly as they are in the repository, covered in Viewing Documents.
Uploading into a project works exactly as it does in the repository. Select Upload to choose files, or drag them onto the page. Files pick up the tags of the folder you are in, and an upload whose name matches a document already there replaces that document's content rather than filing a second copy. See Uploading Documents for the full rules, the zip and spreadsheet prompts, and what to do about validation errors.
Use project folders, covered in Project Folders below, to group the documents within a project. Select one or more documents to switch the Action Pane to batch actions, covered in The Action Pane above.
Change Requests
The Change Requests tab lists the project's change requests. A "Search change requests" field, a Filter button, an "Open | Closed" summary, an Export button, and a Sort dropdown with a direction button help you find one. Select New Change Request in the Action Pane to raise one, and select the star on a row to favourite a change request you follow closely.
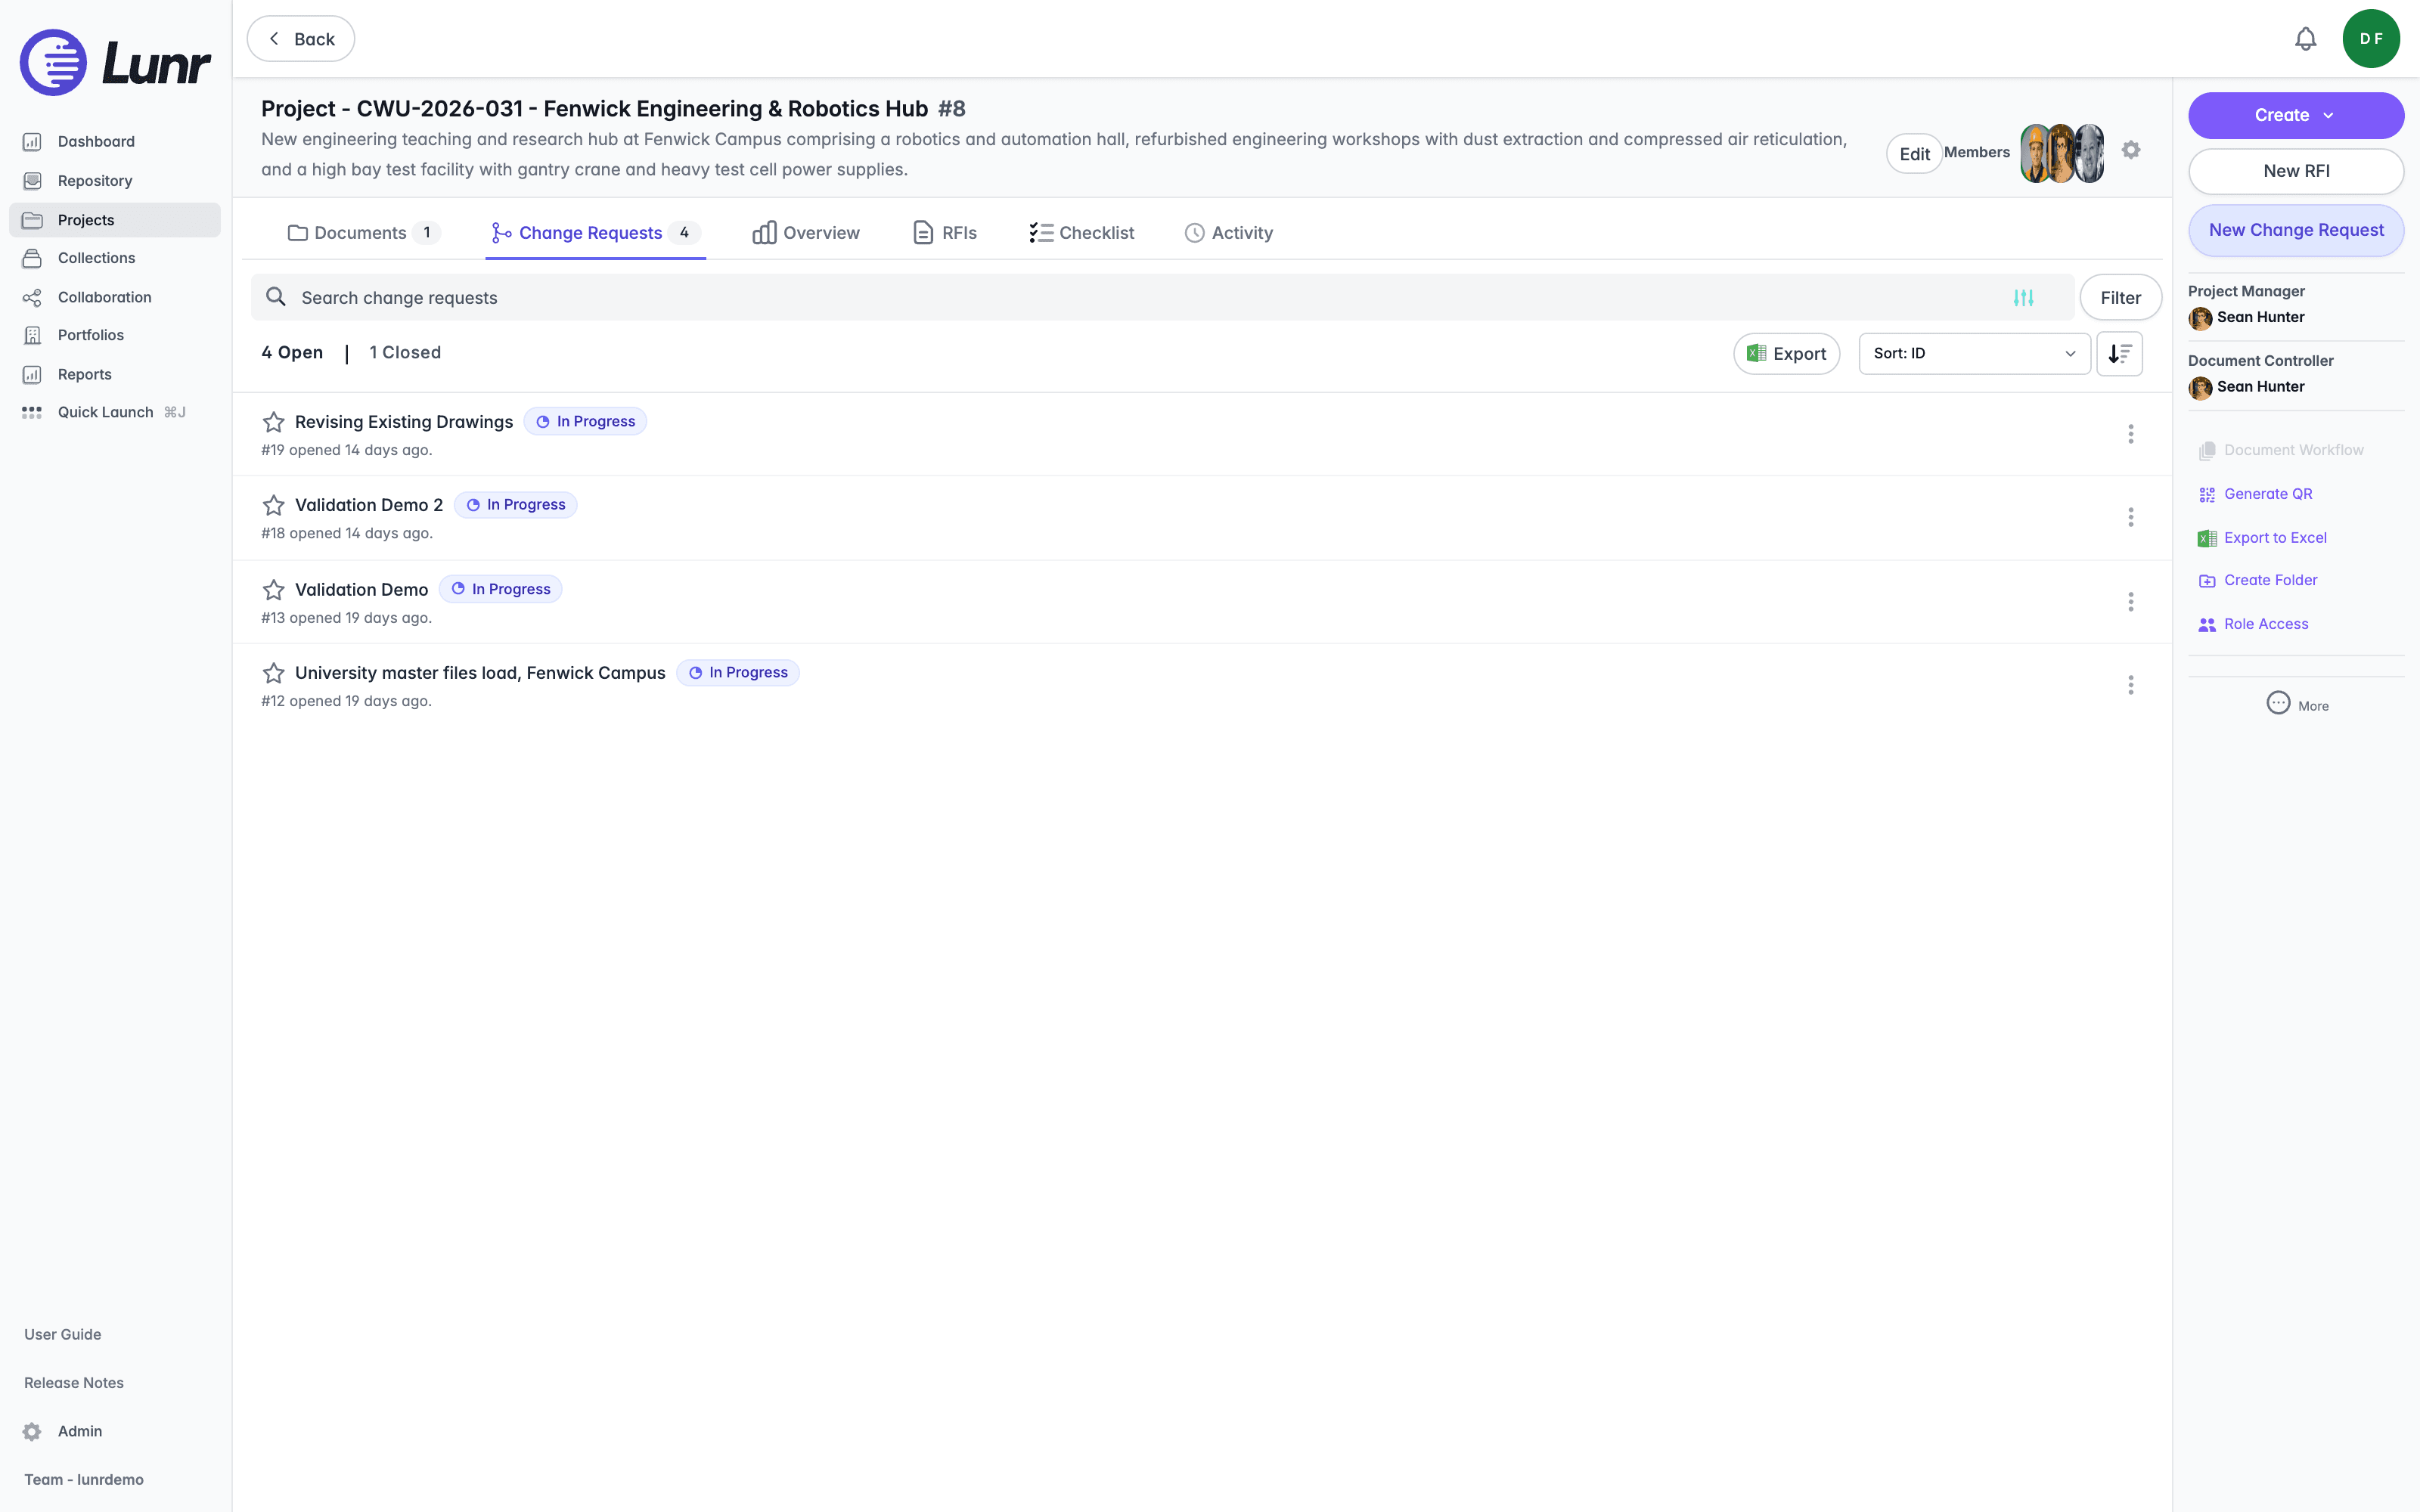
Each row shows the subject, a status badge such as In Progress, and a line such as "#19 opened 14 days ago", with an Options menu.
Document Number Requests
If you hold the View DNRs access right, a Document Number Requests tab lists the document numbers requested against the project.
Overview
Where the project dashboard is enabled, the Overview tab summarises the project's activity across five widgets.
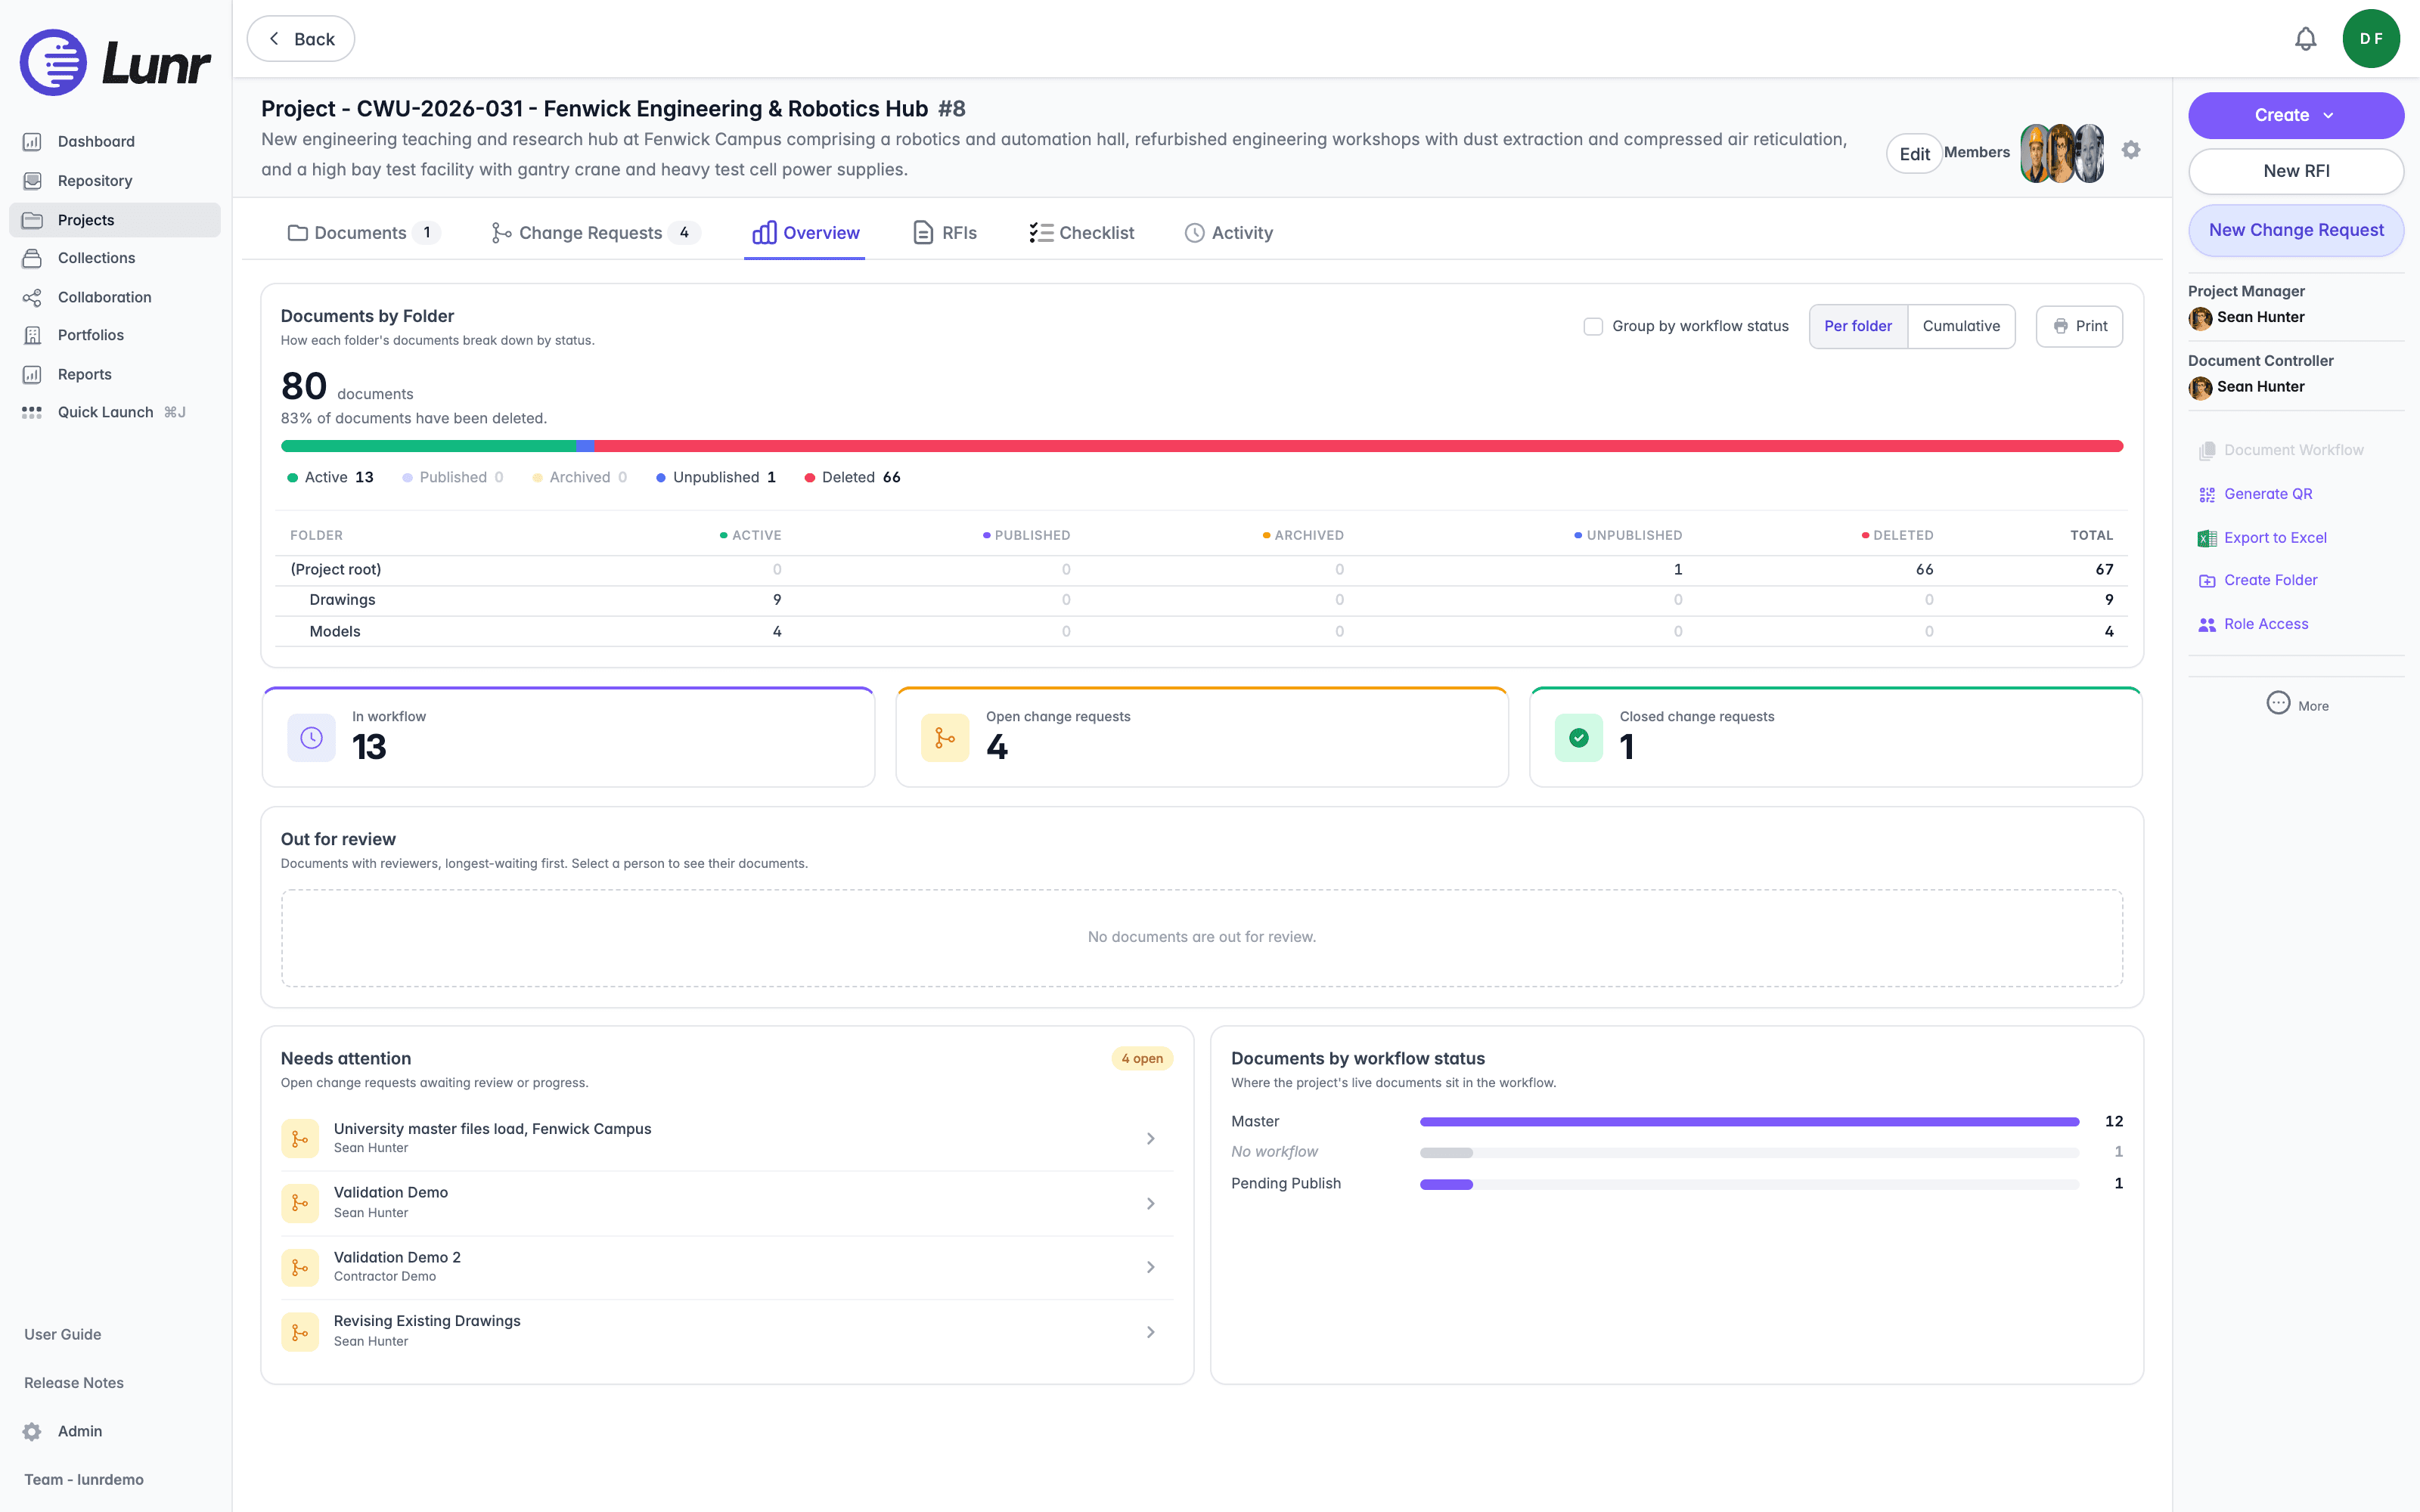
Documents by Folder shows how each folder's documents break down by status, with a headline count, a one-line insight such as "83% of documents have been deleted.", a composition bar, and a legend of Active, Published, Archived, Unpublished, and Deleted. A Group by workflow status box and a Per folder and Cumulative toggle change how the numbers roll up, and Print exports the same information, offering Include document list and Group by folder boxes. Below the chart, a table lists Folder, Active, Published, Archived, Unpublished, Deleted, and Total, with one row per folder plus "(Project root)".
Three KPI tiles show the In workflow, Open change requests, and Closed change requests counts.
Out for review lists documents with reviewers, longest-waiting first; select a person to see their documents. It reads "No documents are out for review." until a document is out for review.
Needs attention lists open change requests awaiting review or progress, each with the person who raised it and an "open" badge; select "View all open change requests" if there are more than the widget shows. When nothing is outstanding, it reads "No open change requests. Nothing needs attention."
Documents by workflow status shows a bar per workflow state with its document count, including a grey italic No workflow bucket, or "No documents in a workflow." when the project has none.
RFIs
If RFIs are enabled for your organisation, an RFIs tab, labelled with your organisation's own wording for "RFI", lists them for the project. A "Subject, number or attachment..." search field, a Filter button, a My RFIs Only toggle, and an Export button help you narrow the list.
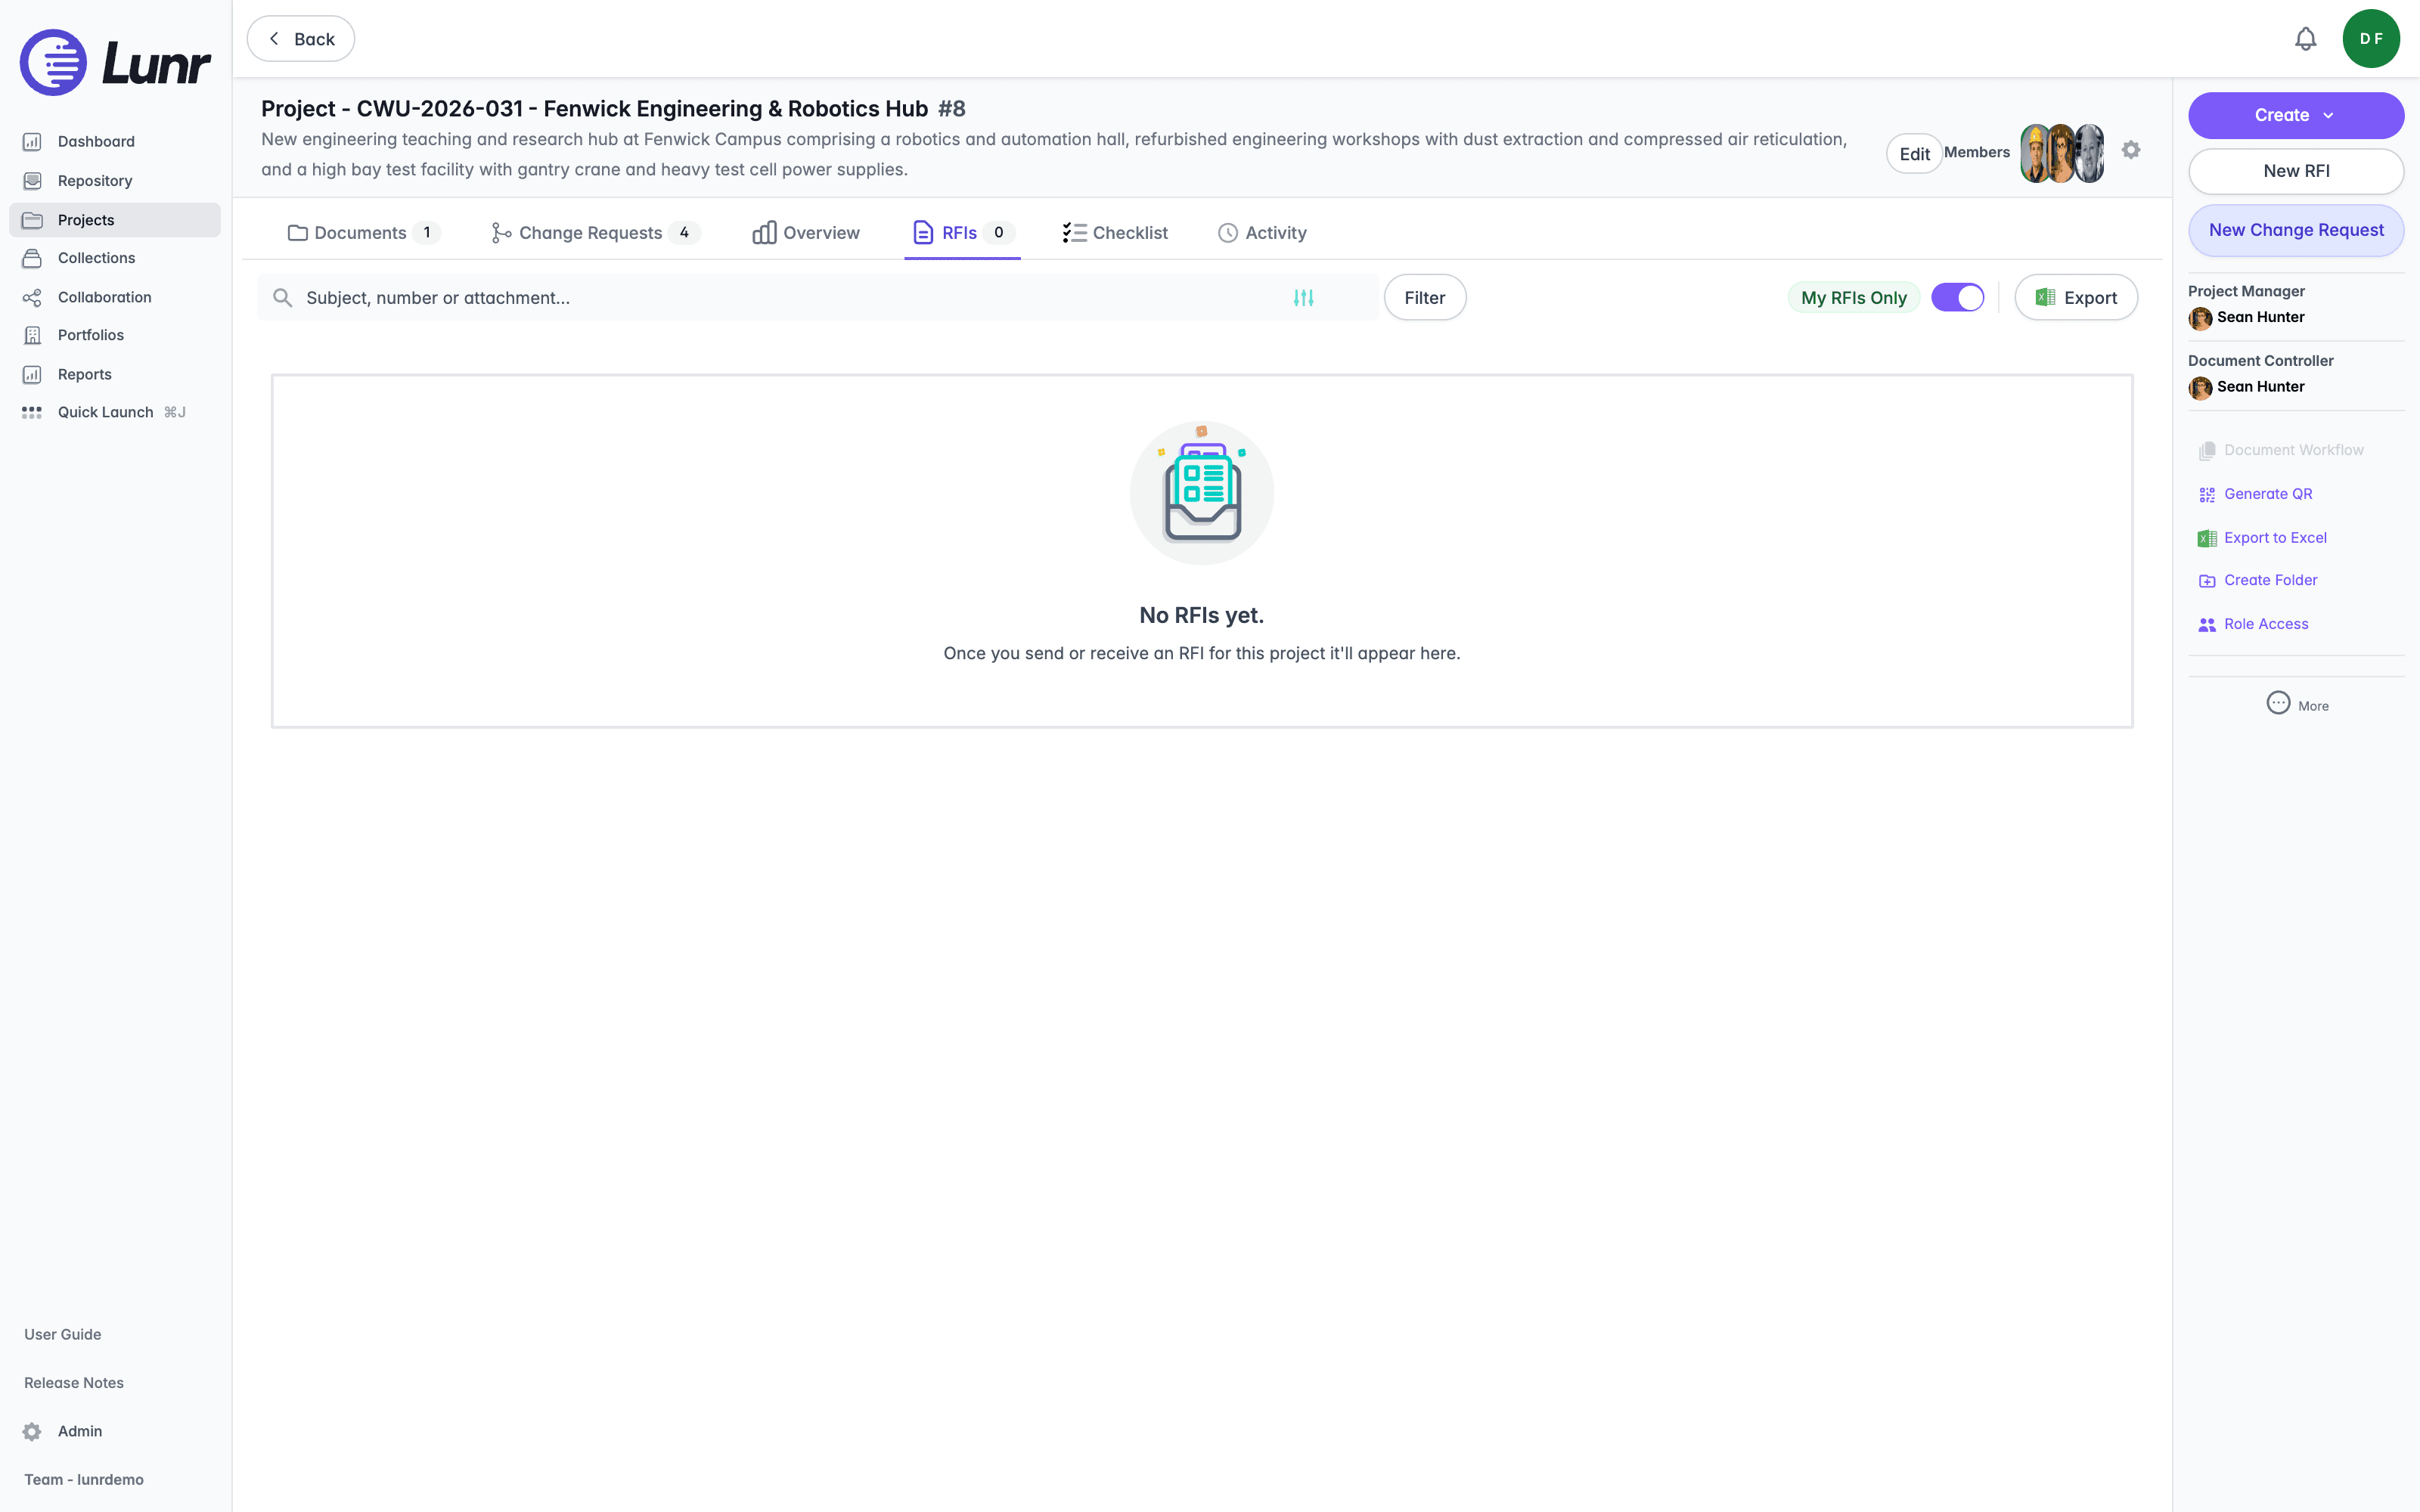
Until there is an RFI, the tab reads "No RFIs yet." and "Once you send or receive an RFI for this project it'll appear here."
Transmittals
If transmittals are enabled for your organisation, a Transmittals tab lists the transmittals sent and received for the project. A transmittal is a type of share, covered in Shares, and this tab is the project's own view of them.
Narrow the list with the search field, prompted "Subject...", or open its filter panel to set a Status, a Shared with user, and a created date range, then select Filter. Applied filters appear as badges you can remove one at a time.
Where your organisation shows everyone's requests, a My Transmittals Only control limits the list to your own. Turn it off to see the rest.
The table lists each transmittal with four columns:
| Column | What it shows |
|---|---|
| Transmittal | The subject, reading "No Subject" where none was given, with the transmittal's number beneath it |
| Date Created | The date it was created, with how long ago that was beneath it |
| Status | Active or Inactive |
| Recipients | The members it was sent to, as avatars, with up to three shown |
Select a row to open that transmittal. Long lists are paged.
With none to show, the tab reads "No transmittals yet." and "Once you send or receive a transmittal for this project it'll appear here."
Checklist
If checklists are enabled for your organisation, the Checklist tab shows the checklists attached to the project. An OVERALL PROGRESS bar summarises every attached checklist, for example "4 of 12 closed out (33%)", and an Attach a checklist button adds another. Each attached checklist, such as "As-Built Handover", shows its own "closed out" count and a delete icon.
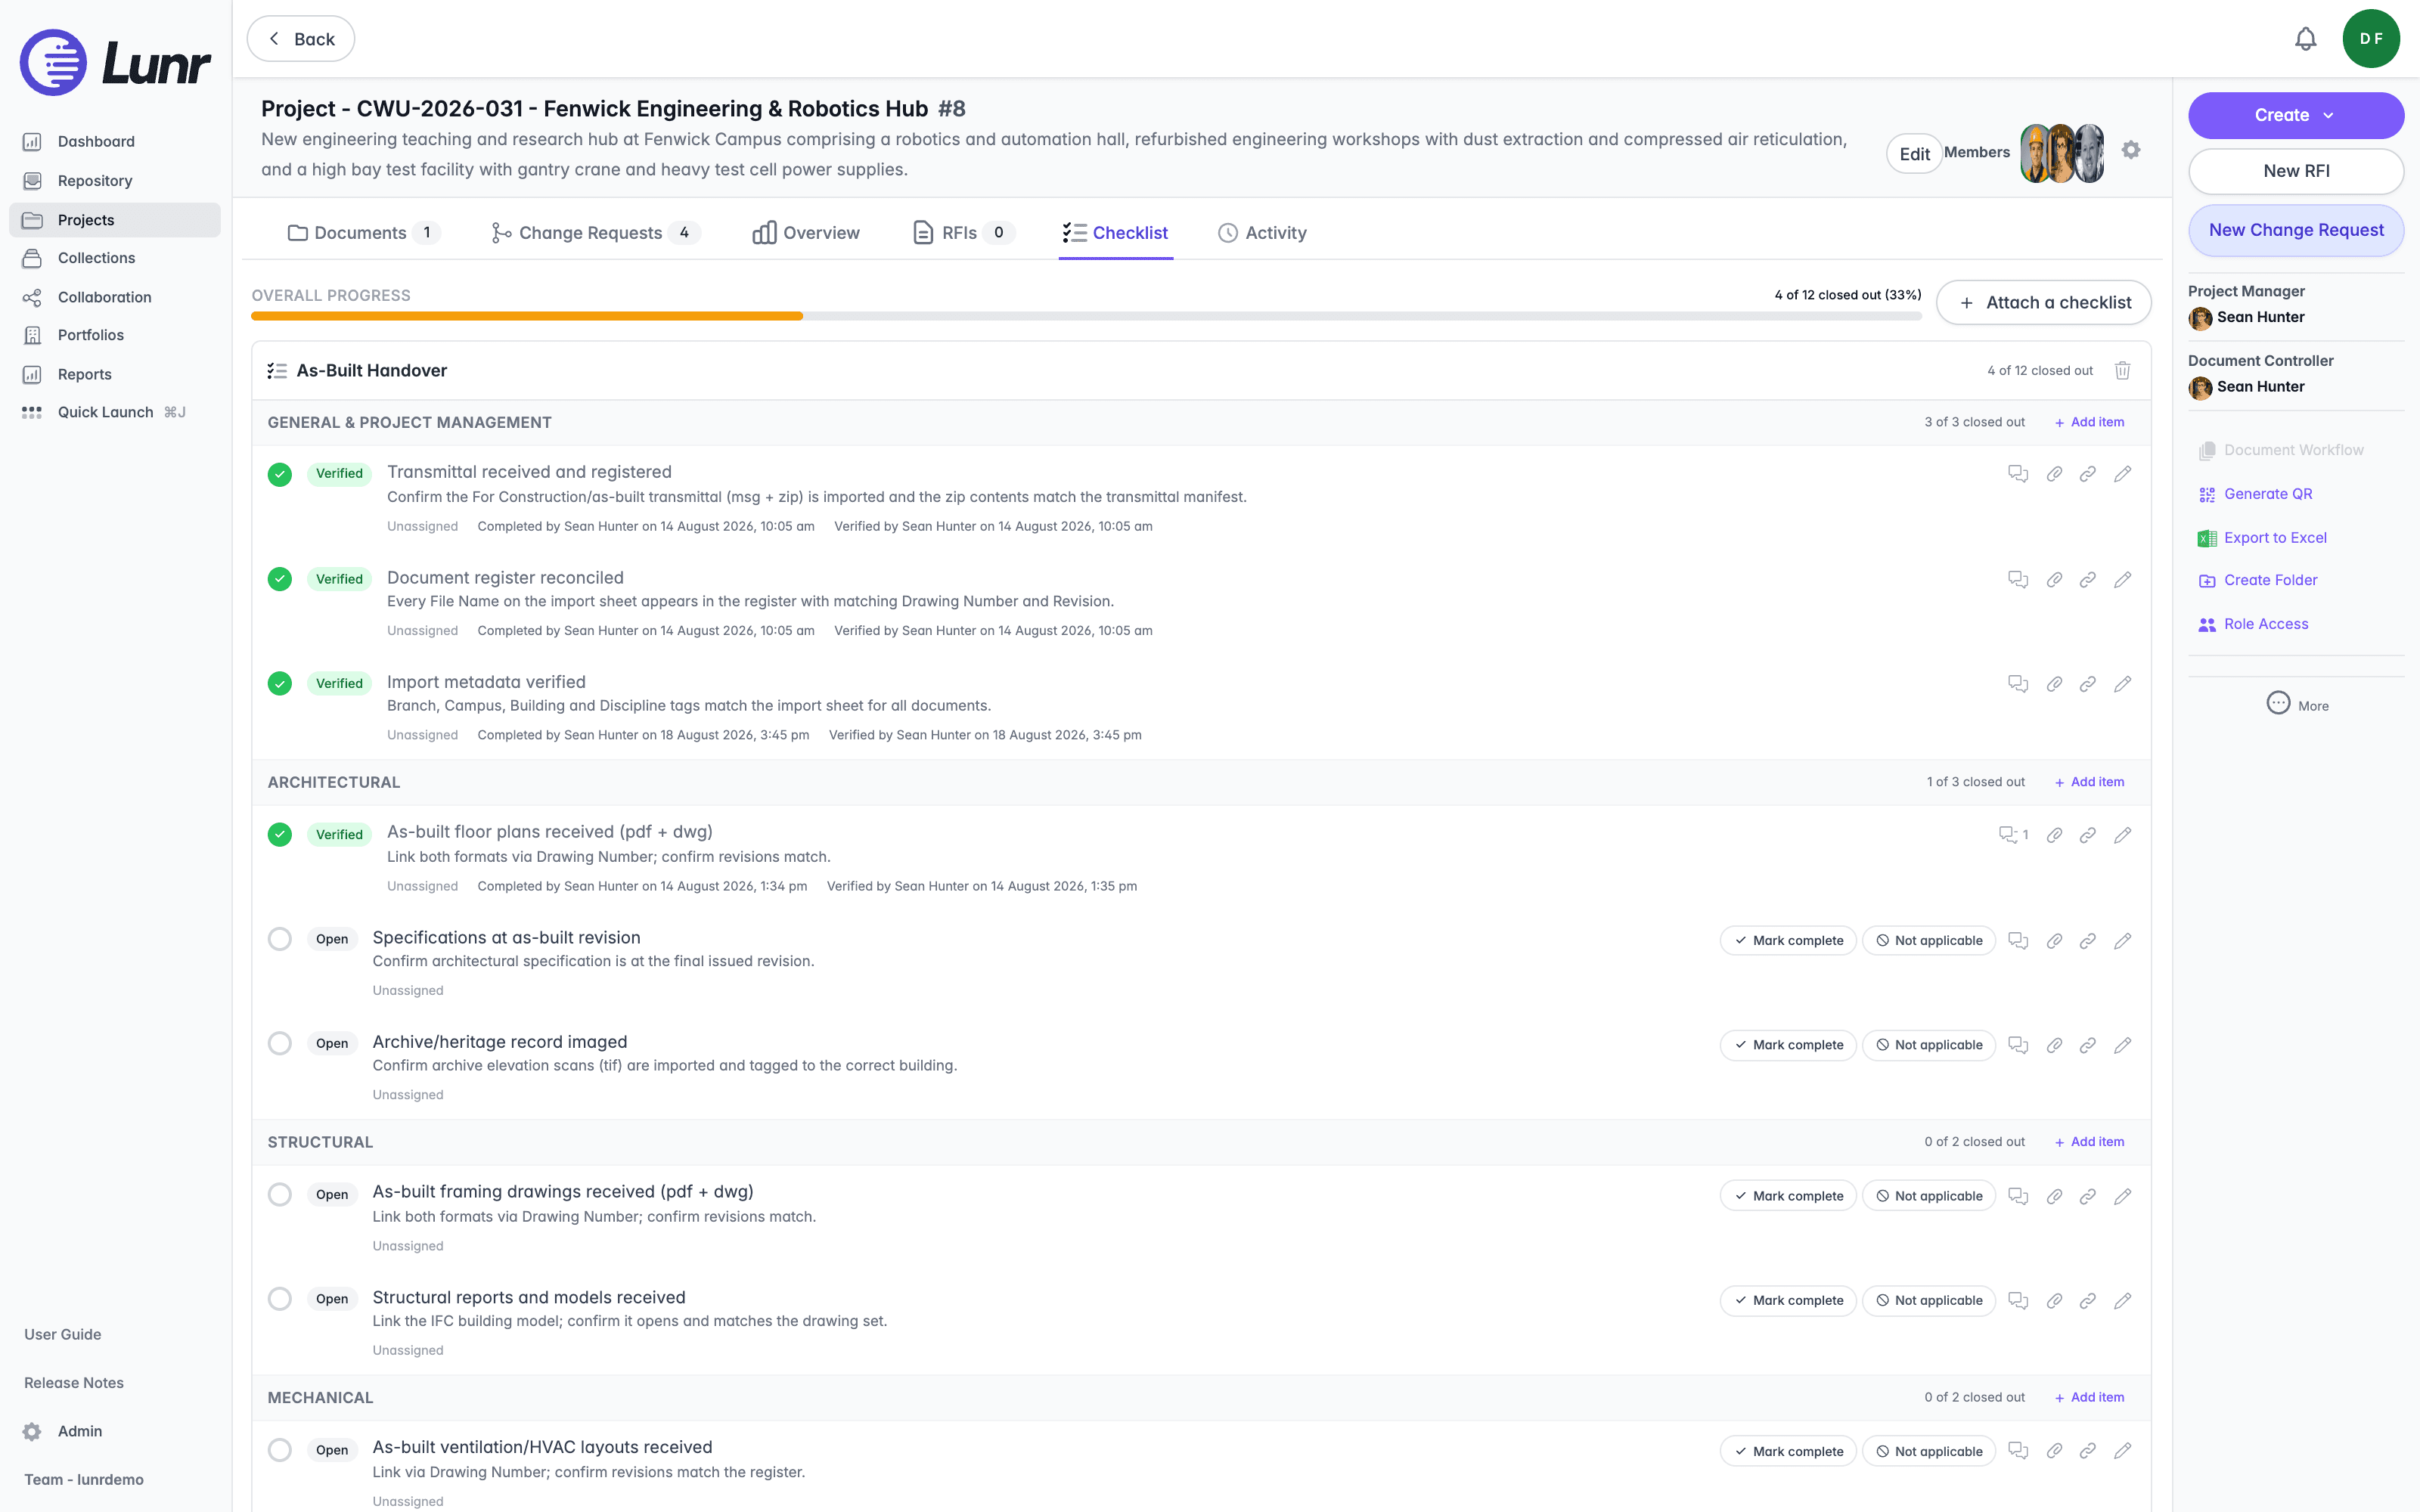
Within a checklist, items are grouped into sections, such as General & Project Management, Architectural, Structural, and Mechanical, each with its own progress count and an + Add item link. Each item shows a status circle, a Verified or Open badge, its name and description, who it is assigned to (or "Unassigned"), and, once done, who completed and verified it and when. Open items carry Mark complete and Not applicable buttons, and every item has comment, attachment, link, and edit icons.
An item moves through Open, then Complete once someone marks it done, then Verified once it is checked. Not applicable takes an item out of the count where it does not apply, and is available from Open or from Rework.
Where a checklist requires verification, an item someone has marked complete carries Verify and Reject as well, and both need the Verify Checklist Items access right. Verify accepts the item. Reject sends it back for Rework, and opens a Reject checklist item dialog naming the item and asking why it is not accepted. A reason is required, so the dialog will not let you confirm without one.
If your organisation uses checklists to gate a change request, unverified gating items block it from moving to Complete or Awaiting Release. Managing checklist templates needs the Manage Checklist Templates access right.
Activity
The Activity tab lists the project's audit history. A date-range filter with Created from and To fields, Cancel, and Apply Filter narrows it. Entries are grouped by month, each showing an icon, a timestamp, the person, what changed, a link to the project, and a relative time, with results paginated, for example "1 - 25 of 142 results."
Project Folders
Use project folders to group a project's documents, for example by discipline or work package. Folders appear as rows on the Documents tab, each with a coloured folder icon; select one to open it. Opening a folder updates the breadcrumb, for example to "Home > Drawings", and updates the document count shown on the tab.
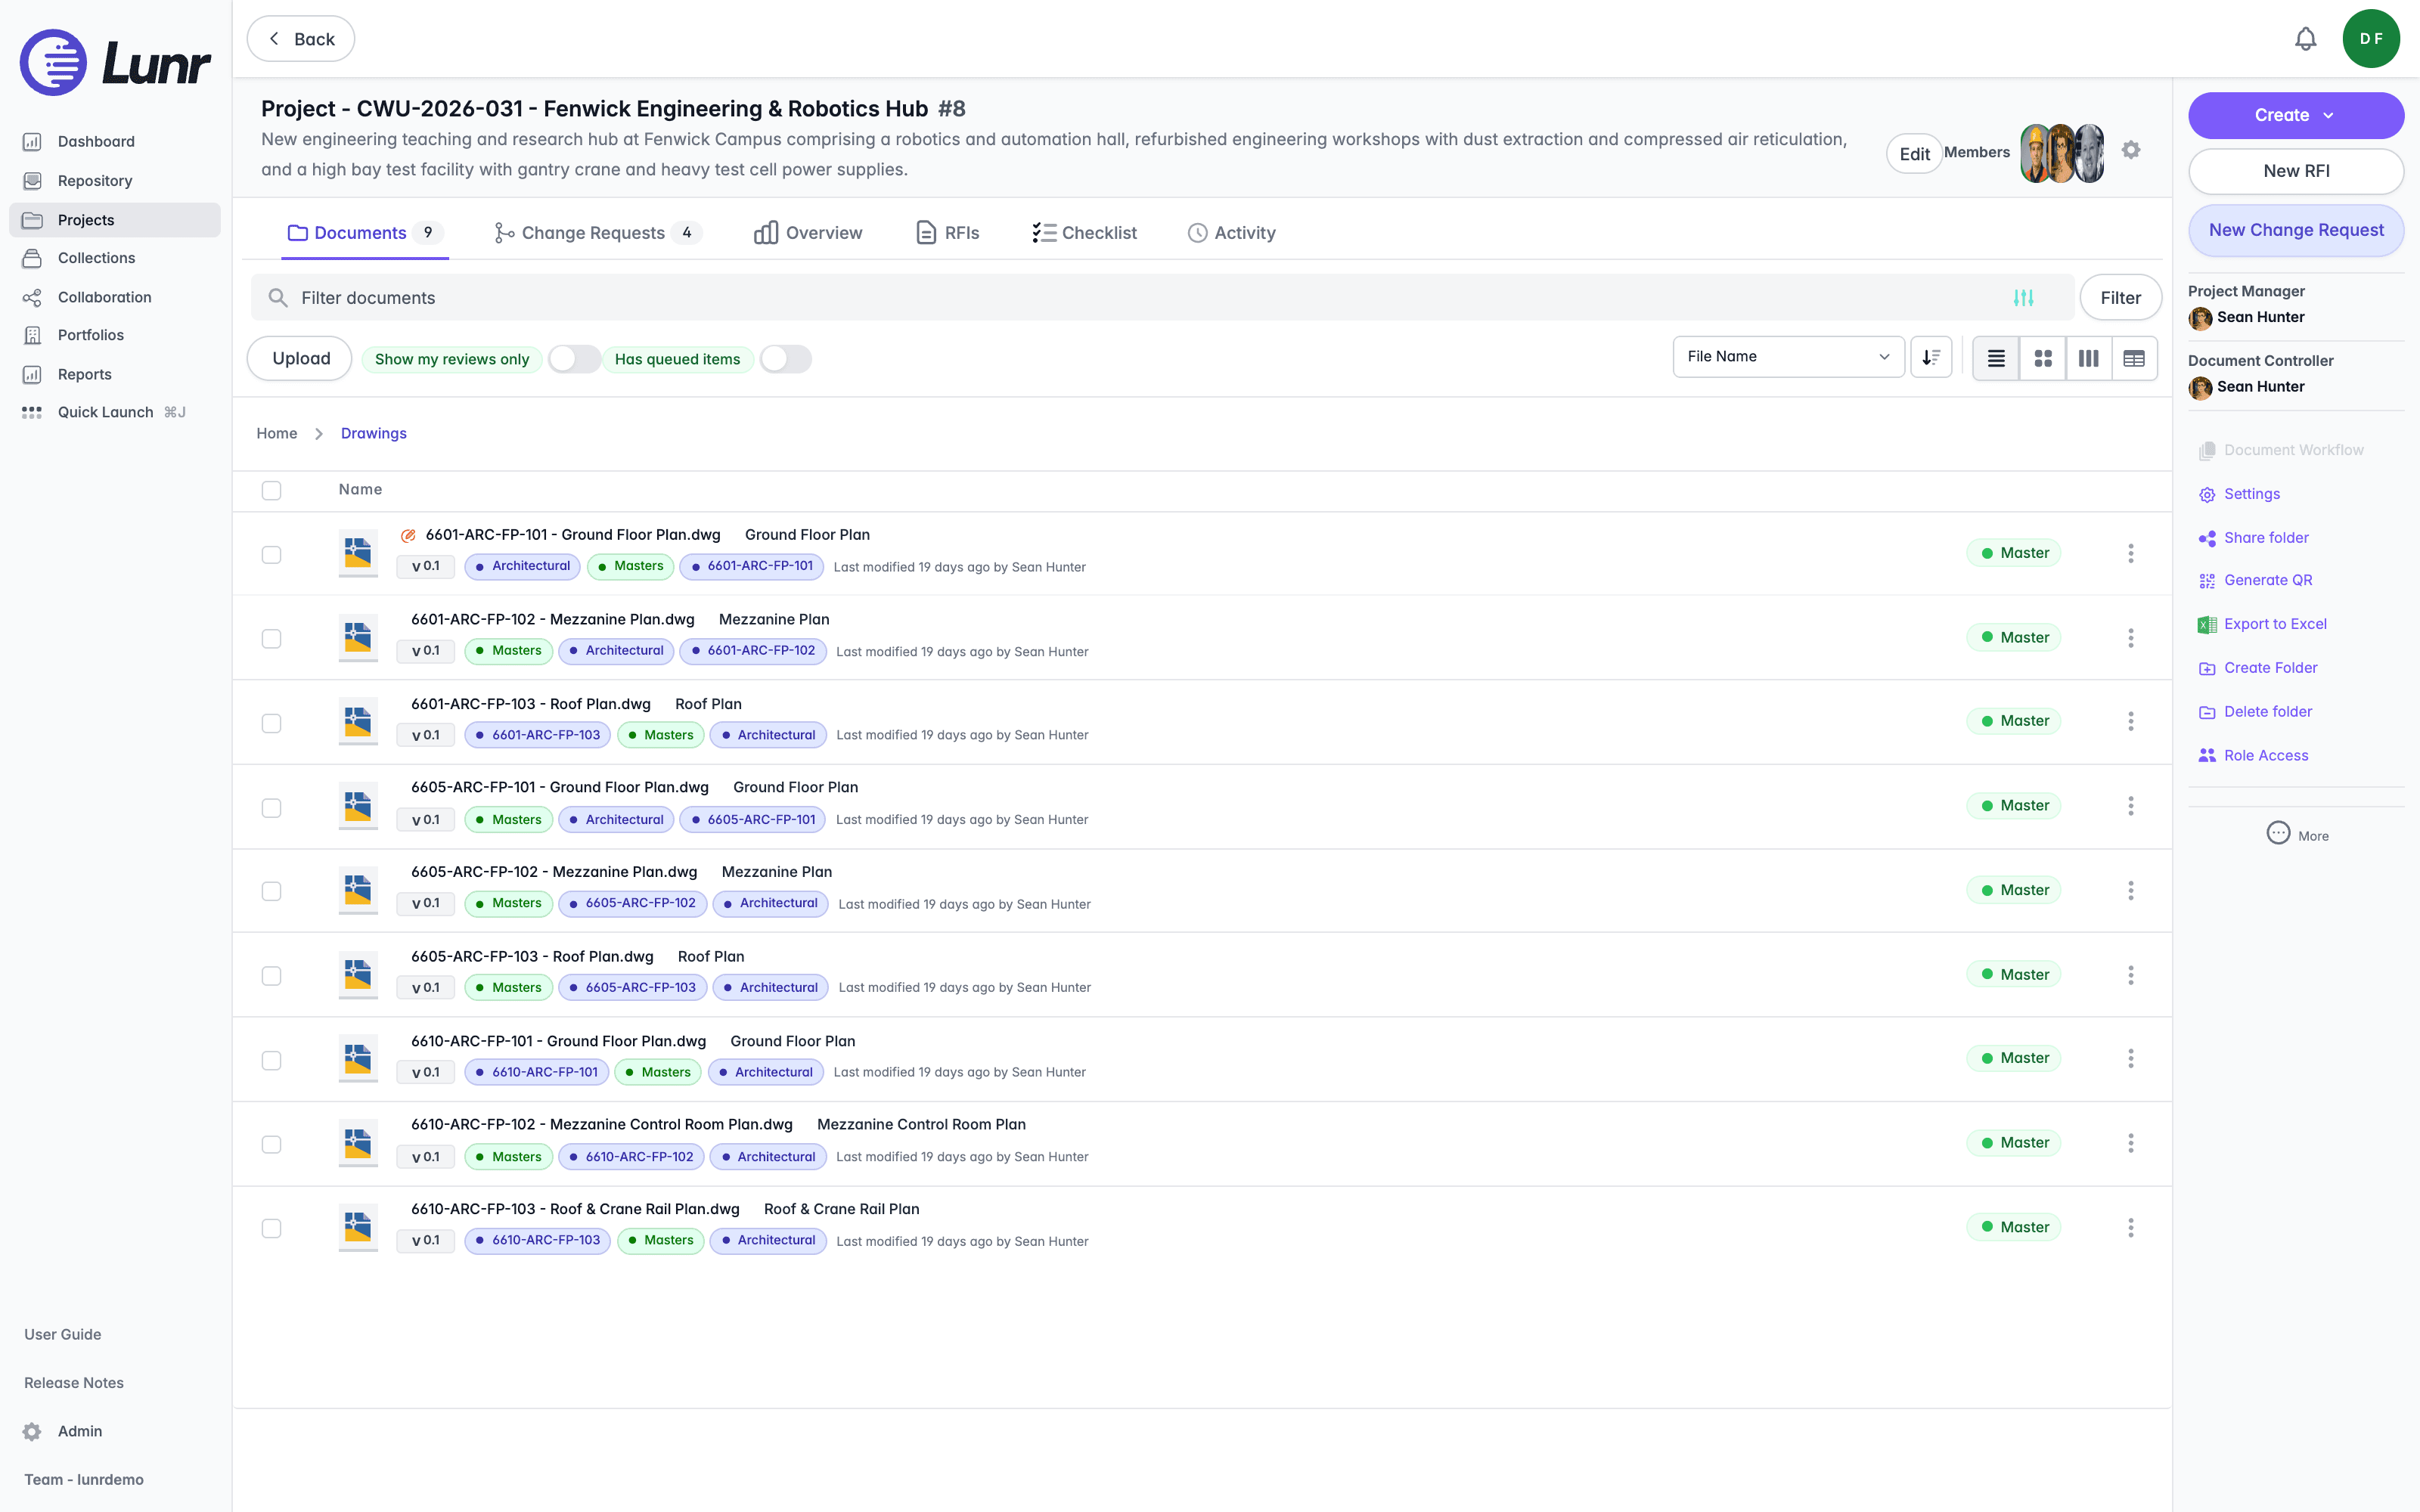
A folder's own Options menu offers Edit, Move, and Delete. The rest of a folder's controls, Settings, Share folder, Generate QR, and Delete folder, live in the Action Pane while you are inside the folder, not in the folder's Options menu.
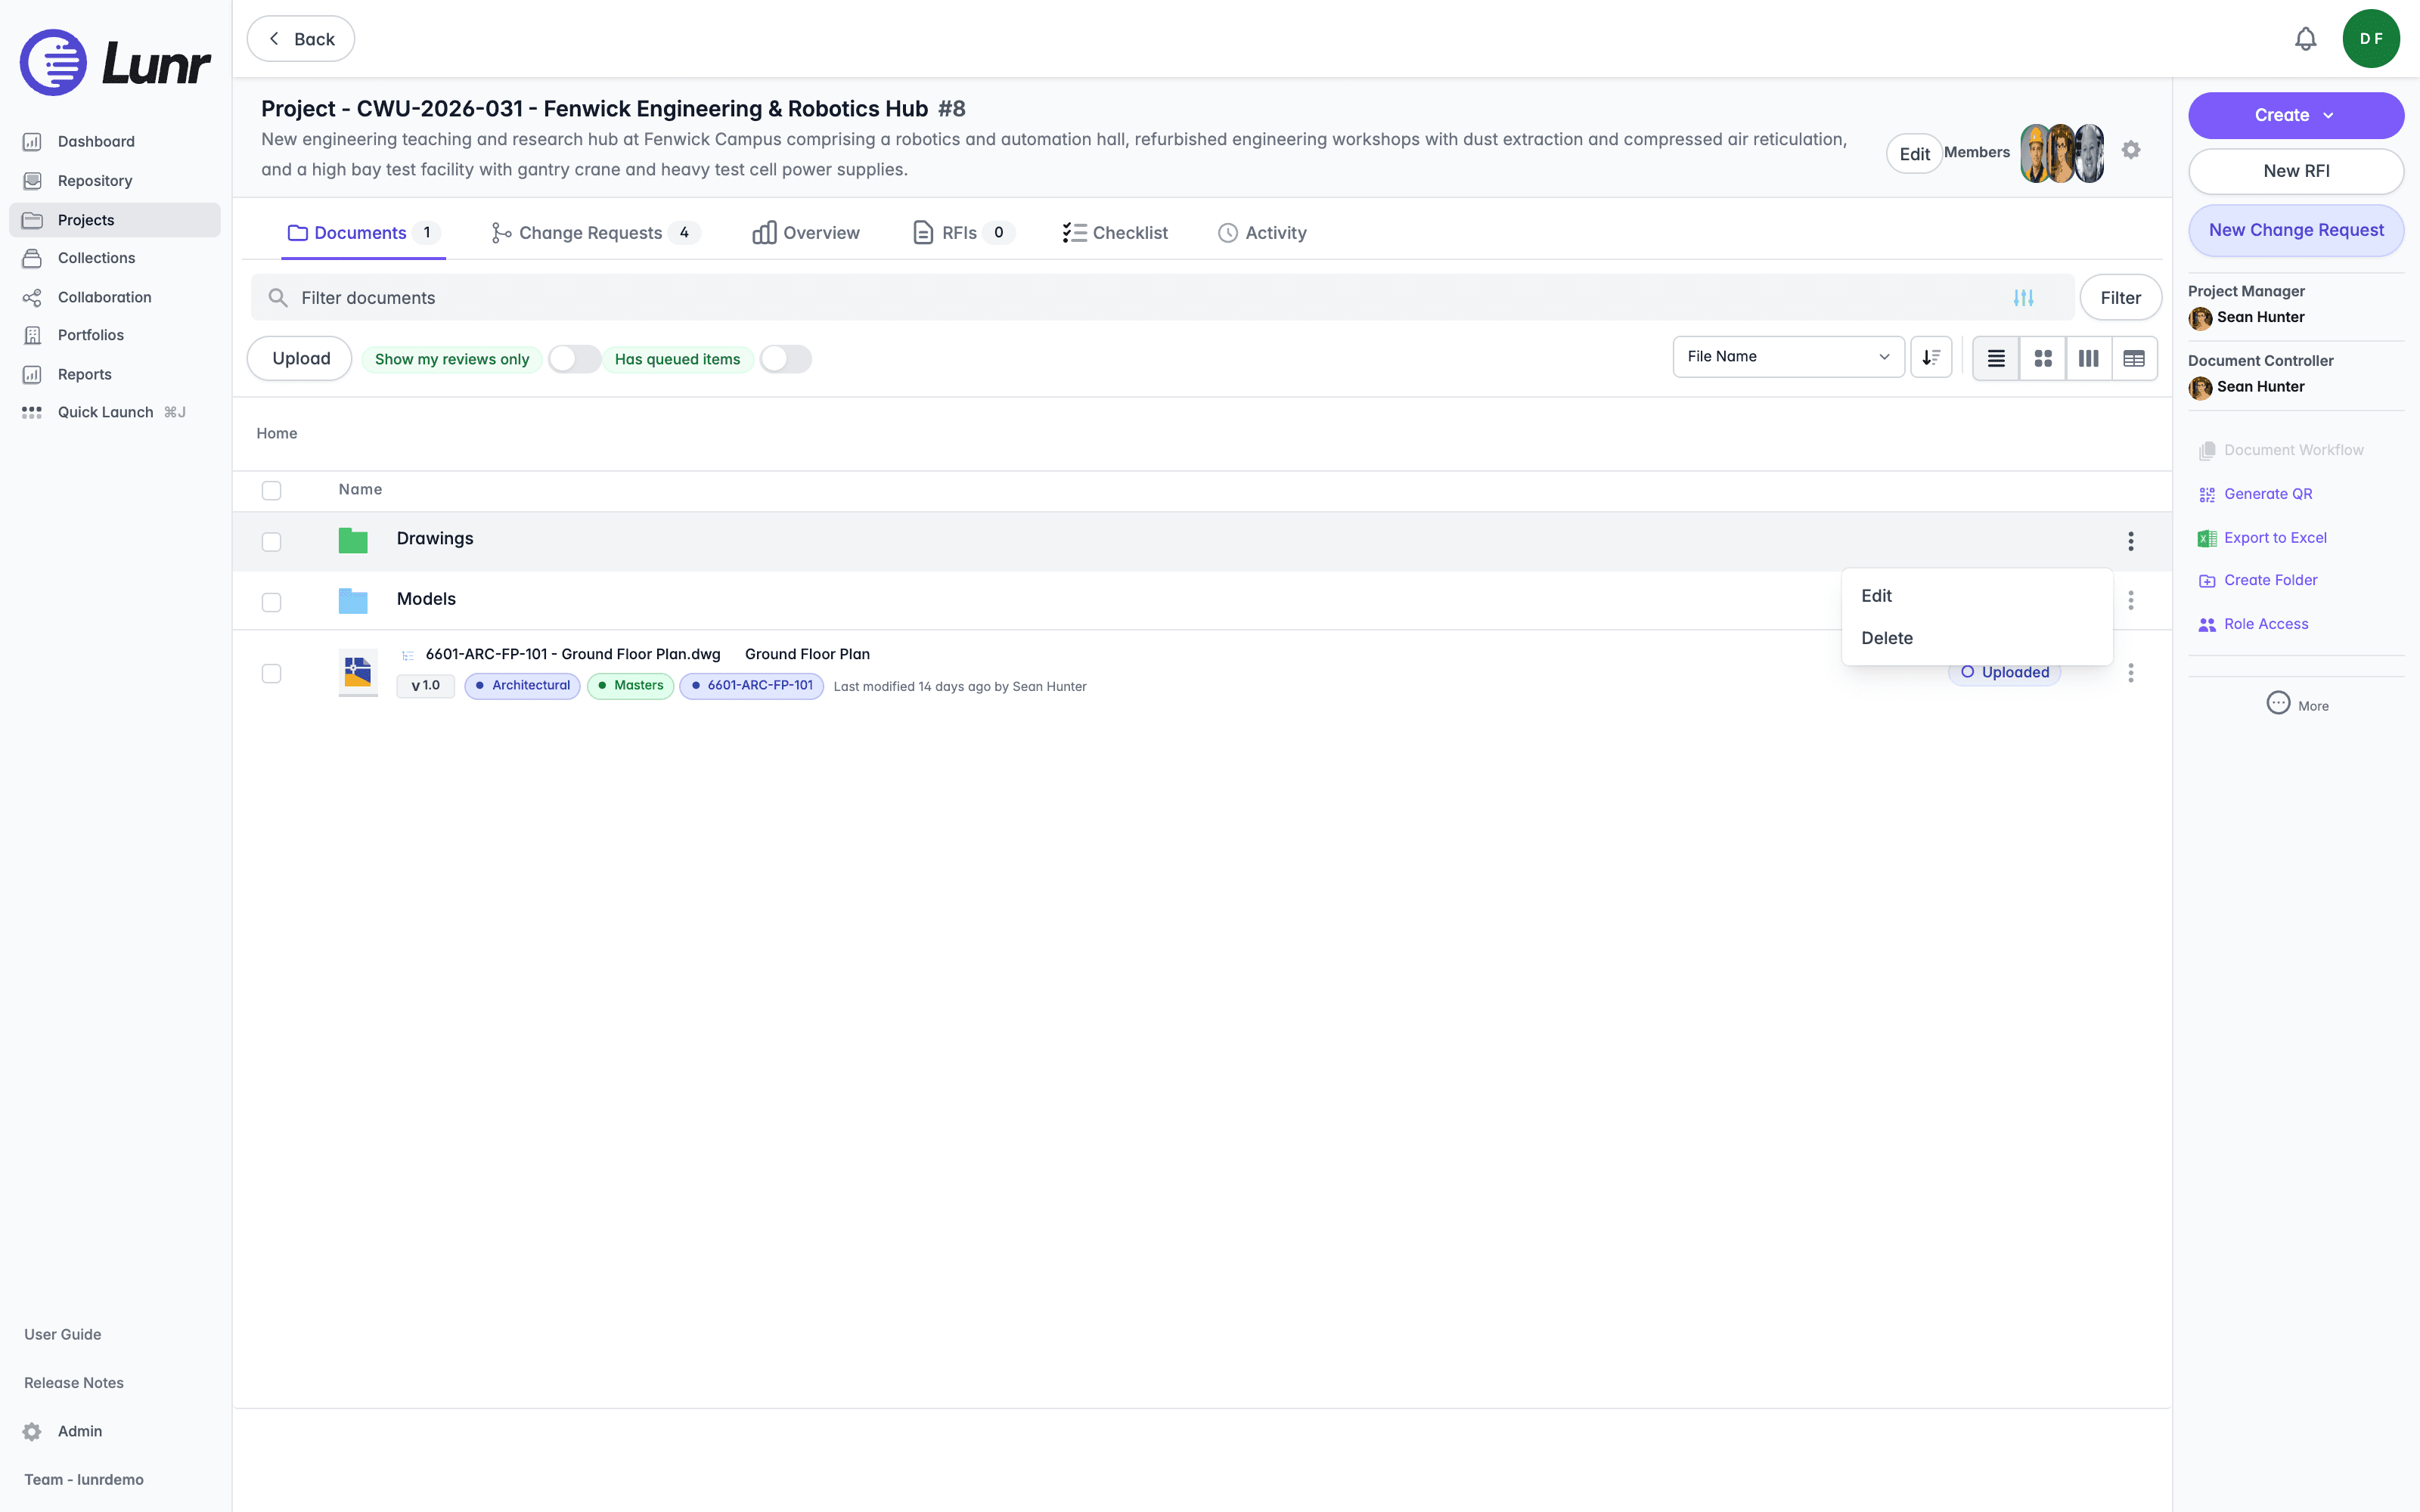
Select Create Folder in the Action Pane to add one; this needs the Manage Projects access right and is hidden while documents are selected. The Create folder dialog shows a live preview labelled "Untitled folder", a Folder Name field, a Folder Colour picker with eight swatches, and an Open Access toggle. Select Create folder to save it, or Cancel to discard it.
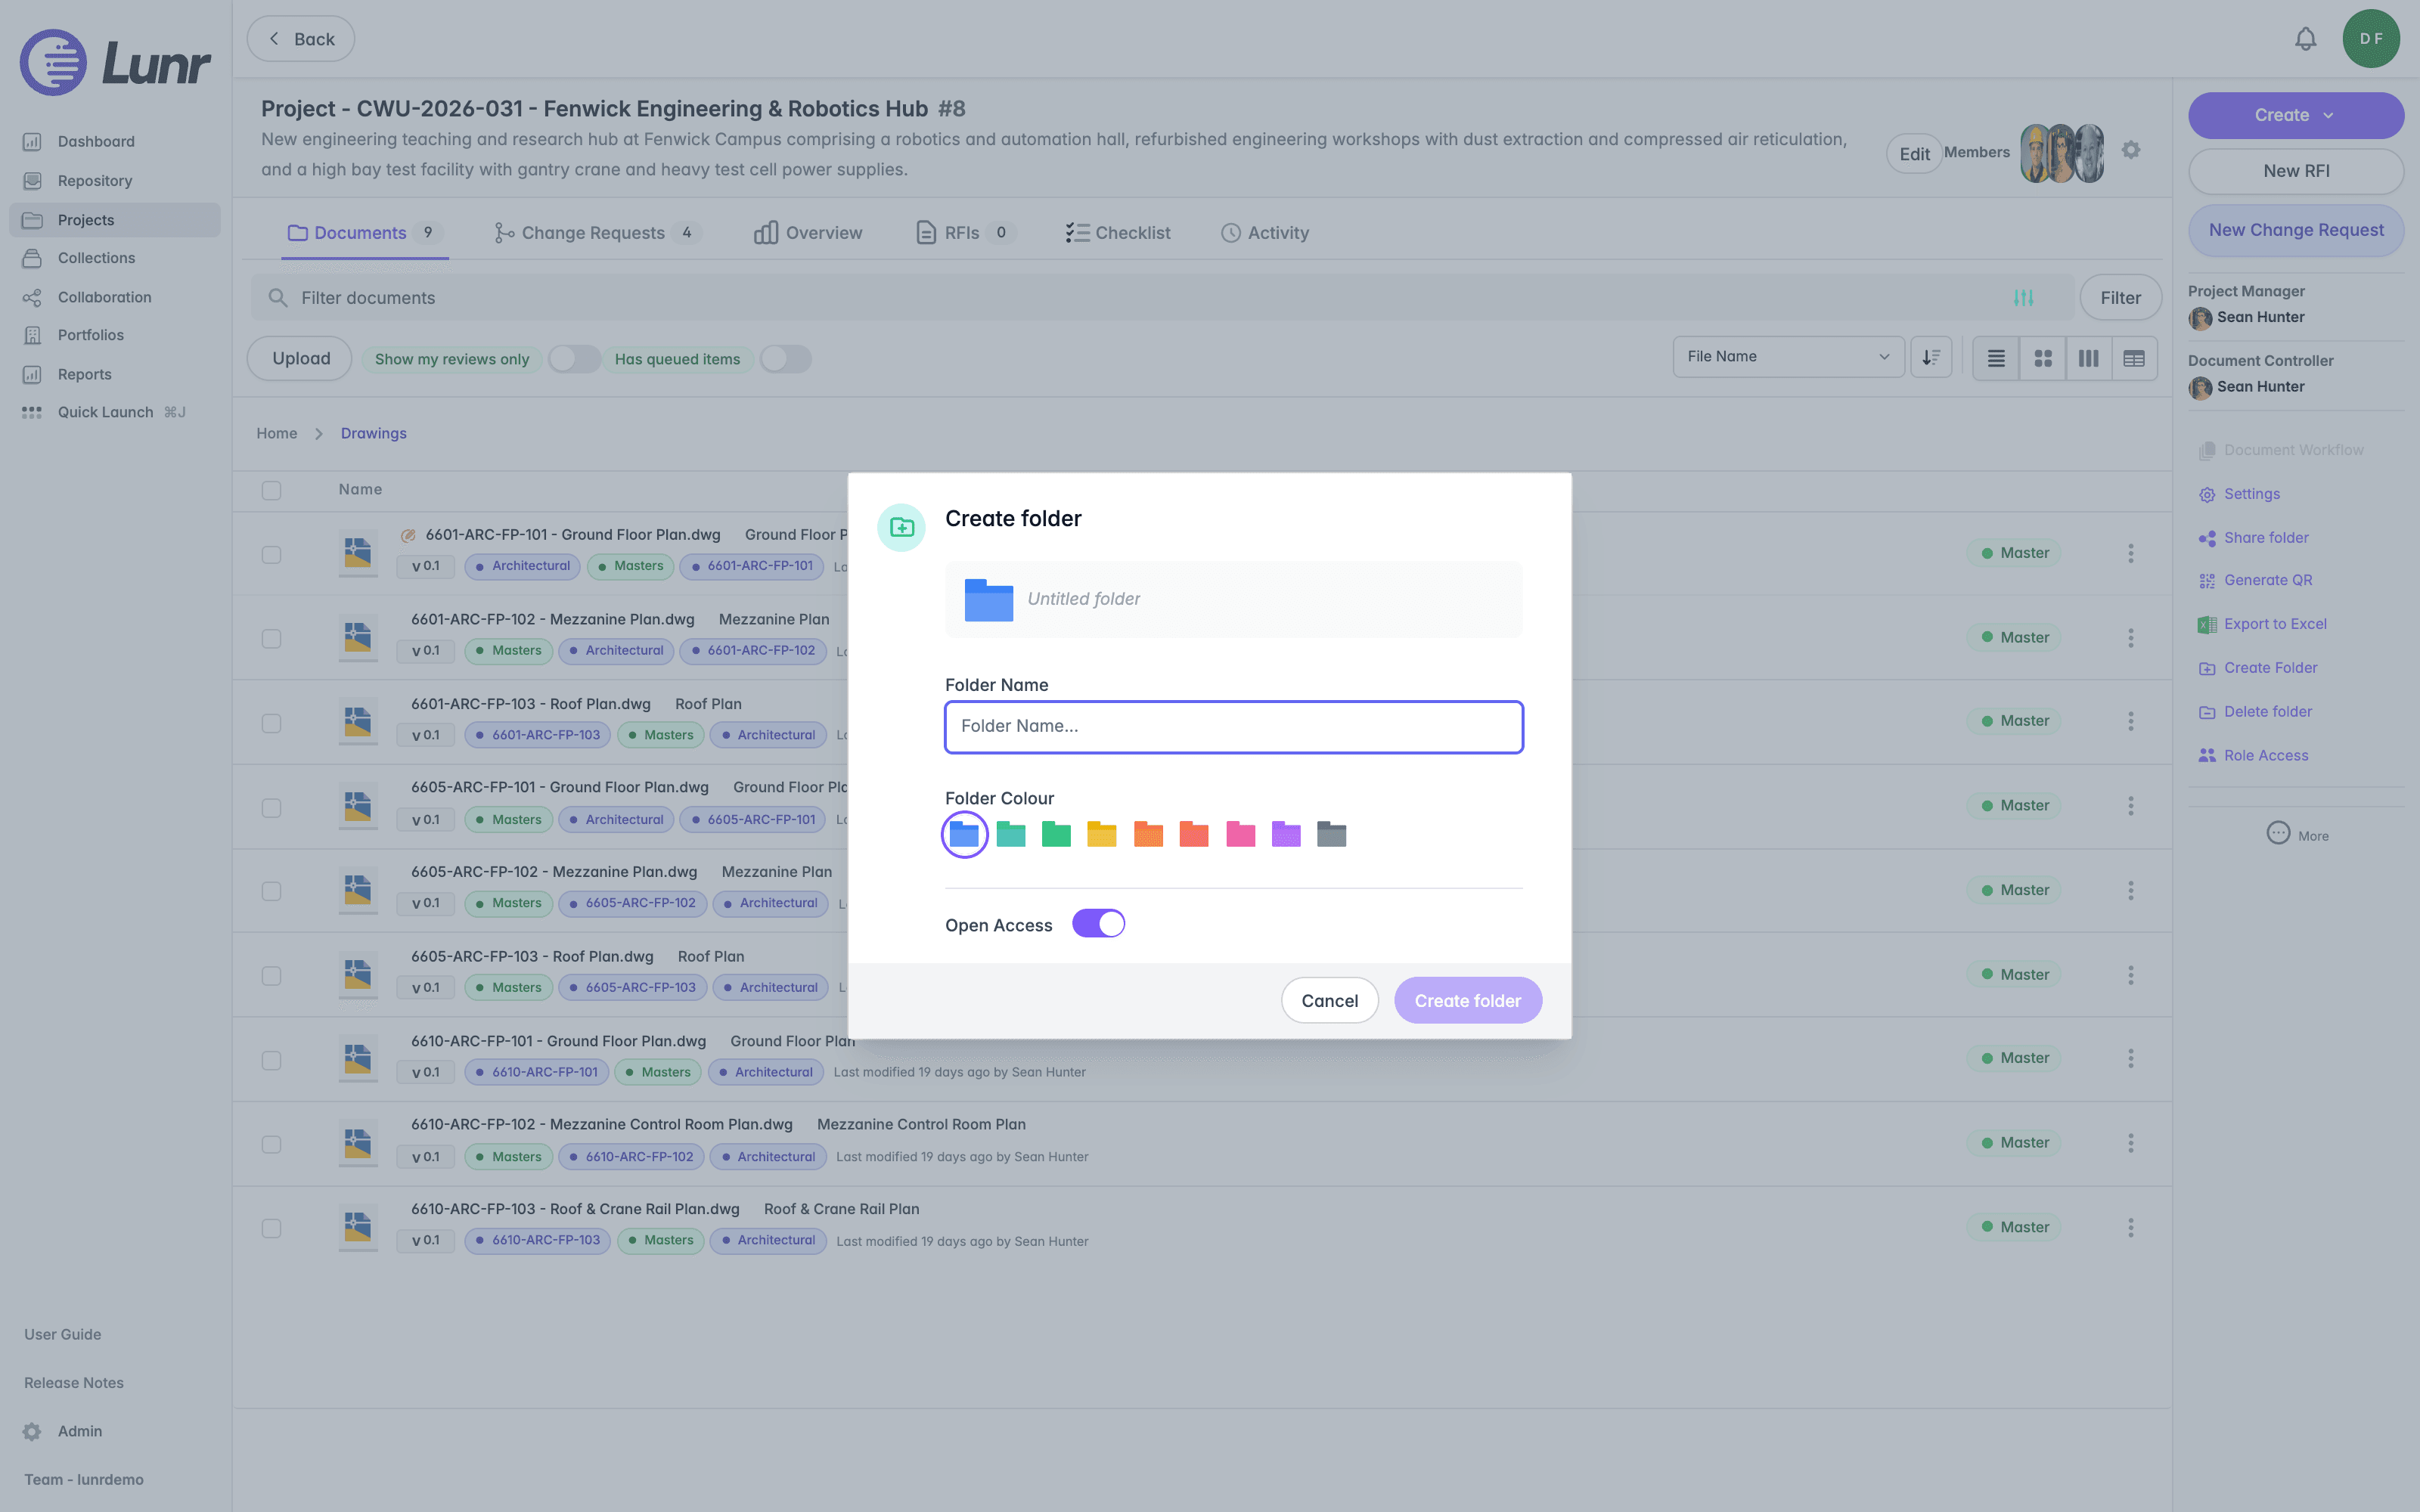
Select Settings in the Action Pane to open Folder Settings, where you choose the folder's Default Document Type (required) and enable Configurable Workflow to use custom workflow steps for documents created inside it. This needs the Manage Projects access right.
Select Share folder to control who can see a folder that is not open to the whole project team. Add members through the Add Member field and remove them individually; the empty state reads "No members selected". This needs the Manage Projects or Administration Pages access right, or Company Admin together with existing membership of that folder. Adding someone to a folder also makes them a project member if they were not one already.
Select Generate QR to open Generate QR Code, which points a QR code at the project, or at the folder you are currently in, so the Lunr mobile application can open it directly.
Moving a Folder
Choose Move from a folder's Options menu to put it somewhere else. The dialog lets you pick a target folder in the current project, or a folder in a different project, so a folder filed in the wrong place can be moved without recreating it. Select several folders and choose Move Folders to move them together.
Moving a folder into another project asks you to confirm first, in a Move Folder dialog reading, for example, "Move Drawings and all its contents to Fenwick Engineering & Robotics Hub (#CWU-2026-031)?". It warns that the move includes every subfolder and document within the folder, and that documents held only in this folder leave this project and its Change Requests along with it.
A folder cannot be moved into itself, and moving it back to the parent it already sits under does nothing.
Select Delete folder to remove the current folder; you are asked to confirm before it is deleted. This needs the Edit Folders access right.
Folders can nest inside each other. A folder with Open Access enabled is visible to everyone on the project. Disable it, and only the people shared into it, the project manager, and anyone holding the View All Project Folders or Manage Projects access right can see it.
Subscribing to a Project
If your organisation has subscriptions enabled, select Subscribe in the Action Pane to receive notifications about a project or a single folder, or Unsubscribe to stop. Notifications arrive as a scheduled digest rather than immediately: Lunr gathers what changed since the last digest, for example documents added or removed and assignments made, and emails a summary on the schedule set for the subscription. Each project in the digest lists up to five documents.
Introduction
Organise documents, change requests, and other work by project, covering the projects list, searching and filtering it, and favouriting the projects you use most.
Introduction
Understand what a Change Request is in Lunr, how the standard and full Change Request experiences differ, and which one your organisation has given you.