Importing Documents
Bring in many documents and their tags at once inside a change request, with an import package or an import spreadsheet, and build the spreadsheet that drives them.
Overview
Inside a change request, a zip or a spreadsheet can bring in or update many documents in one step. An import package unpacks a zip into documents, and an import spreadsheet updates the tags on documents already there. Both are driven by a spreadsheet that ties each file to its tag values.
This page covers choosing between the routes, what an import package holds, and how to build the spreadsheet. For uploading single files, see Uploading Documents.
Zip and Spreadsheet Uploads
A zip or a spreadsheet can be an ordinary document, or it can be a way of bringing in or updating many documents at once. Lunr cannot tell which you mean from the file alone, so inside a change request it asks. Anywhere else, in the repository or a project folder, Lunr files it as a single document without asking.
| You want to | Upload | Select |
|---|---|---|
| Bring in a set of documents and their tags in one go | A .zip holding the files and an Import.xlsx spreadsheet | Import Package, covered under Import Packages |
| Change the tags on documents already in the change request | A spreadsheet whose name starts with Import_ | Update Tags, covered under Updating Tags from a Spreadsheet |
| Keep the zip or spreadsheet as a document in its own right | Either file | Upload File |
The Select Upload Type Prompt
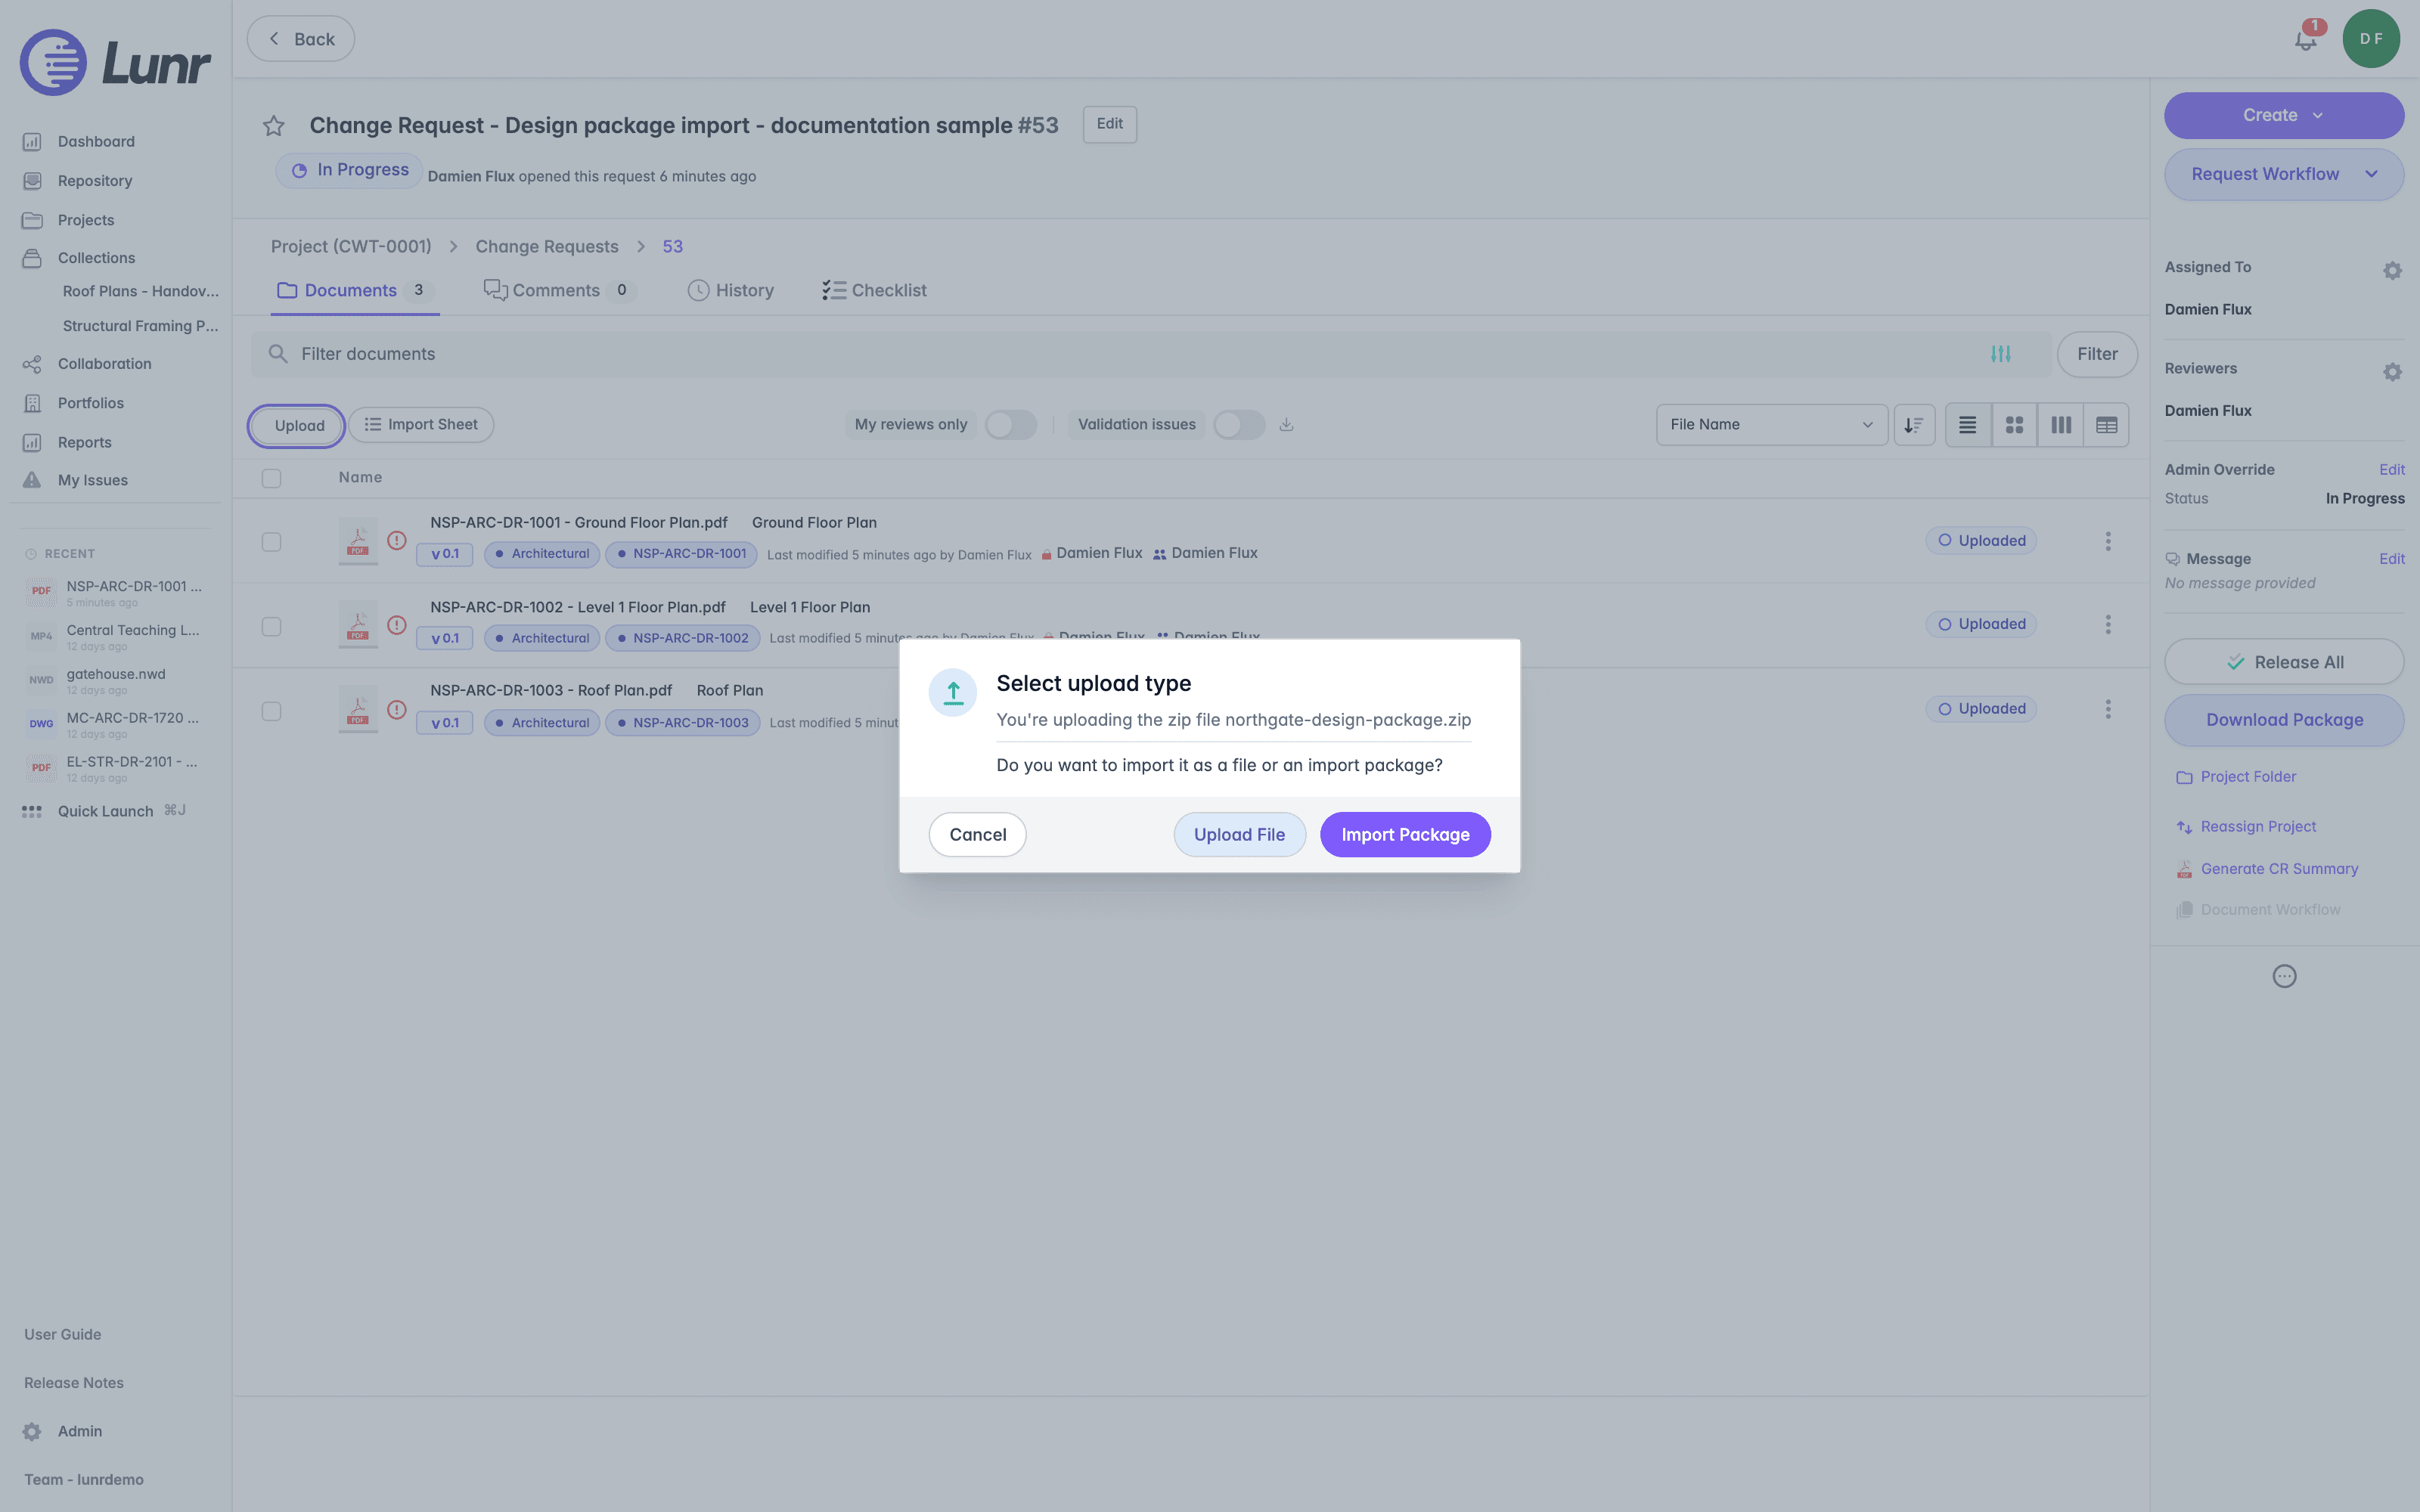
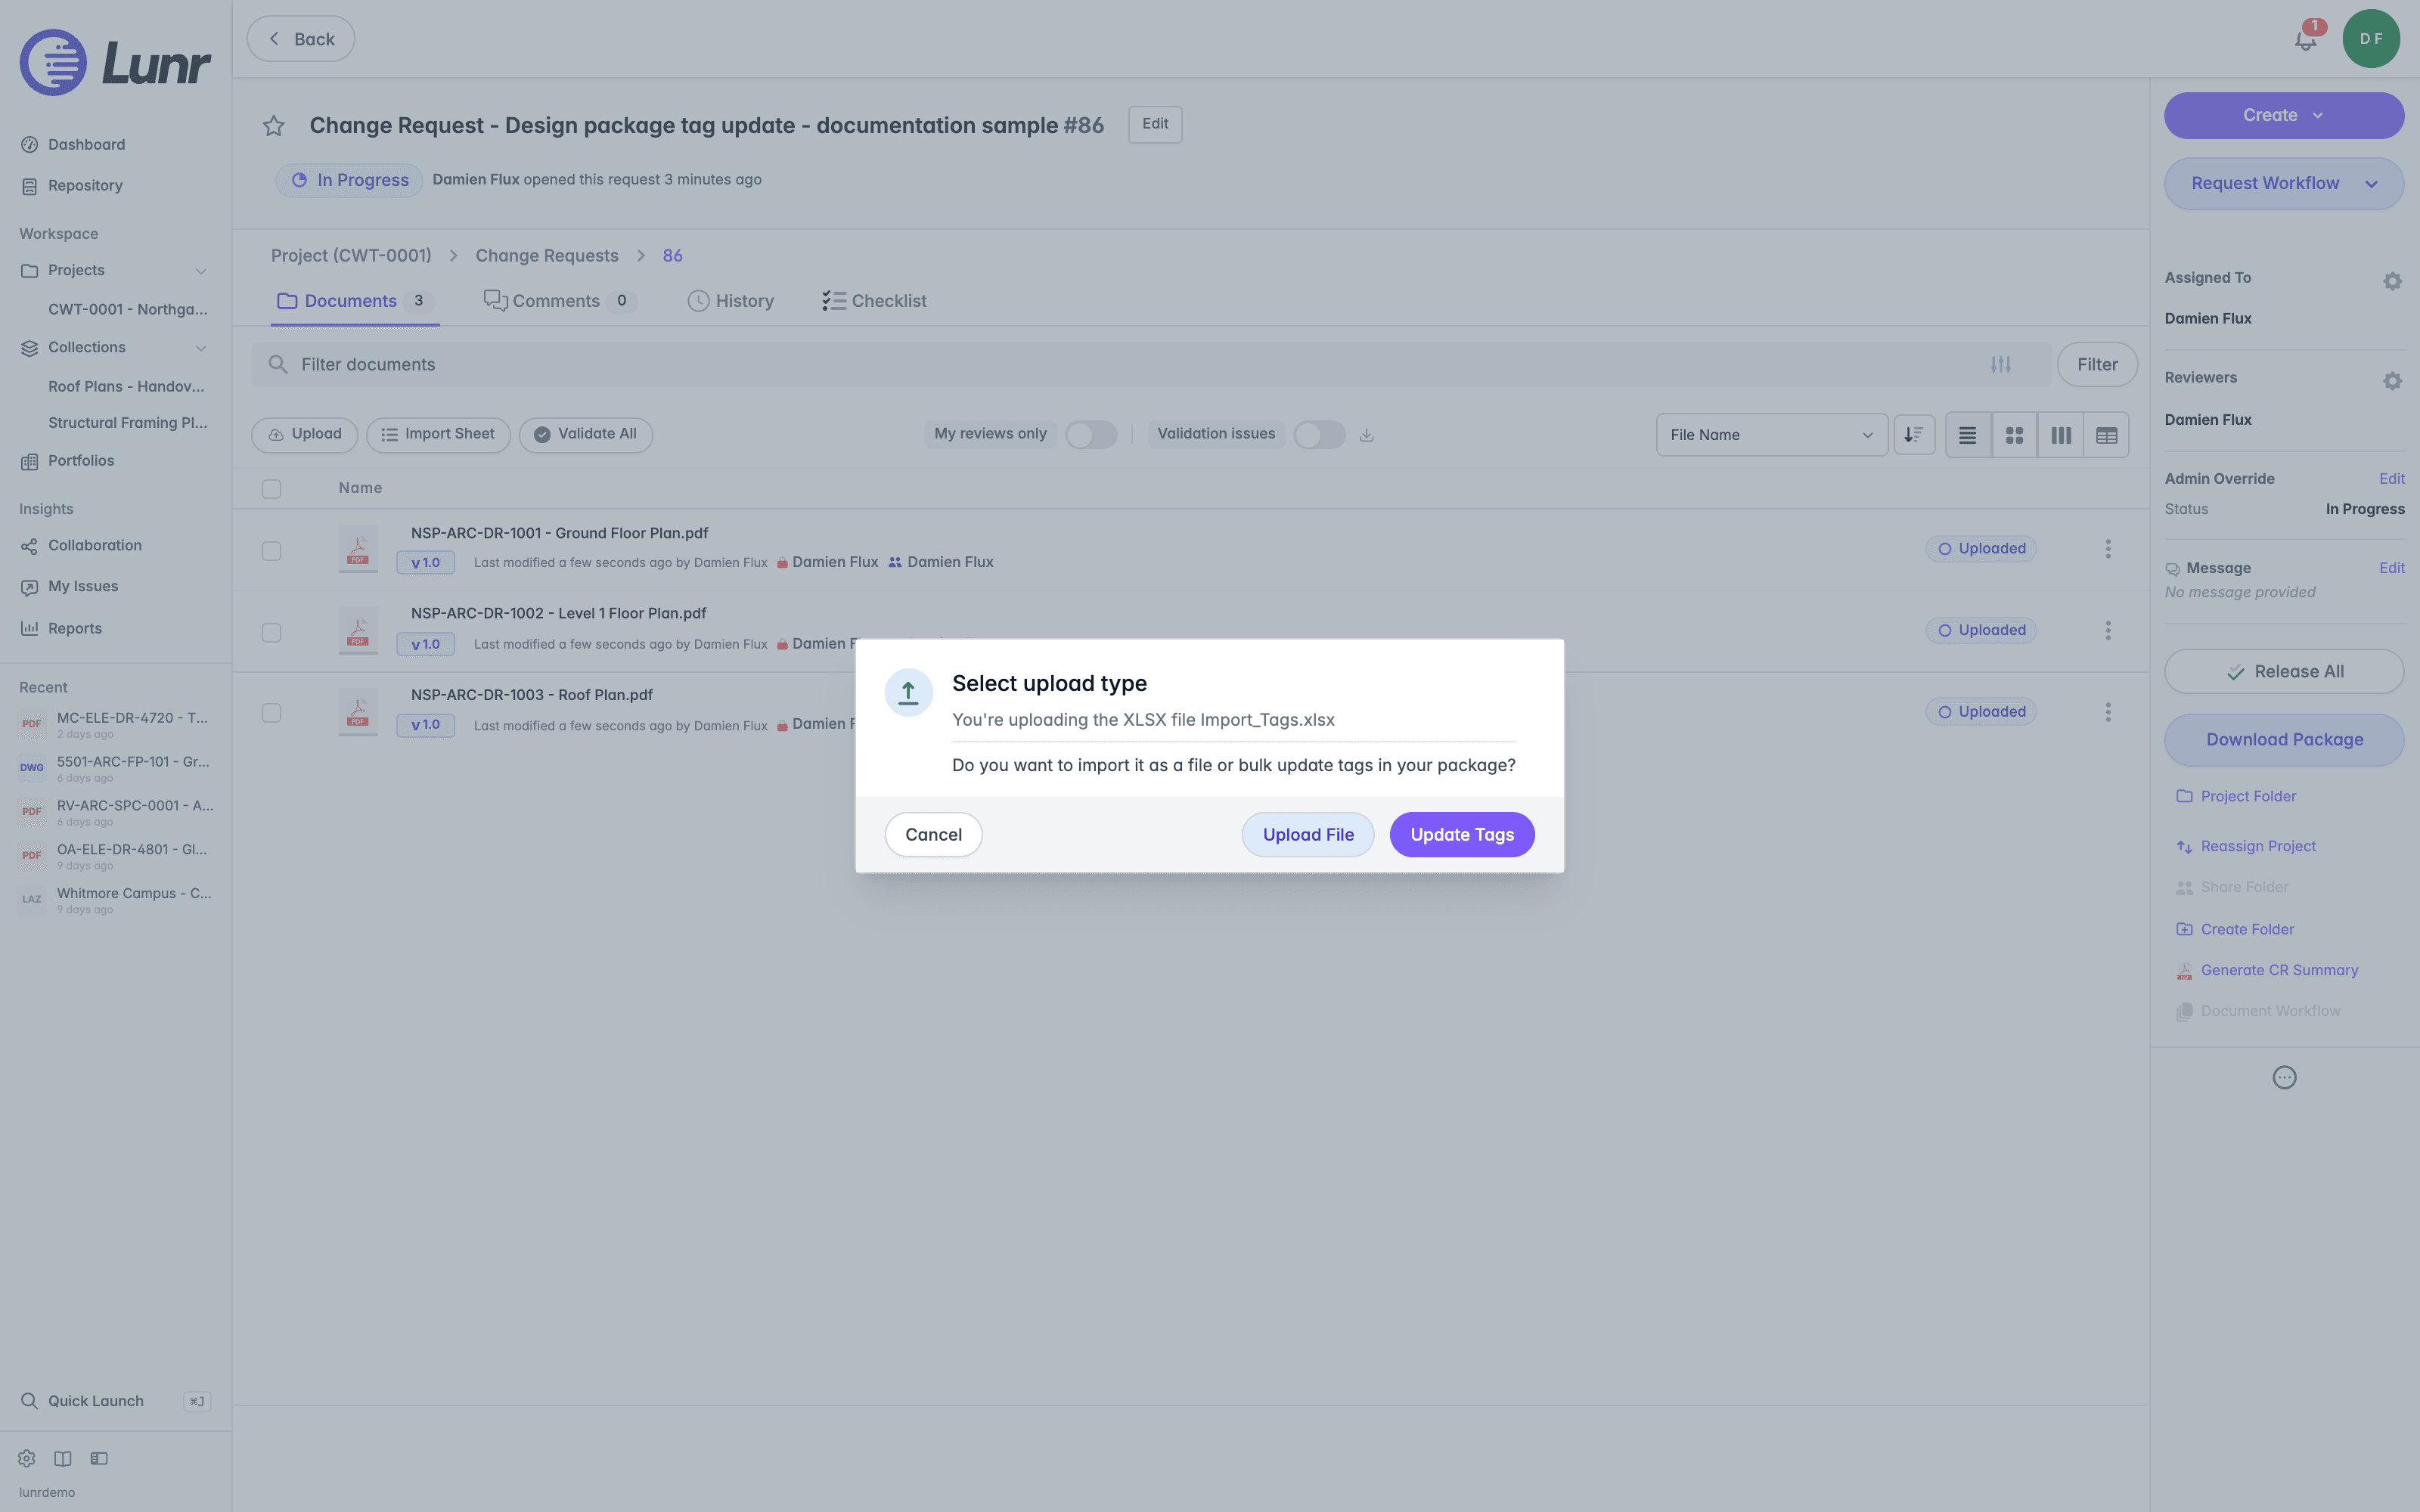
Both prompts are headed Select upload type and offer Cancel if you would rather not go ahead.
- For a zip. The dialog reads "You're uploading the zip file" followed by its name, then "Do you want to import it as a file or an import package?". Select Import Package to unpack it and bring its documents in individually, or Upload File to file the zip itself as a single document.
- For a spreadsheet. The dialog reads "You're uploading the XLSX file" followed by its name, then "Do you want to import it as a file or bulk update tags in your package?". Select Update Tags to read the spreadsheet and apply its values to existing documents, or Upload File to file the spreadsheet itself as a document.
A spreadsheet raises the prompt only when its name starts with Import_. Any other spreadsheet becomes a document, whatever it holds.
A zip always raises the prompt, so one you want kept as a document costs a single extra selection.
Import Packages
An import package is a single zip that carries a set of documents and a spreadsheet describing them, so a consultant can hand over a whole task in one file rather than one upload per drawing. Lunr unpacks it, creates a document for each file, and reads the tag values for each one from the spreadsheet.
To import one, open the change request, select Upload, and choose the zip. At the Select upload type prompt select Import Package.
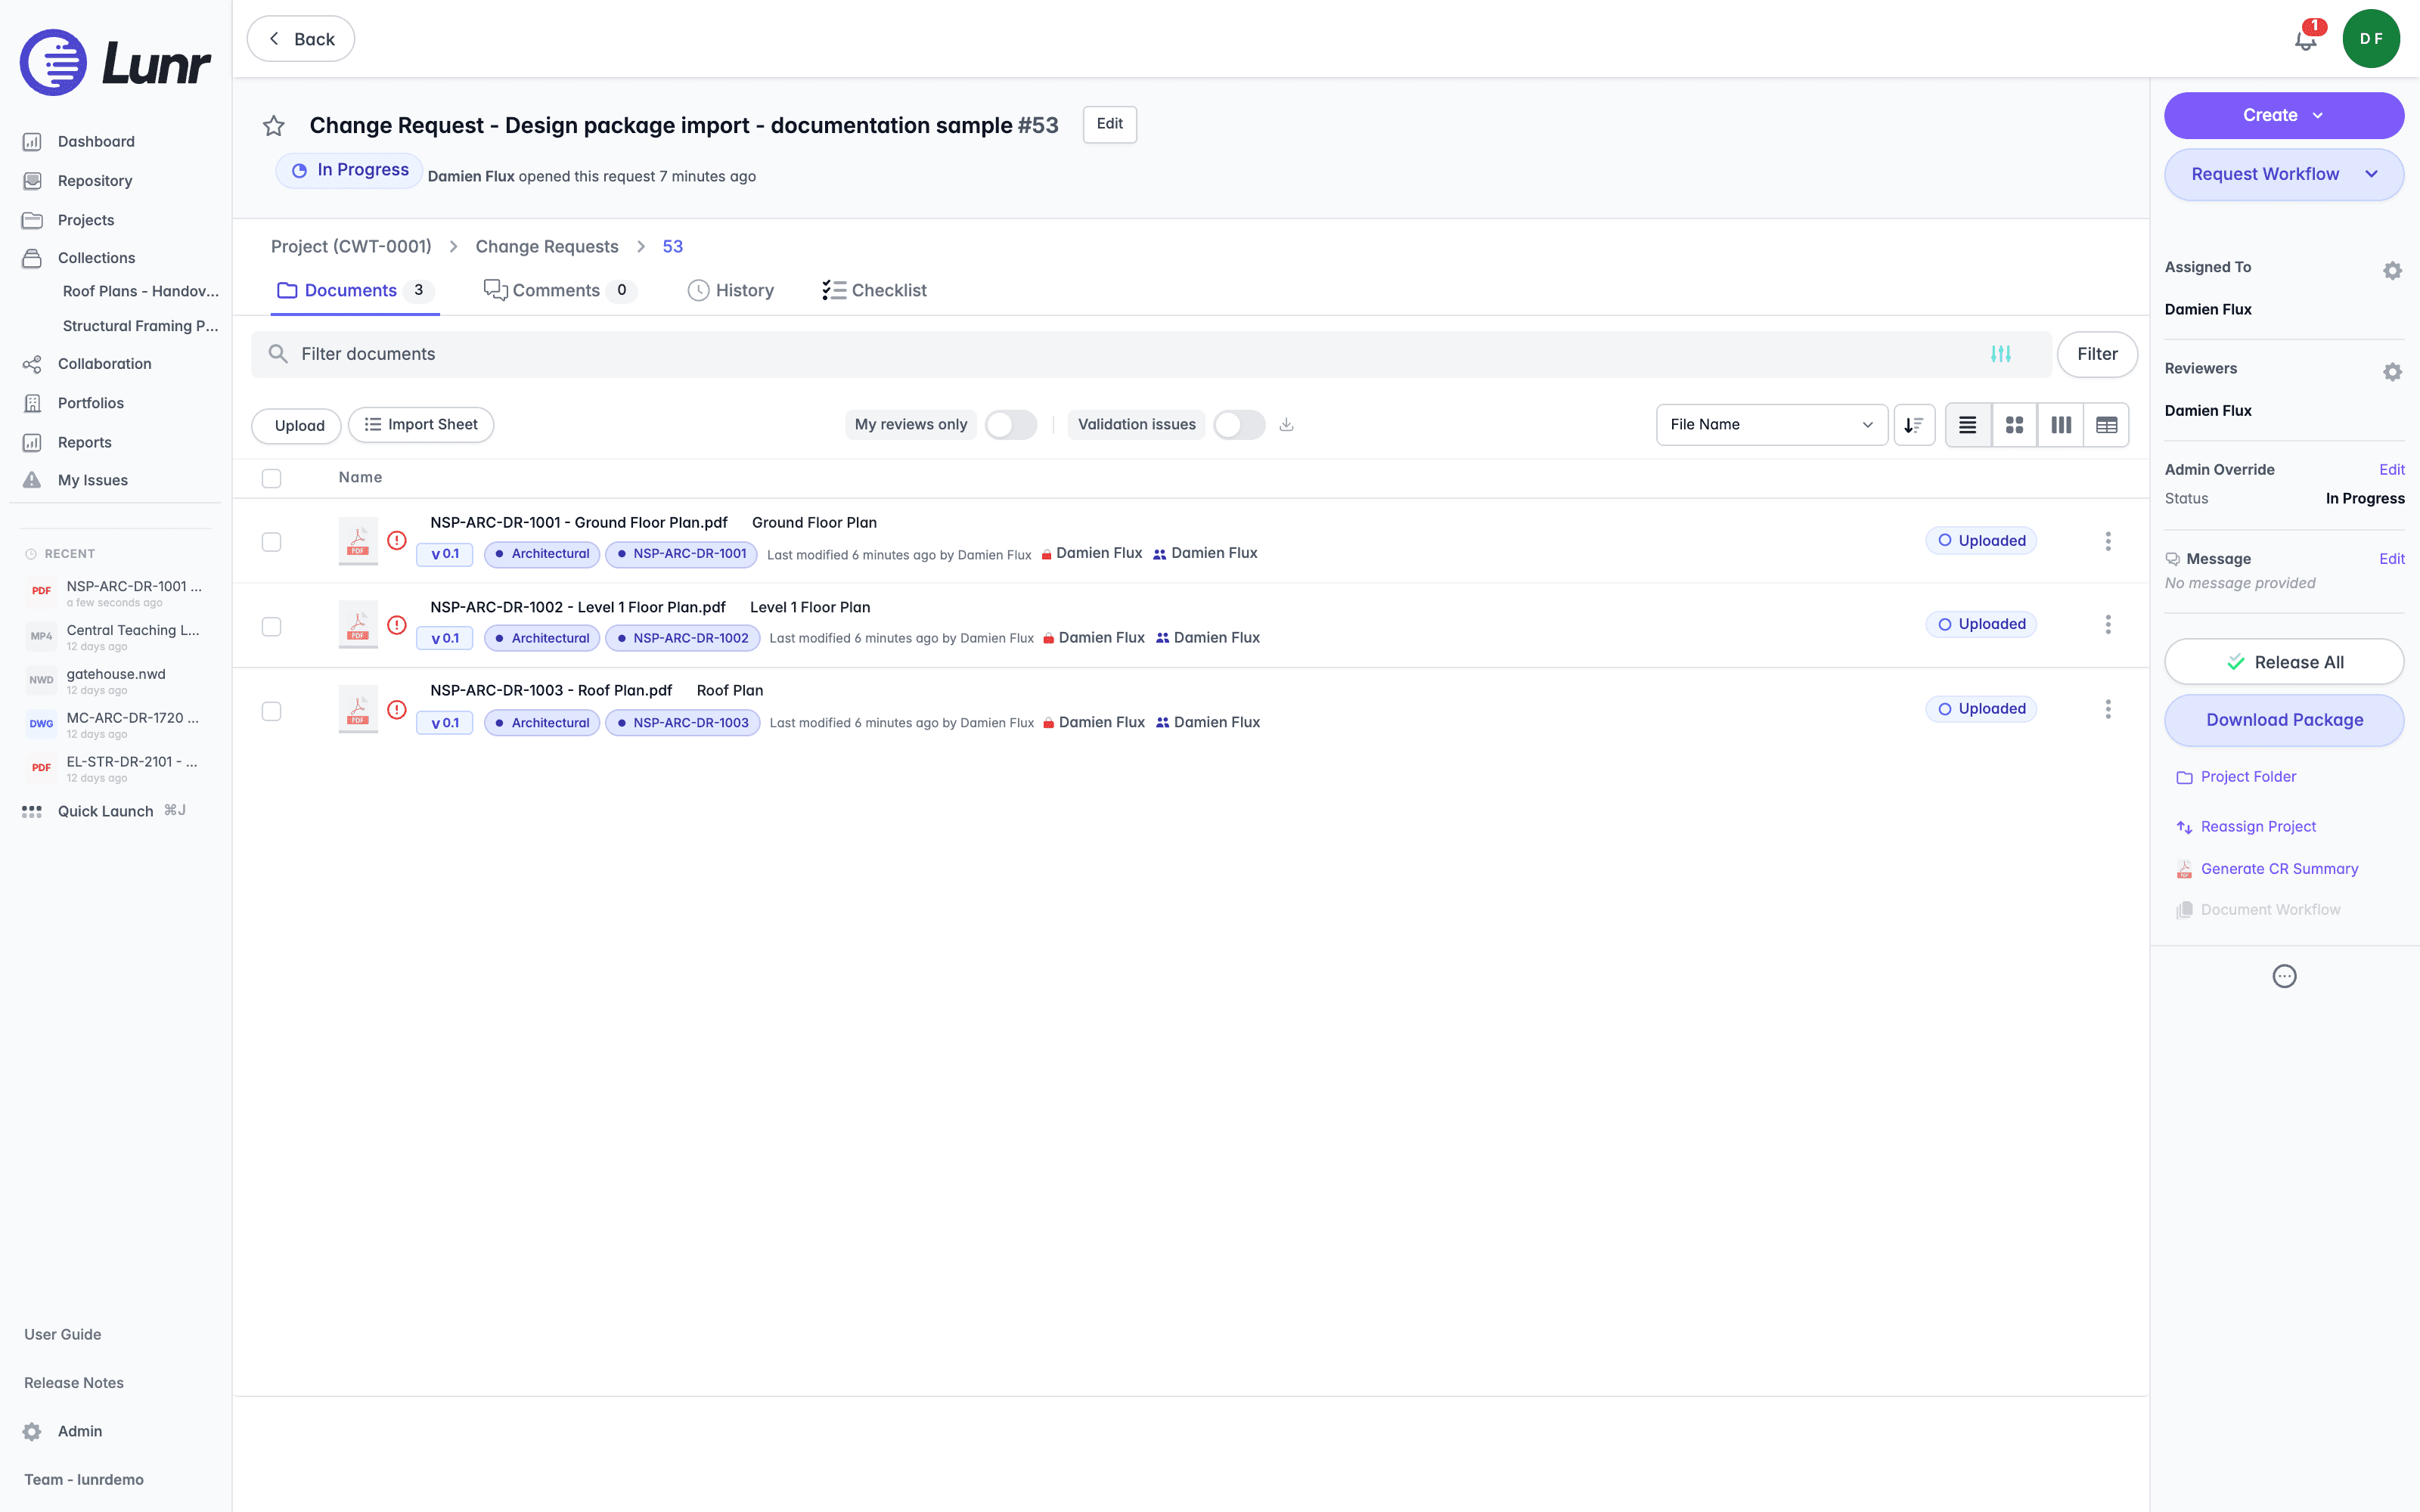
A progress bar headed Uploading package names the file and counts up while Lunr unpacks it, with Cancel alongside if you need to stop. The documents appear in the change request when it finishes, each at an initial version number and carrying the tags that were specified in the spreadsheet.
What an Import Package Contains
The zip holds the document files and, in most organisations, a spreadsheet that describes them, covered under Building the Import Spreadsheet. The spreadsheet has one row per document, and the file name on each row is what ties it to its file.
The spreadsheet and the zip have to agree in both directions.
| The package | What happens |
|---|---|
| Every row names a file in the zip, and every file has a row | Lunr imports it. |
| A row names a file the zip does not hold | The import fails. |
| The zip holds a file no row names | The import fails, unless the file is a PDF, covered under Renditions in a Package. |
Where an import fails, Lunr names the files at fault, so you can correct the spreadsheet or the zip and upload again.
Lunr skips, rather than imports, a file with an unsupported extension, a file with an unsafe name, and a Windows executable disguised as an AutoCAD script. It also skips an existing document that lies outside the folder the package was uploaded into. Apart from unsafe file names, each skip is recorded in the change request's audit trail.
Some organisations allow a package without a spreadsheet, covered under Importing a Package Without a Spreadsheet.
Importing a Package Without a Spreadsheet
Where your organisation allows it, a zip with no import spreadsheet is still accepted as an import package. Lunr unpacks it and creates a document for each file, so you can bring in a folder of drawings without preparing a spreadsheet first. Upload it as you would any import package, selecting Import Package at the Select upload type prompt.
Because there is no spreadsheet to read, no tag values come with the documents. Each one is created without the tags a spreadsheet would have supplied, so add them afterwards, either one document at a time or in bulk with a spreadsheet, covered under Updating Tags from a Spreadsheet.
Not every organisation has this enabled. Where it is not, an import package needs its spreadsheet. Ask your administrator if you are unsure which applies to you.
Renditions in a Package
A PDF is the one file the zip can carry without a row of its own, because a PDF can ride along as a rendition of another document. Lunr matches it on its name without the extension and accepts it where either of these holds.
- The spreadsheet has a row for a file of the same name, so a row for
Plan-01.dwgcoversPlan-01.pdf. - The zip holds a file of the same name that is not itself a PDF, so
Plan-01.dwgalongsidePlan-01.pdfcovers it.
A PDF matching neither fails the import, and two PDFs of the same name cannot cover each other, because the partner has to be a file of another type. The exception runs one way only: it lets the zip carry a file no row names, and never lets a row name a file the zip does not hold.
Updating Documents Already in the Change Request
Where the change request already holds a document with the same file name as a file in the package, the import updates that document rather than creating a duplicate. A document marked as in workflow but with no open workflow can be updated only by its assignee. Any other matching document can be updated by its assignee or by a reviewer of the change request.
Lunr skips a row you are not allowed to update, records the skip in the audit trail under your name, and does not create a duplicate in its place. A package that holds only files, with no tag values to apply, replaces the document's file and leaves its tags unchanged.
What the History Records
Each document keeps a record of how it arrived in its Activity view. A new document reads "Created new document from package import" followed by the package file name and its size, and an existing document that the import changed reads "Updated from package import" in the same way. A document that the import left unchanged gets no entry. These entries show in the default Document Lifecycle & Revisions group.
Where cross-reference linking applies to a drawing in the package, Lunr records the outcome in the References & Automation group. The entry reads "Xref linking finished" with the count of references linked, and lists up to ten names under Not found, Could not be linked, or Unloaded in the drawing, followed by "and N more" for the rest. It can also read "Xref linking finished: no external references declared", "Xref linking did not finish: the drawing could not be processed", or "Xref linking did not run" with one of these reasons:
- Linking is turned off for new documents.
- The import updated the document details only.
- The drawing file was not found in the package.
- Rendition generation was skipped for this drawing.
- The antivirus scan did not clear the file.
- The file could not be processed after the upload.
Where your organisation validates cross-references on import, the change request's History records the result for the package. It reads "Xref validation finished for package" with the file name, the number of drawings checked, and how many have missing references, or "Xref validation did not run" with the reason, such as the setting being disabled. Package file names in these entries are visible to anyone who can see the document's activity.
Validation Issues After an Import
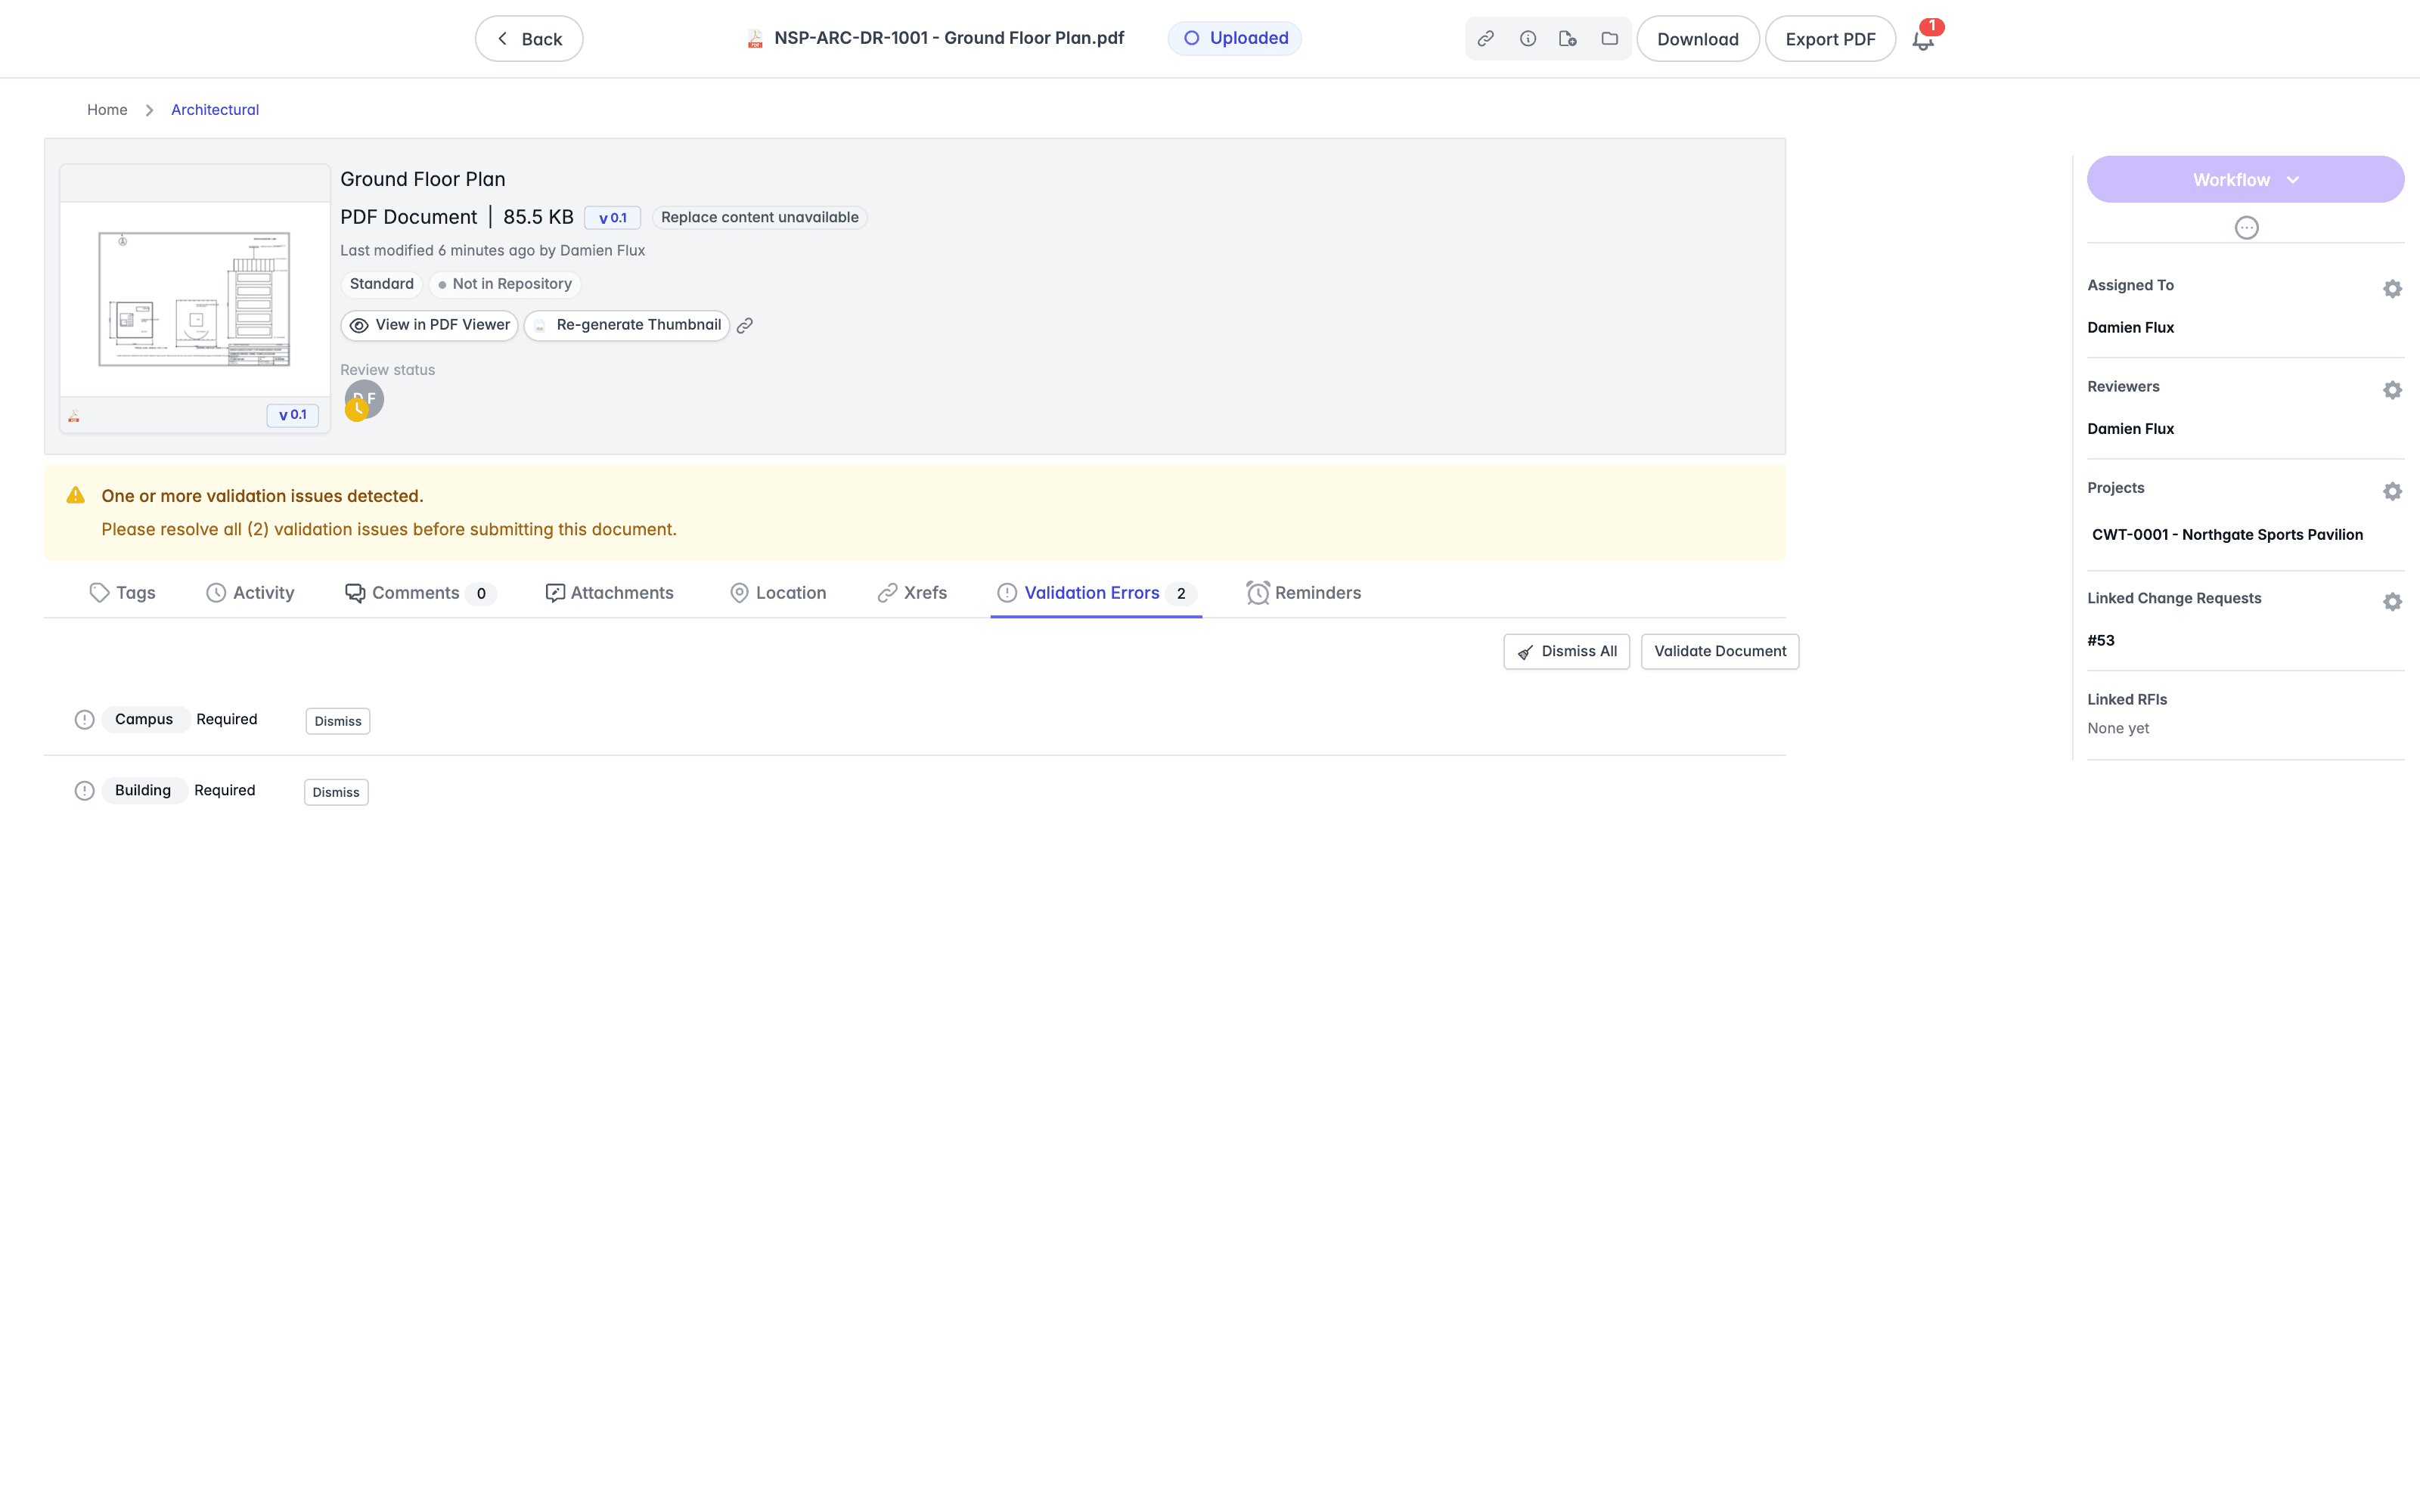
Where your organisation validates imported documents, Lunr imports each document and flags what is missing, such as a required tag, and a banner reads "We found one or more validation issues with your package." above a count of the issues and the documents they affect.
After an import, Lunr validates only the documents the import processed, using the newest version of each. Running validation again with a check disabled clears that check's open issues and keeps any you have dismissed.
Work through them from the Validation Errors tab on each document, which lists each missing tag against Required. Fill the tags in and the flags clear. To dismiss flags instead, including across the whole package at once, see Validation Errors.
Updating Tags from a Spreadsheet
Use a spreadsheet when the documents are already in the change request and only their tags need to change. Nothing is unpacked and no files are uploaded, so there is no zip to prepare. Lunr reads the spreadsheet and applies its values to the documents.
- Open the change request.
- Name the spreadsheet so that it starts with
Import_. - Select Upload and choose the spreadsheet.
- At the Select upload type prompt, select Update Tags.
The spreadsheet that Import Sheet downloads is already named this way, for example Import_CR_53_20260923.xlsx, so you can download it, fill in the tag values, and upload it without renaming. See Generating the Spreadsheet from a Folder.
The layout is the same as for an import package, covered under Building the Import Spreadsheet. Unlike an import package, a spreadsheet for Update Tags does not need to be called Import.xlsx.
Building the Import Spreadsheet
The spreadsheet tells Lunr which tag values belong to which file. It has the same layout whether it travels inside an import package or is uploaded on its own to update tags, so build it once and use it either way. There are three ways to start, and each ends with a spreadsheet you check against the requirements below.
| Starting point | Best when |
|---|---|
| Generate it from a folder | The files are on your computer and nothing is in Lunr yet. |
| Export documents already in Lunr | The documents exist and you want their current tags as the starting values. |
| Download a change request package | You want the files and a populated spreadsheet together, to adjust and import again. |
Requirements
Whichever way you start, the spreadsheet has to meet these. A sheet that Import Sheet generates is built to meet them already.
- An
.xlsxworkbook. - A worksheet named
Import. Lunr reads only that worksheet and ignores any others. Without it the import fails. - Headings in the first row. A column with no heading is ignored.
- A File Name column. It holds one row per file, with the full file name including its extension, for example
NSP-ARC-DR-1001 - Ground Floor Plan.pdf. Case does not matter. A row with no file name is skipped, and a spreadsheet with no File Name column fails. - One column per tag. The heading is the tag's name, written as it appears in Lunr. Every column with a heading is read as a tag, so delete any column that is not one before you upload.
- Values. An empty cell sets nothing. A date entered as a date is read as year, month, and day, with the time kept where there is one.
- Several values in one cell. This works only for a tag that allows several values. Separate them with the delimiter your organisation has set, for example
Architectural||Structural. Lunr's own exports write||, so ask your administrator if the values in an exported cell do not split when you import it. A tag that takes one value reads the whole cell as that value. - A name Lunr can find. Name it
Import.xlsxand put it in the zip. Lunr also accepts a single spreadsheet whose name starts withImportand ends in.xlsx, such asImport_CR_53_20260923.xlsx, wherever it sits in the zip. Where the zip holds more than one of these and none isImport.xlsx, the import fails.
Generating the Spreadsheet from a Folder
Rather than typing every file name by hand, let Lunr read the folder you are preparing and write the spreadsheet for you. Select Import Sheet, next to Upload in the change request, to open the Generate Import Sheet dialog.
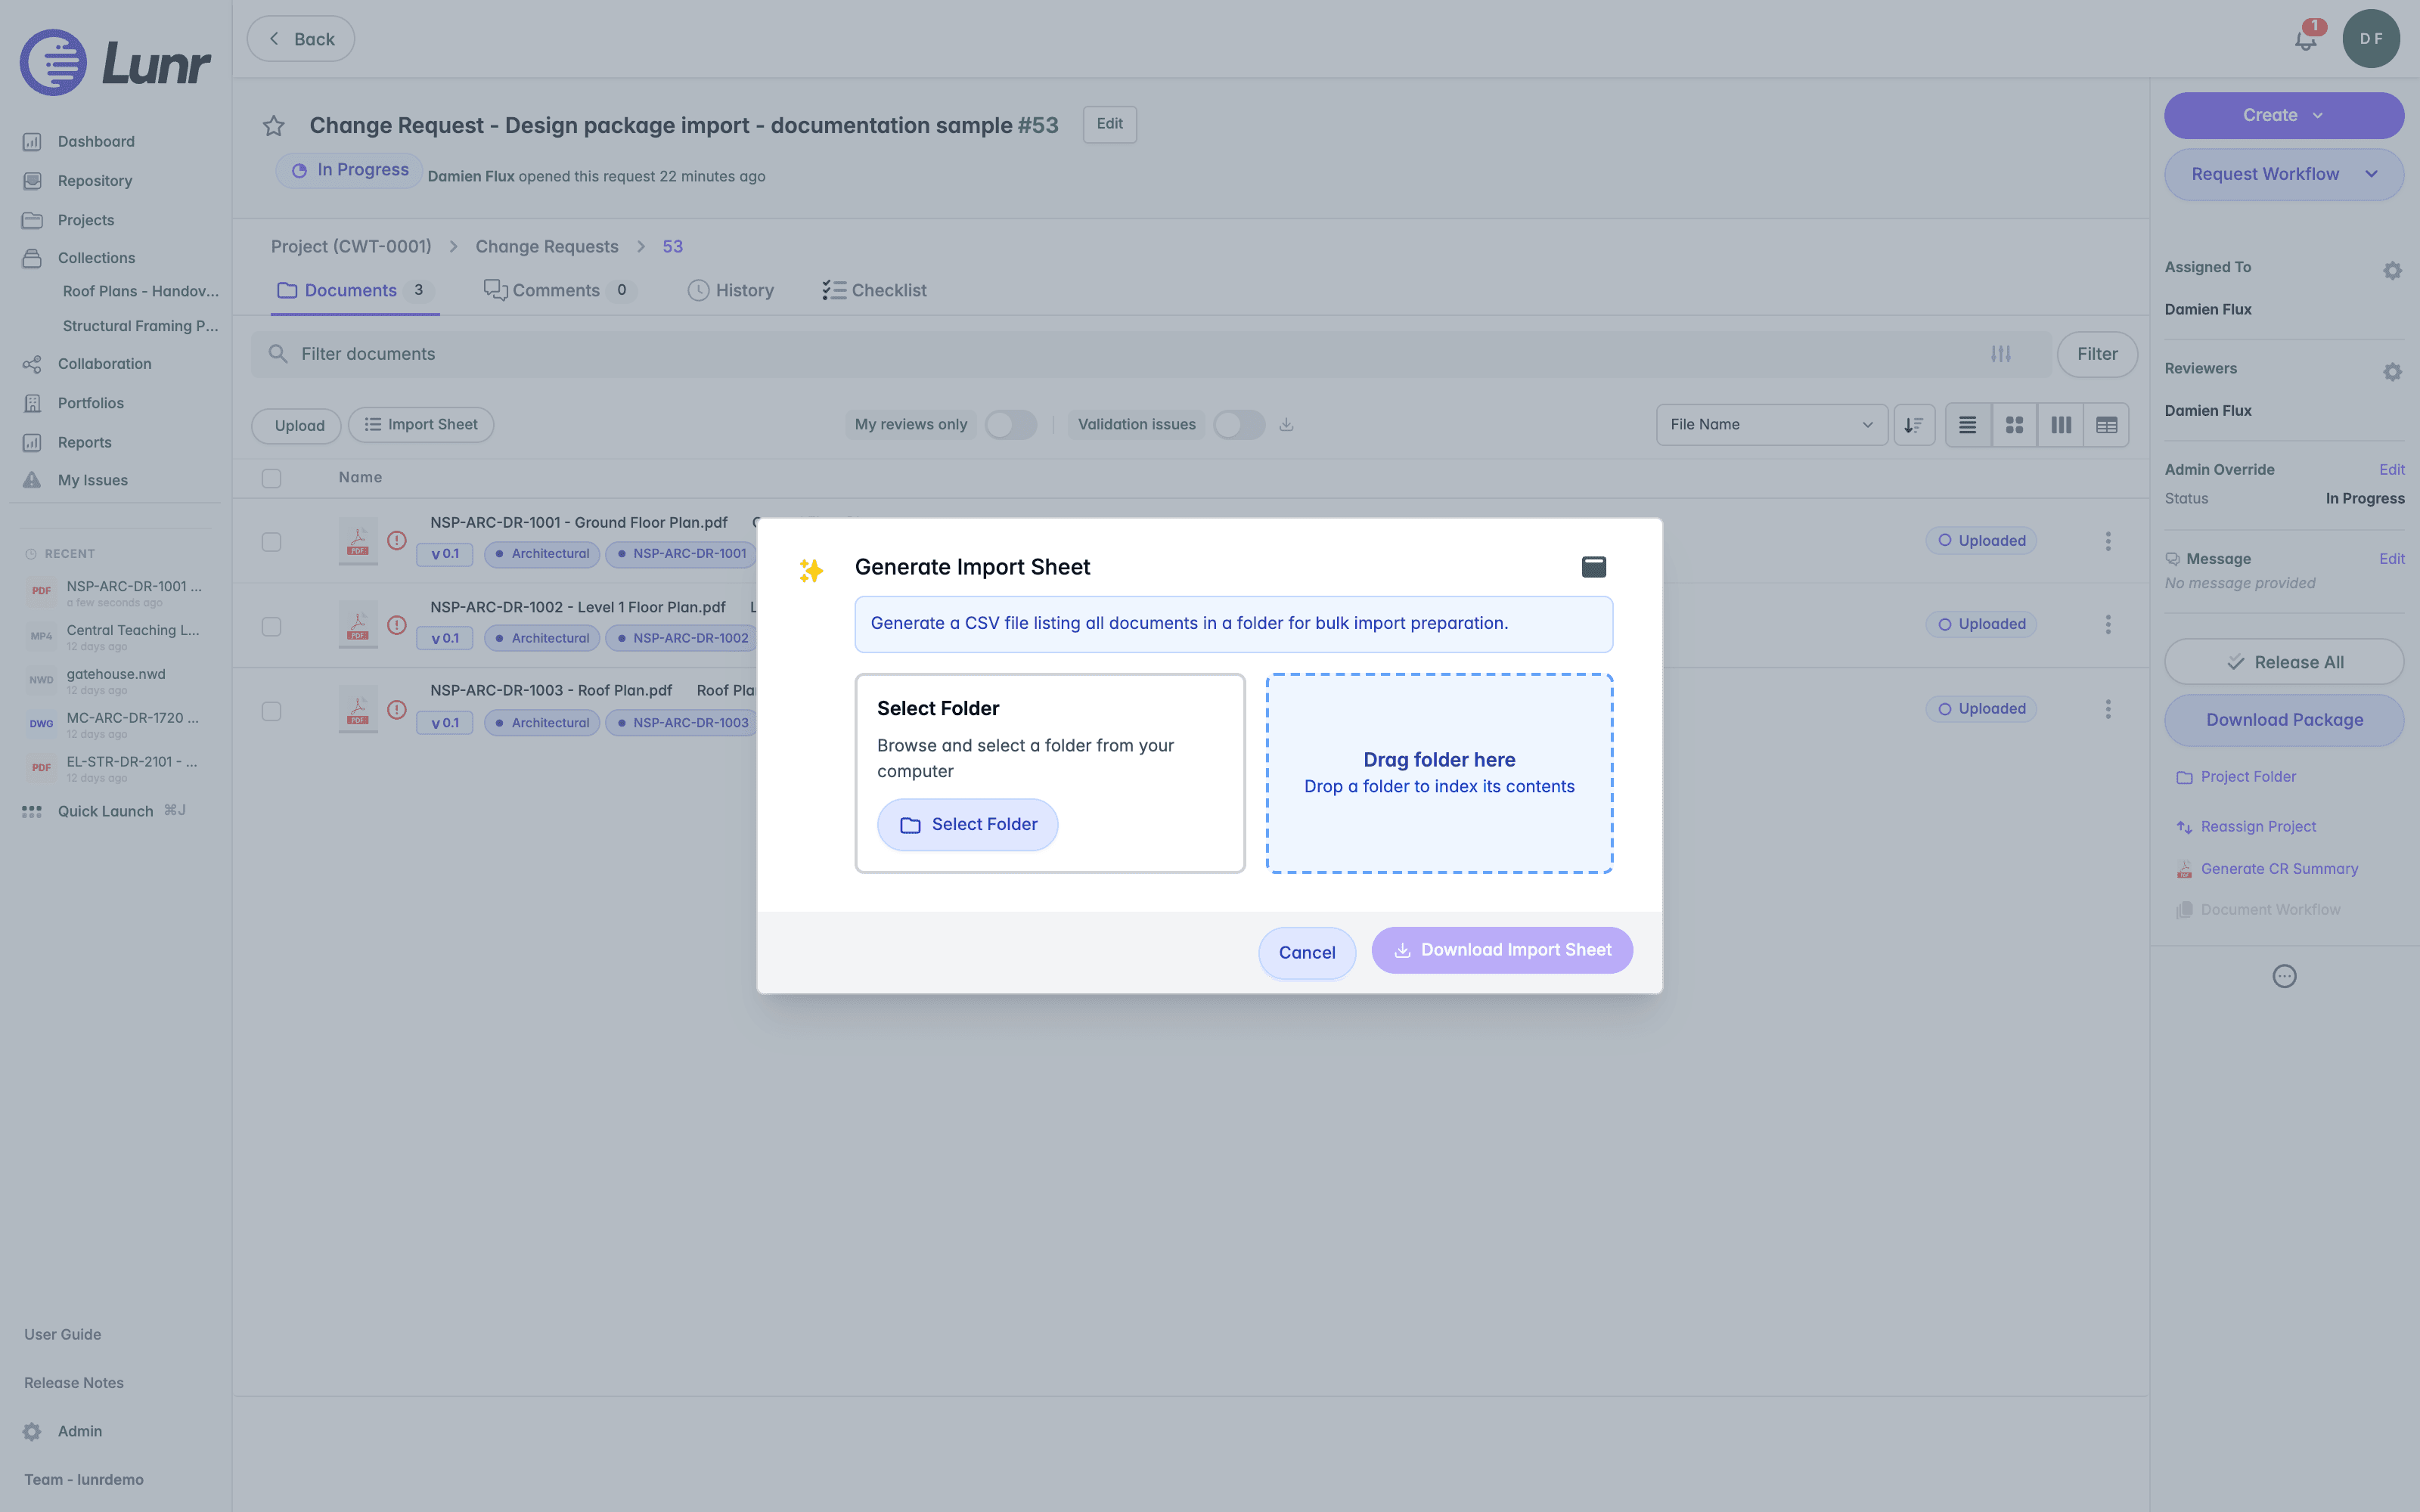
Choose the folder in one of two ways.
- Select Select Folder to browse for it on your computer.
- Drag the folder onto the Drag folder here area.
Lunr reads the folder, including its subfolders, and lists what it found. A summary line gives the number of files, their total size, and how many file types are present, and the list itself carries a File Name and Size column, with Show Path and Show Type adding the other two. Sort by selecting a column heading, and narrow a long list with the filter field, which matches on name, path, or extension.
Where your organisation has set up an import template, a Template field above the list chooses the layout of the sheet, which decides the columns it carries.
Select Download Import Sheet to save the spreadsheet. It downloads as an .xlsx named for the change request and the date, for example Import_CR_53_20260923.xlsx, listing every file the dialog showed. Fill in the tag values, rename it to Import.xlsx so there is no doubt which file Lunr should read, and zip it with the files themselves to make the package.
Checking the Folder Against the Change Request
Select Scan Package to compare the folder with the documents already in the change request before you generate anything. Lunr adds a Status and a Validation column to the list and counts how many files it can and cannot take. The counts read New, Updates, and Skipped, and each file's Status reads New, Update, or Skipped. Where a file cannot be taken, the Validation column gives the reason: "Not current version" where the matching document is not at its current minor version, and "Document is Master" or "Document is Released" where it is at that stage. A document already in the change request with no file in the folder is listed too, as Skipped with "Not in folder". Select Rescan Package to run it again after changing the folder.
Applying a Tag to Every File
Default Tag Values sets a tag once and writes it against every row, which suits the values a whole issue shares, such as a discipline or a status. Select Add Tag, choose the tag, and give it a value, either by entering one or by choosing from the list where the tag has fixed values. Each tag you give a value becomes a column in the list, so you can see what the spreadsheet will carry before you download it. Remove a tag with the remove icon at the end of its row.
Exporting Documents from Lunr
Where the documents are already in Lunr, export them and use the result as your spreadsheet, so the file names and current tag values are filled in for you. Select the documents in the repository, a project, or search results, select Export to Excel, choose a Report template, and select Export. The export is described further under Exporting Metadata.
Choose a template whose first column is File Name and that carries the tags you want, because the export fills only the tag columns the template has. Then check the result against the requirements, deleting any column that is not a tag, such as a workflow status column.
Change the values you want to change. Then either zip the spreadsheet with the files as Import.xlsx, or upload it on its own with a name starting Import_ and select Update Tags.
Downloading a Change Request Package
A change request package already contains a spreadsheet. Select Download Package in a change request and the zip holds the request's documents together with an Import.xlsx listing each document's file name and tags, built from your organisation's import template. That is the layout an import package expects, so you can adjust the values, add or swap files, and upload the zip into a change request as an import package. See Downloading a Change Request Package for how the package is built.
Uploading Documents
Bring files into the Lunr repository with the Create menu, the Upload button, or drag and drop, and understand when an upload becomes a new document, a new revision of an existing one, or a rendition attached to another.
Uploading Assemblies
Upload an Inventor or SolidWorks assembly into a project with Upload Assembly, covering the pre-upload check of its parts, how folders are kept, the upload progress, and the 3D model Lunr builds from it.