Managing Projects
Create, upload, edit, archive, and delete projects, and manage who can reach a project and its documents through members, folder access, and roles.
Overview
This page covers setting a project up and looking after it: creating one by hand or in bulk from a spreadsheet, deciding who can reach it, and editing, archiving, or deleting it once it is running. For the projects list itself, see Introduction, and for working inside a project, see Working in a Project.
Creating a Project
Creating a project requires the Manage Projects access right. Select Create Project in the Action Pane to open the Create a project form.
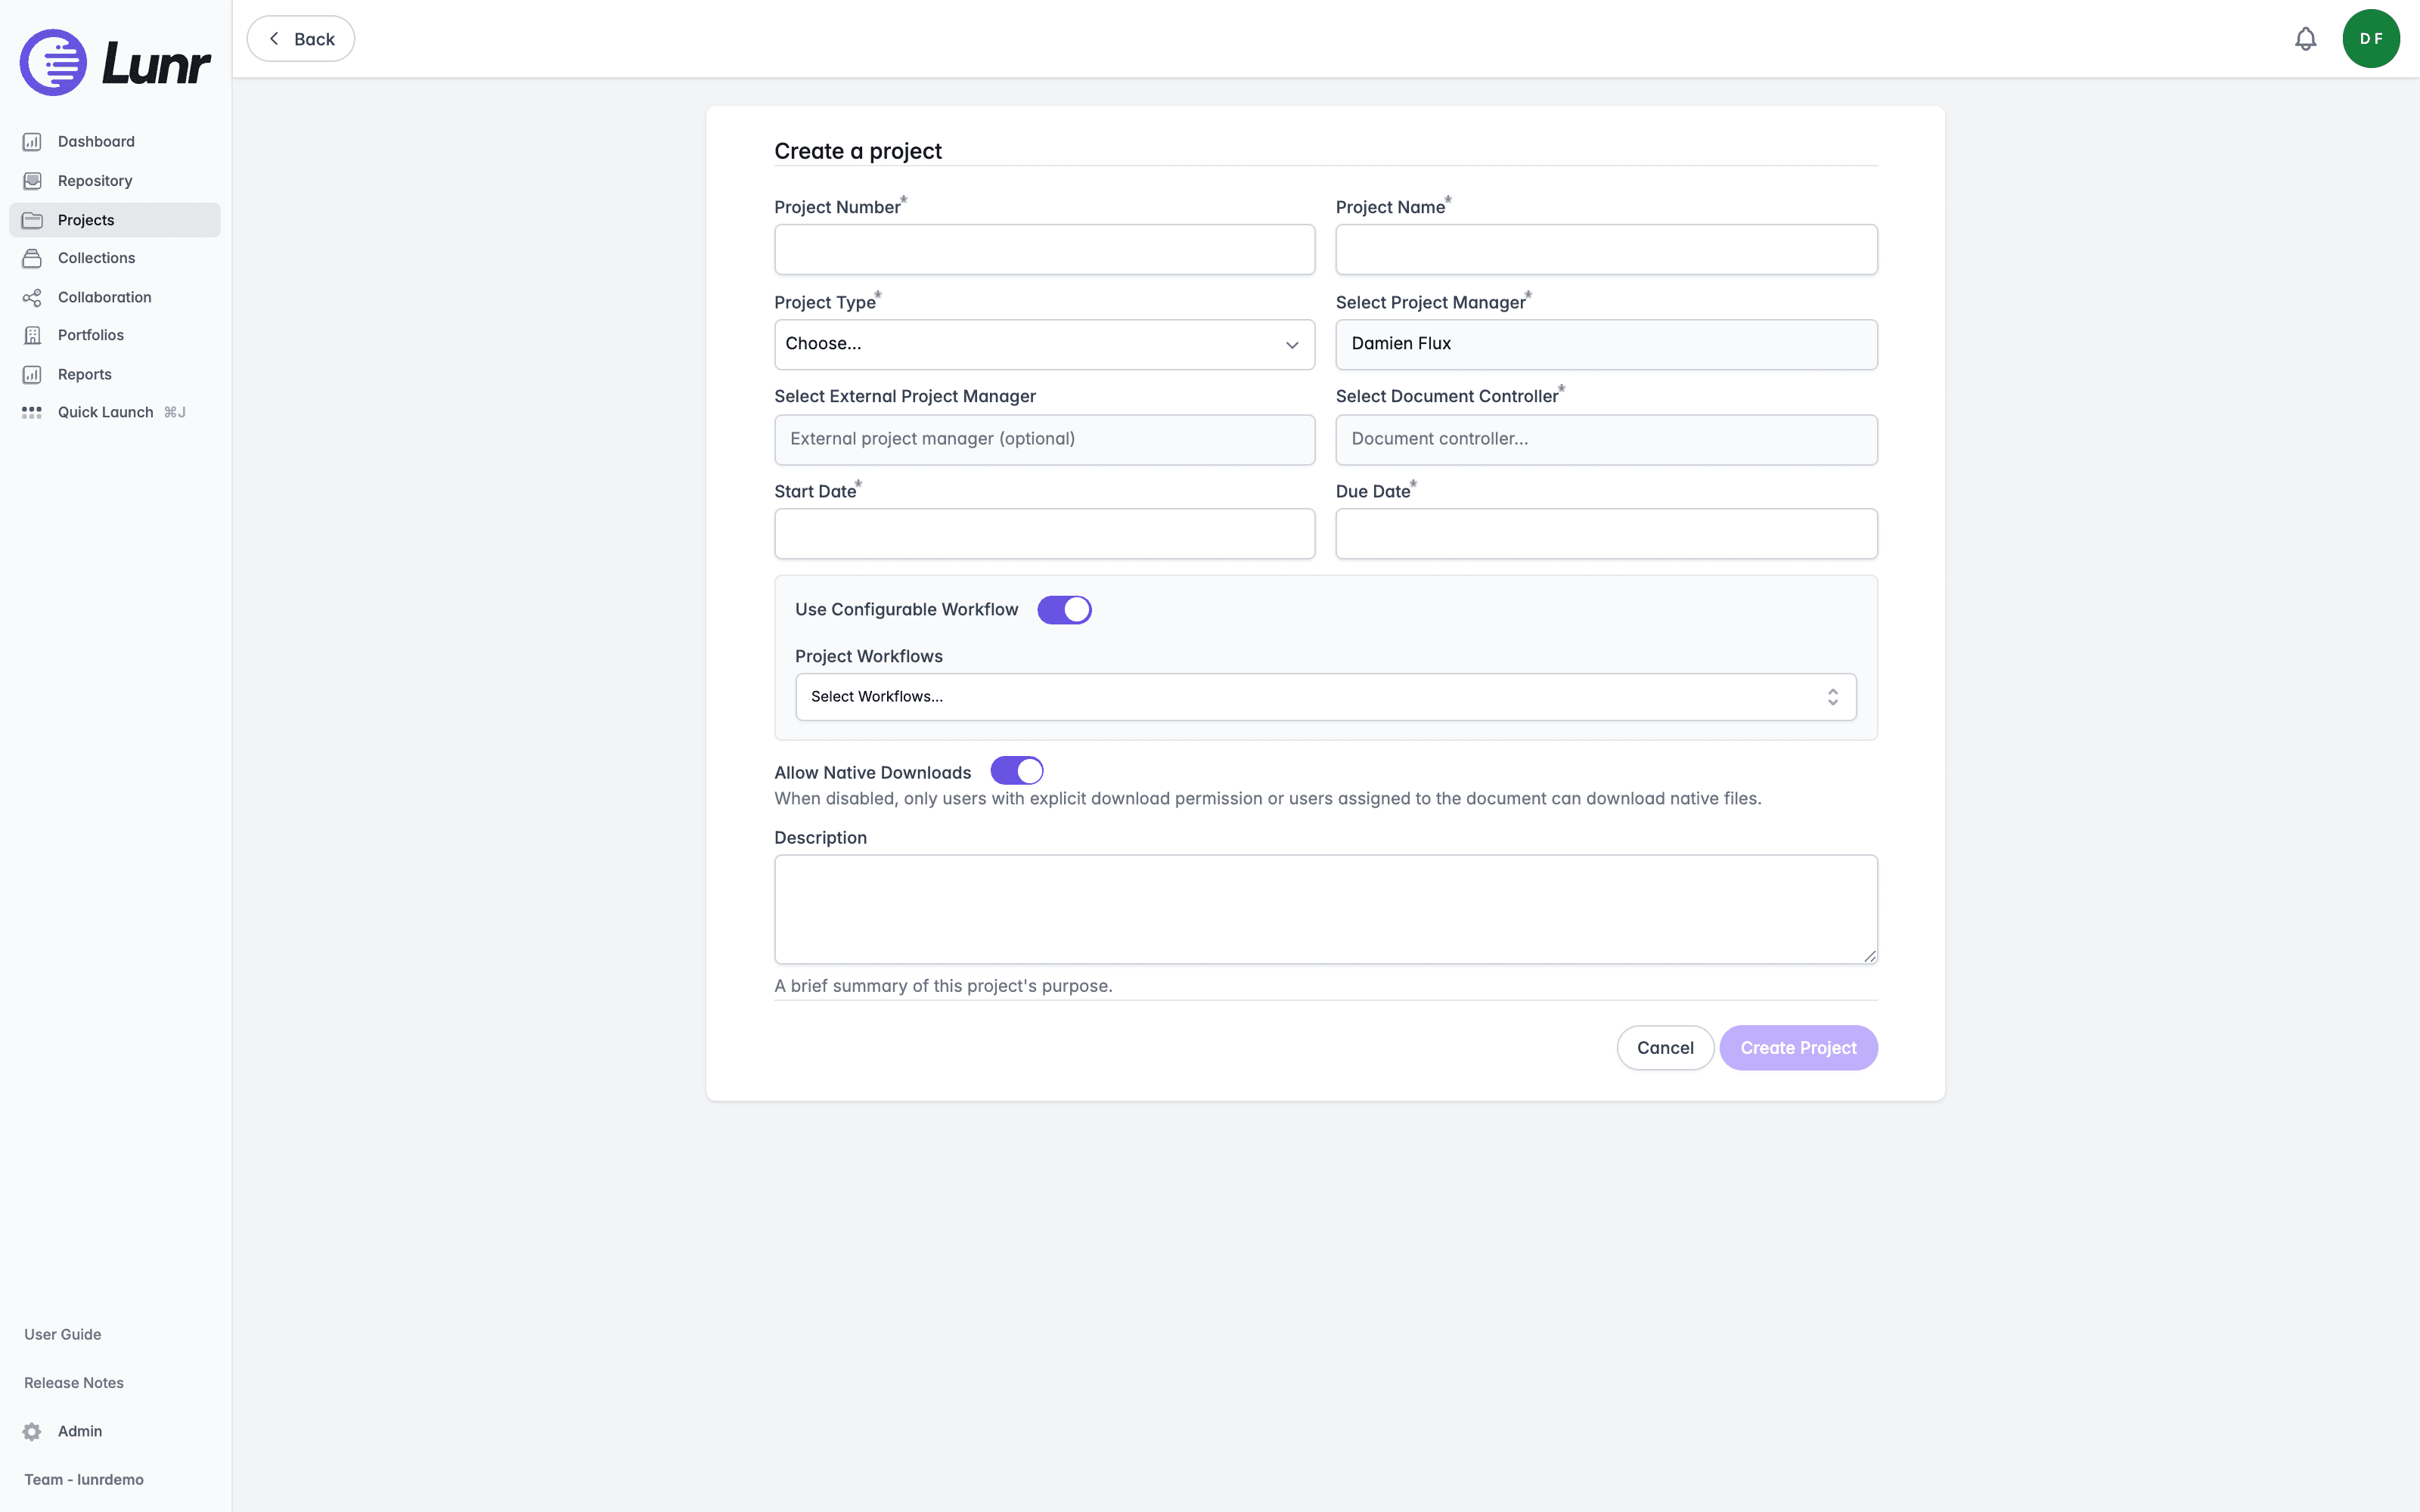
- Enter a Project Number and a Project Name (both required).
- Choose a Project Type from the dropdown (required; your organisation defines the available types), and confirm the project manager field, shown here as Select Project Manager though your organisation may label it differently. It is required and prefilled with you.
- Optionally enter someone in the Select External Project Manager field, and choose a Select Document Controller (required).
- Enter a Start Date and a Due Date (both required).
- If your organisation uses configurable workflows, leave the Use Configurable Workflow toggle enabled and choose from the Project Workflows multi-select. This panel needs the Release as Master access right.
- Leave Allow Native Downloads on to let native files be downloaded freely, or turn it off so that only users with explicit download permission, or users assigned to the document, can download them.
- Enter a Description to summarise the project's purpose.
- Select Create Project. The button stays disabled until the required fields are filled, and its label changes to "Creating Project..." while the project saves.
If your organisation enables the project status field, a Project Status dropdown also appears, and your organisation's own project tags each add their own field, some of which can be required. A Create Project Role box lets you "Create a project role to grant repository permissions at the project level".
If your organisation has project templates enabled, the form also offers a Use a Template selector at the top and a Create as Template box further down. Both are covered in Project Templates.
Uploading Projects
Select Upload Projects in the Action Pane to open a file picker directly; there is no dialog and no template to download. Choose an .xlsx spreadsheet of up to 500 KB, which Lunr scans for viruses before processing it.
Recognised column headings are Project Number, Project Name, Project Type, Project Manager (matched on "First Last"), Start Date, Finish Date, Description, and Project Status, with dates entered as dd/MM/yyyy. Rows without a project number are ignored. An existing project is matched by its project number, and only its name, description, start date, due date, and manager are updated, its number, type, and status are left alone. A new project is not created if its status is Complete, Closed, or Cancelled. Once the upload finishes, Lunr reports how many projects were added, updated, and skipped.
Project Templates
If your organisation has project templates enabled, a template is an ordinary project marked as a template, so you edit it like any other project, and new projects can be created from it with its folder structure, tags, and settings already in place. See Project Templates for how to create and use one, and exactly what is and is not copied.
Project Members and Access
Members
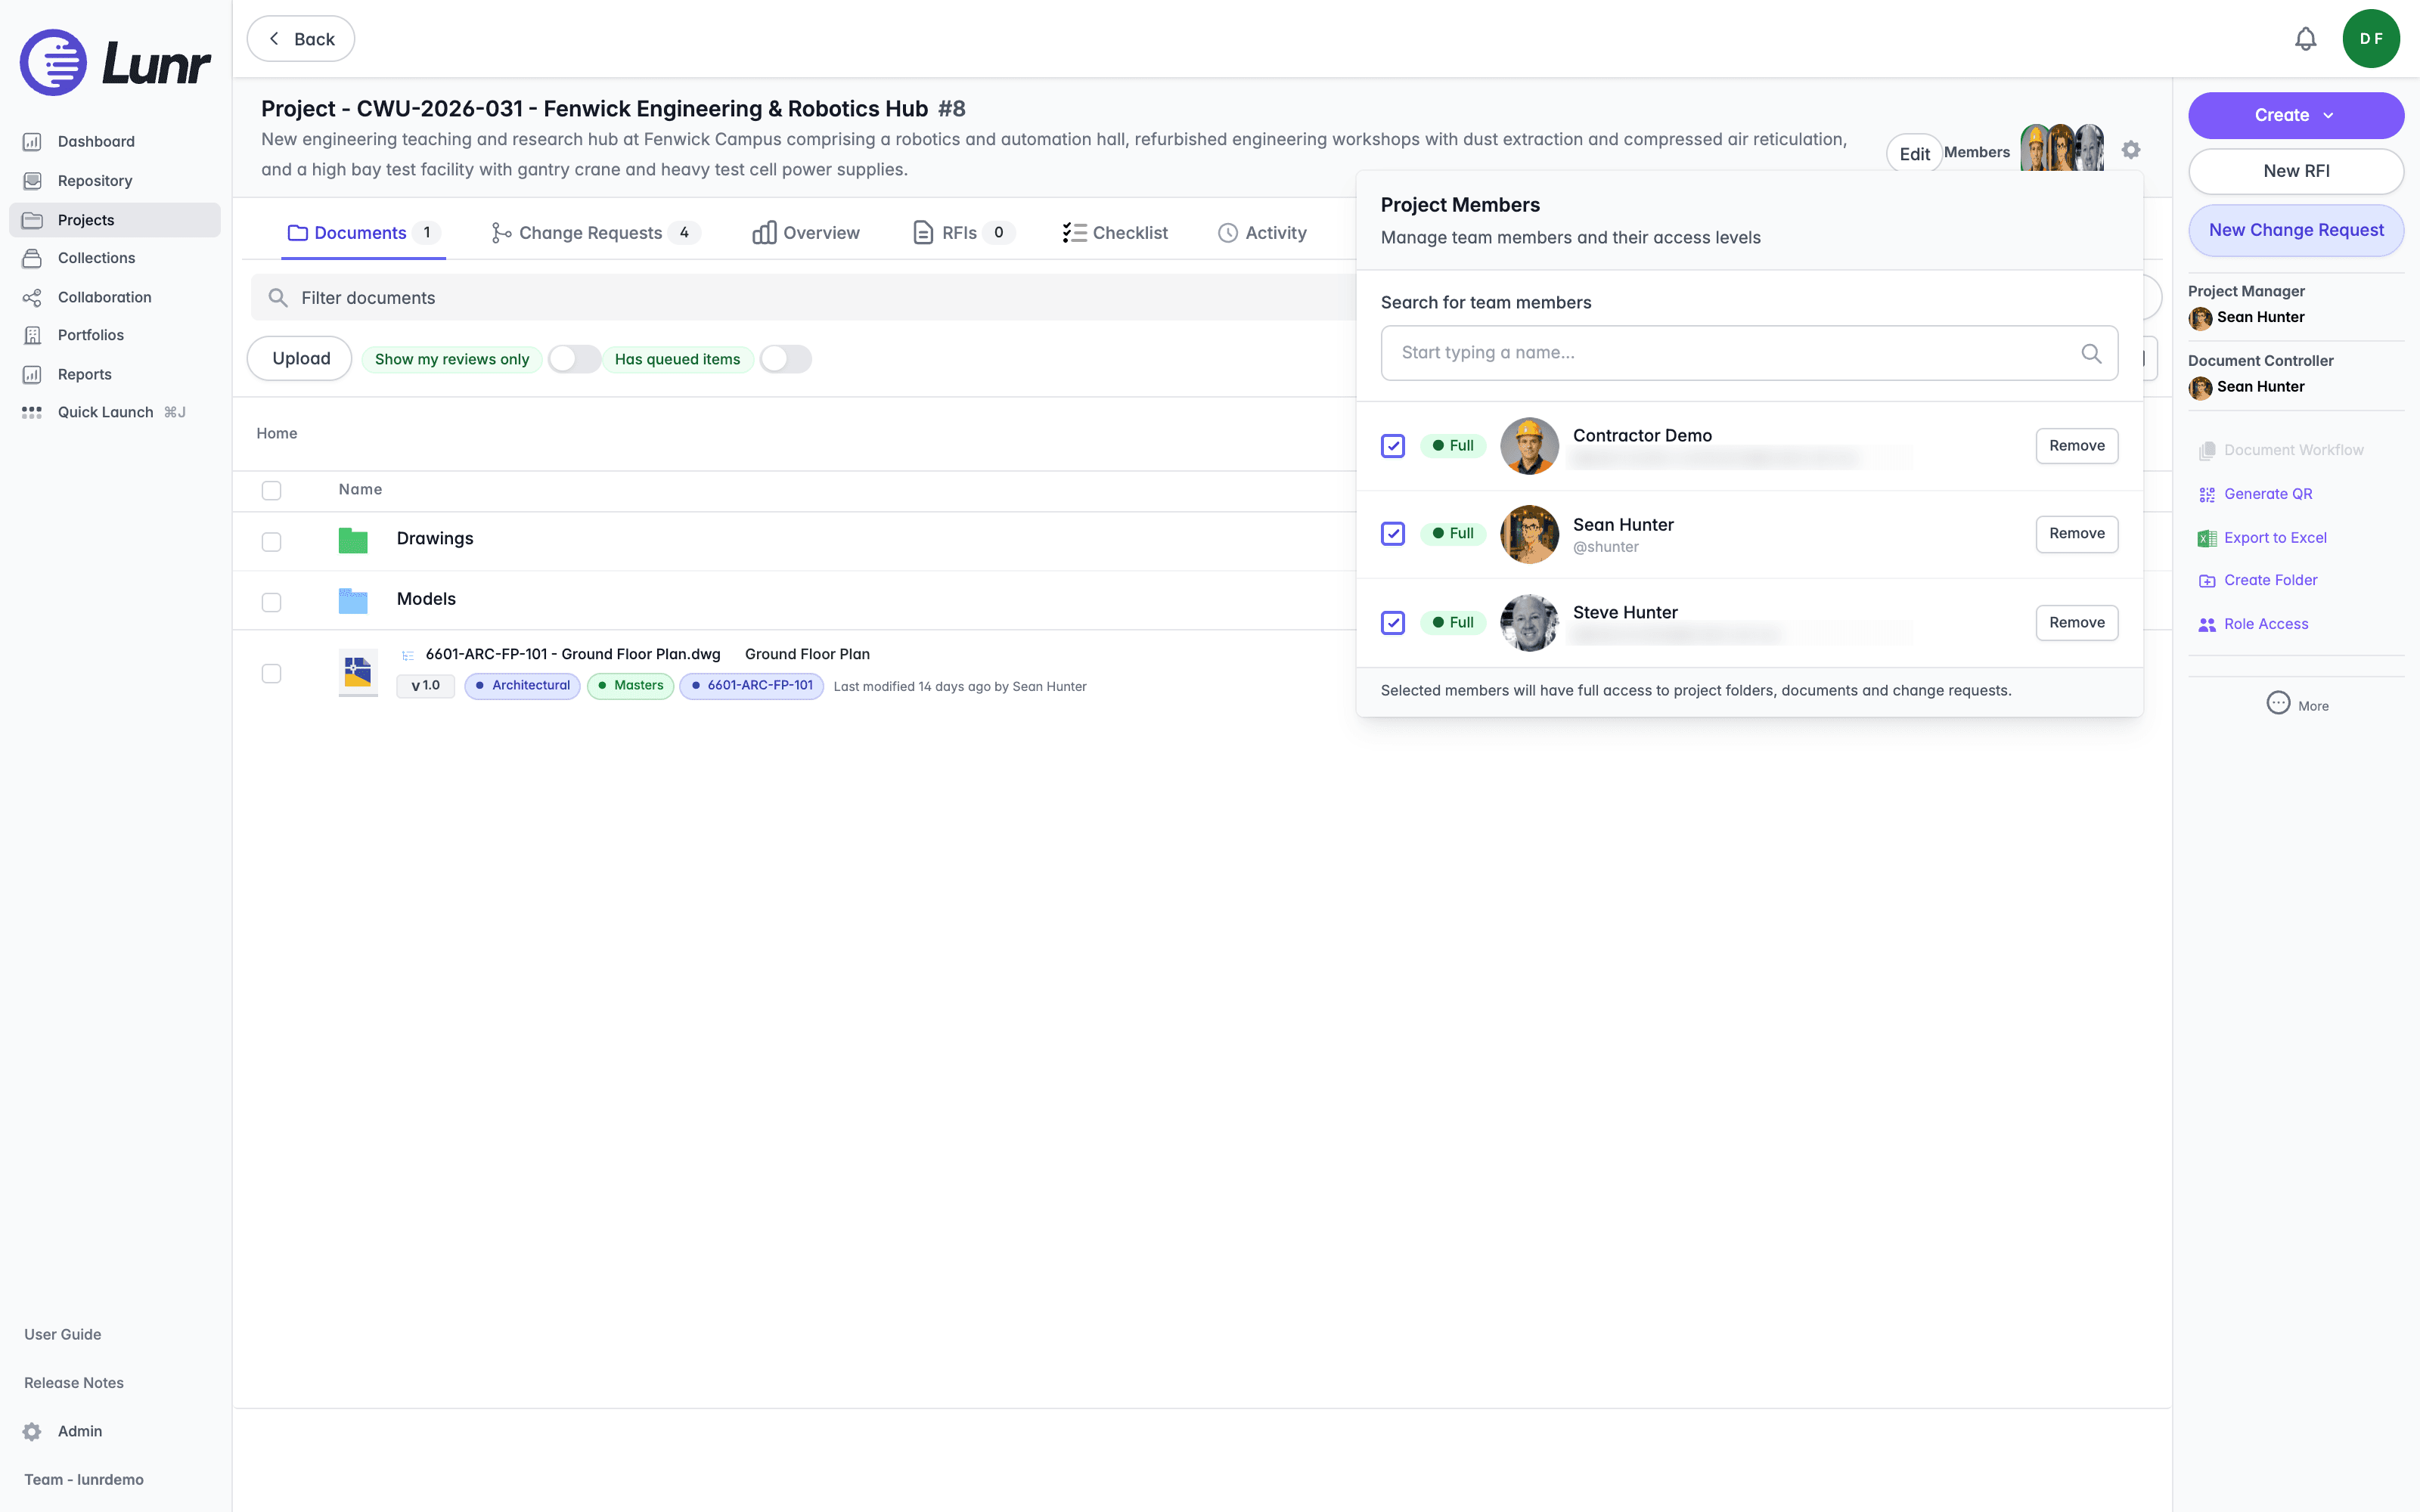
Select the gear icon next to the Members label in the project header to open the Project Members popover, headed "Project Members" with the subtitle "Manage team members and their access levels". Use the "Search for team members" field, placeholder "Start typing a name...", to find someone. Each row shows a green Full badge, the member's avatar, name, username or email address, and a Remove button. A footer note reads: "Selected members will have full access to project folders, documents and change requests."
For the same list with more detail, select Members from a project's Options menu in the projects list to open the full Project Members page. An Add Project Member panel lets you add someone by name and choose an Access Level, currently Full Access ("Can view and edit all project documents and settings"). A filter row offers All Members, Full Access, and CR Only views, alongside a member count, and each member appears as a card with their access-level badge, name, handle, avatar, and a remove cross.
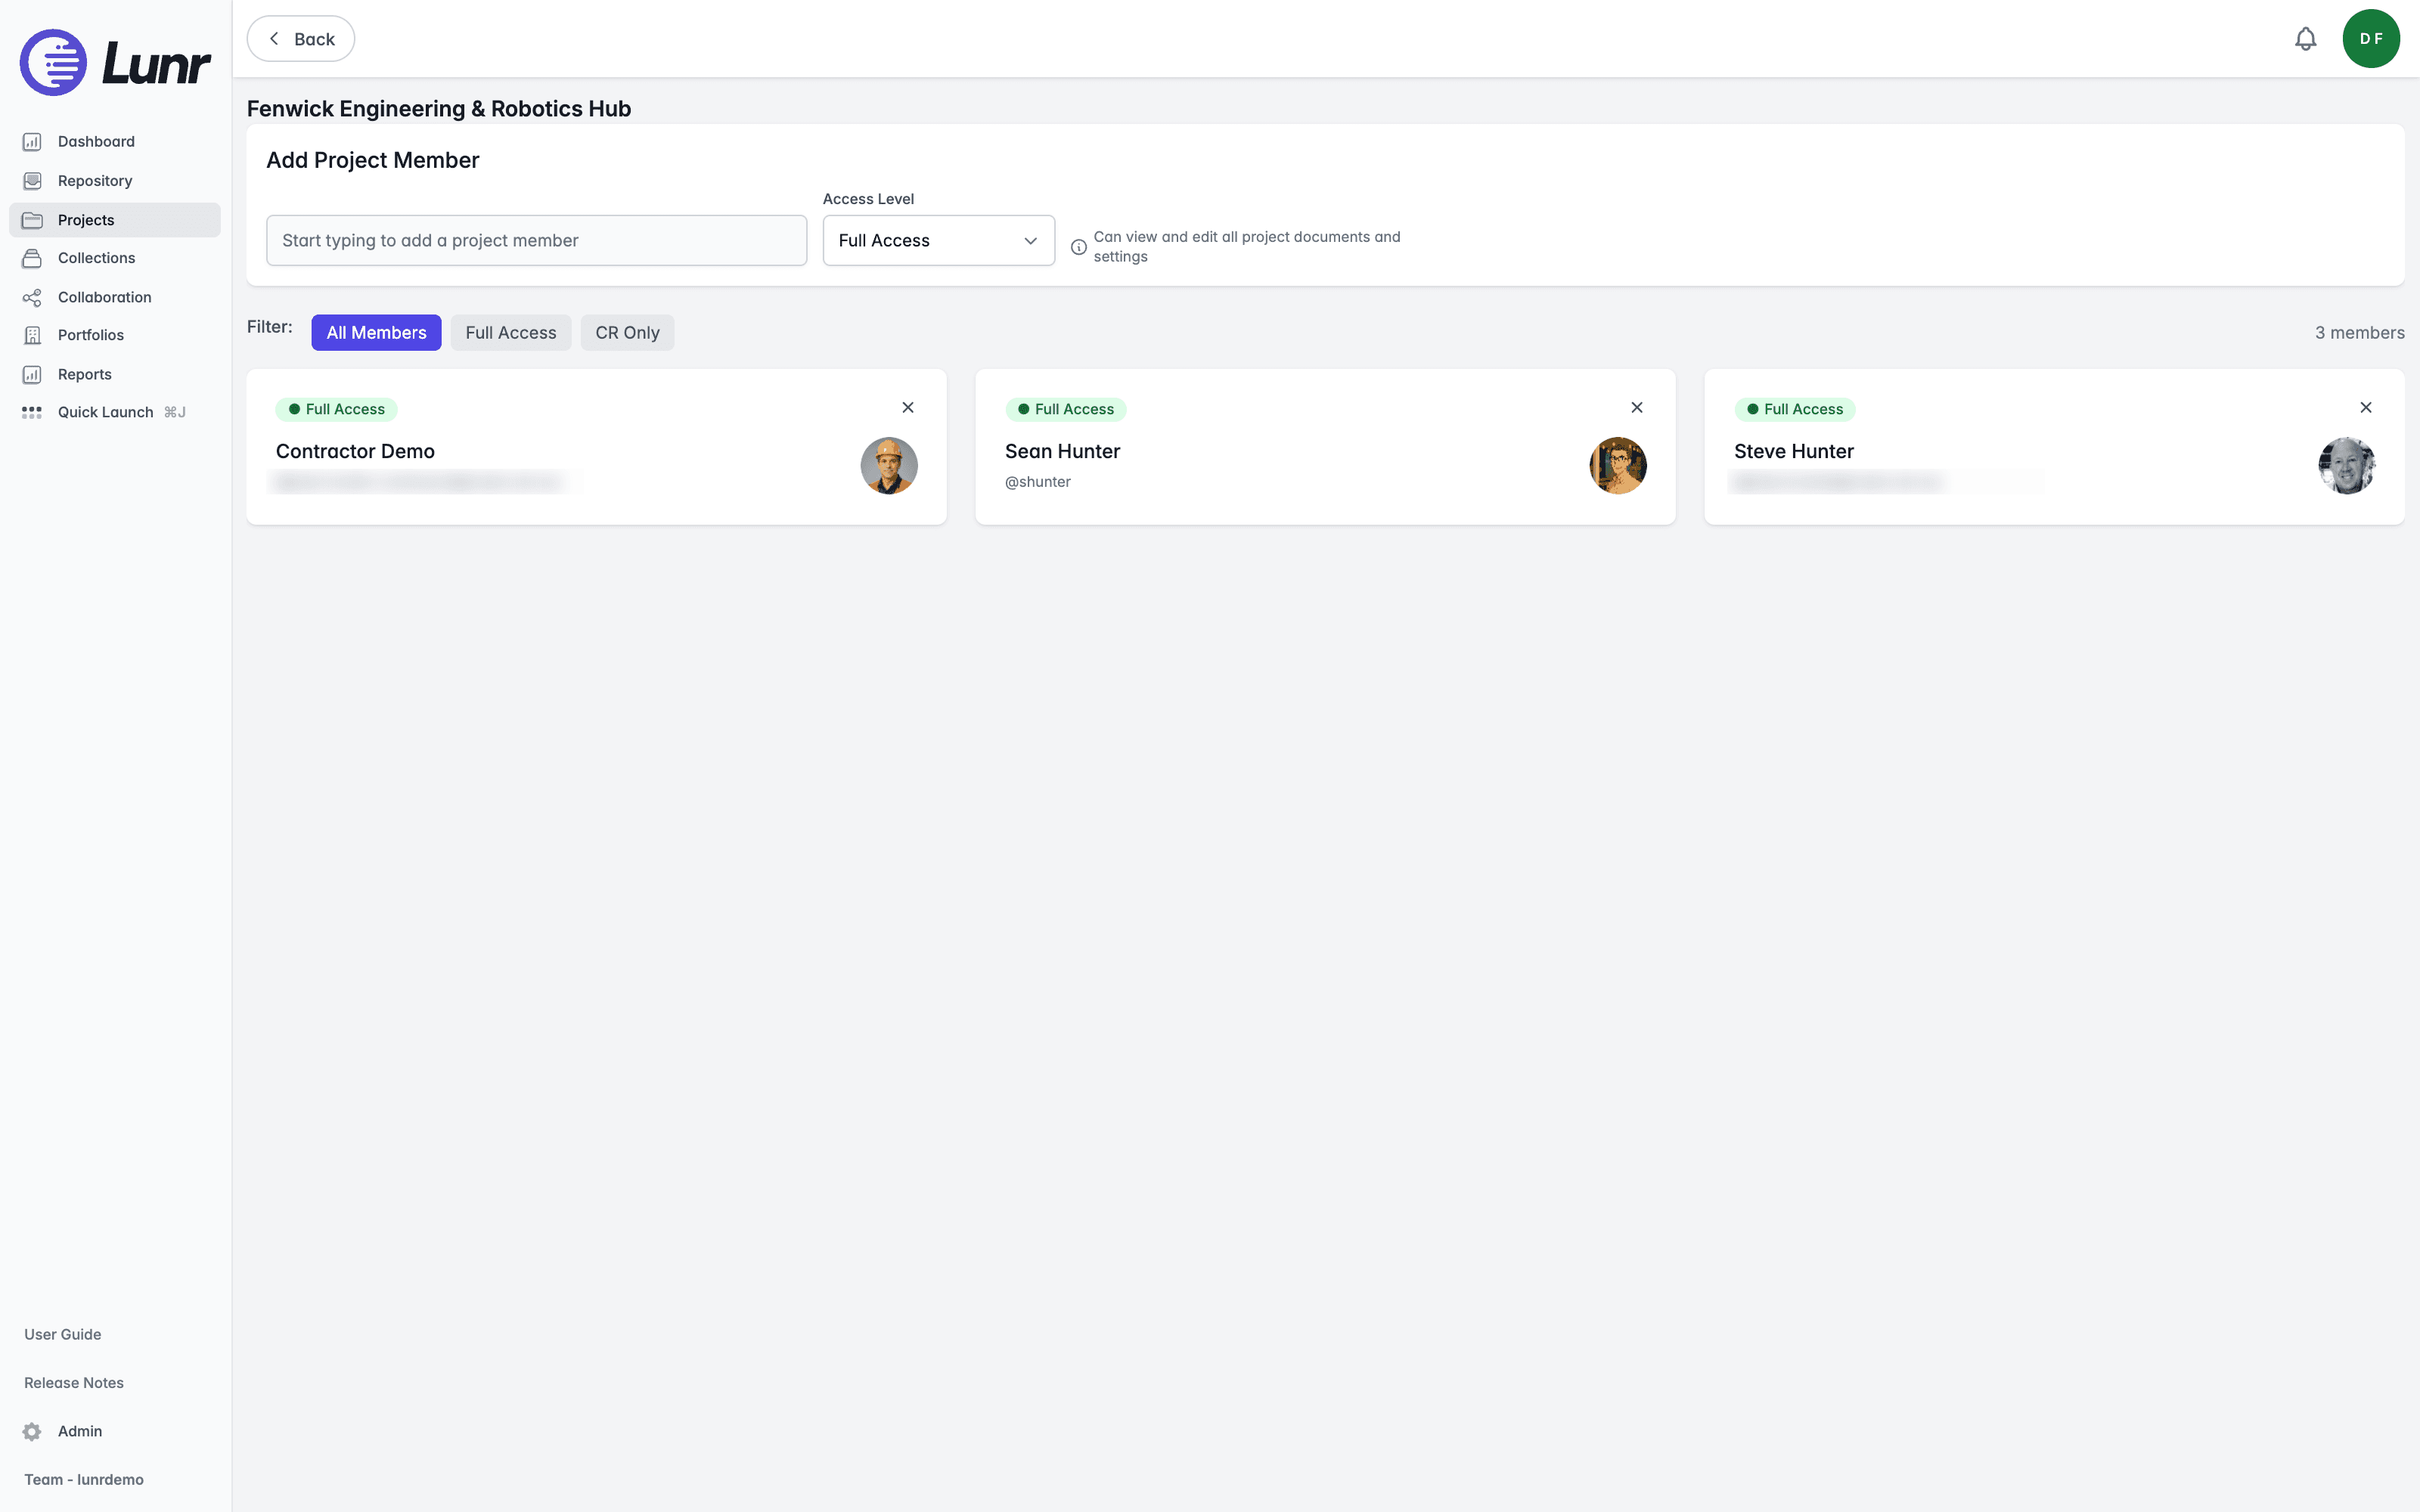
If your organisation enables it, a second access level, Change Requests Only, lets a member "only participate in change requests and reviews"; the filter row shows this as CR Only. A Change Requests Only member can only upload documents into a change-request folder they belong to, not to the project root, and some change-request tags are hidden from them.
Only a project manager, the project's external project manager, or an administrator can manage members; anyone else sees "Only project managers or this project's external manager can manage members." An external project manager can normally only invite people from their own company, unless they also hold the External Project Coordinator access right. Removing someone from a project also removes them from every folder in it.
Document Access
Project membership is enough to reach documents sitting at the project root. A document filed inside a folder also needs folder access, either because the folder is open to the project, because the person is shared into it, because they hold the View All Project Folders or Manage Projects access right, or because they are the project manager.
Role Access
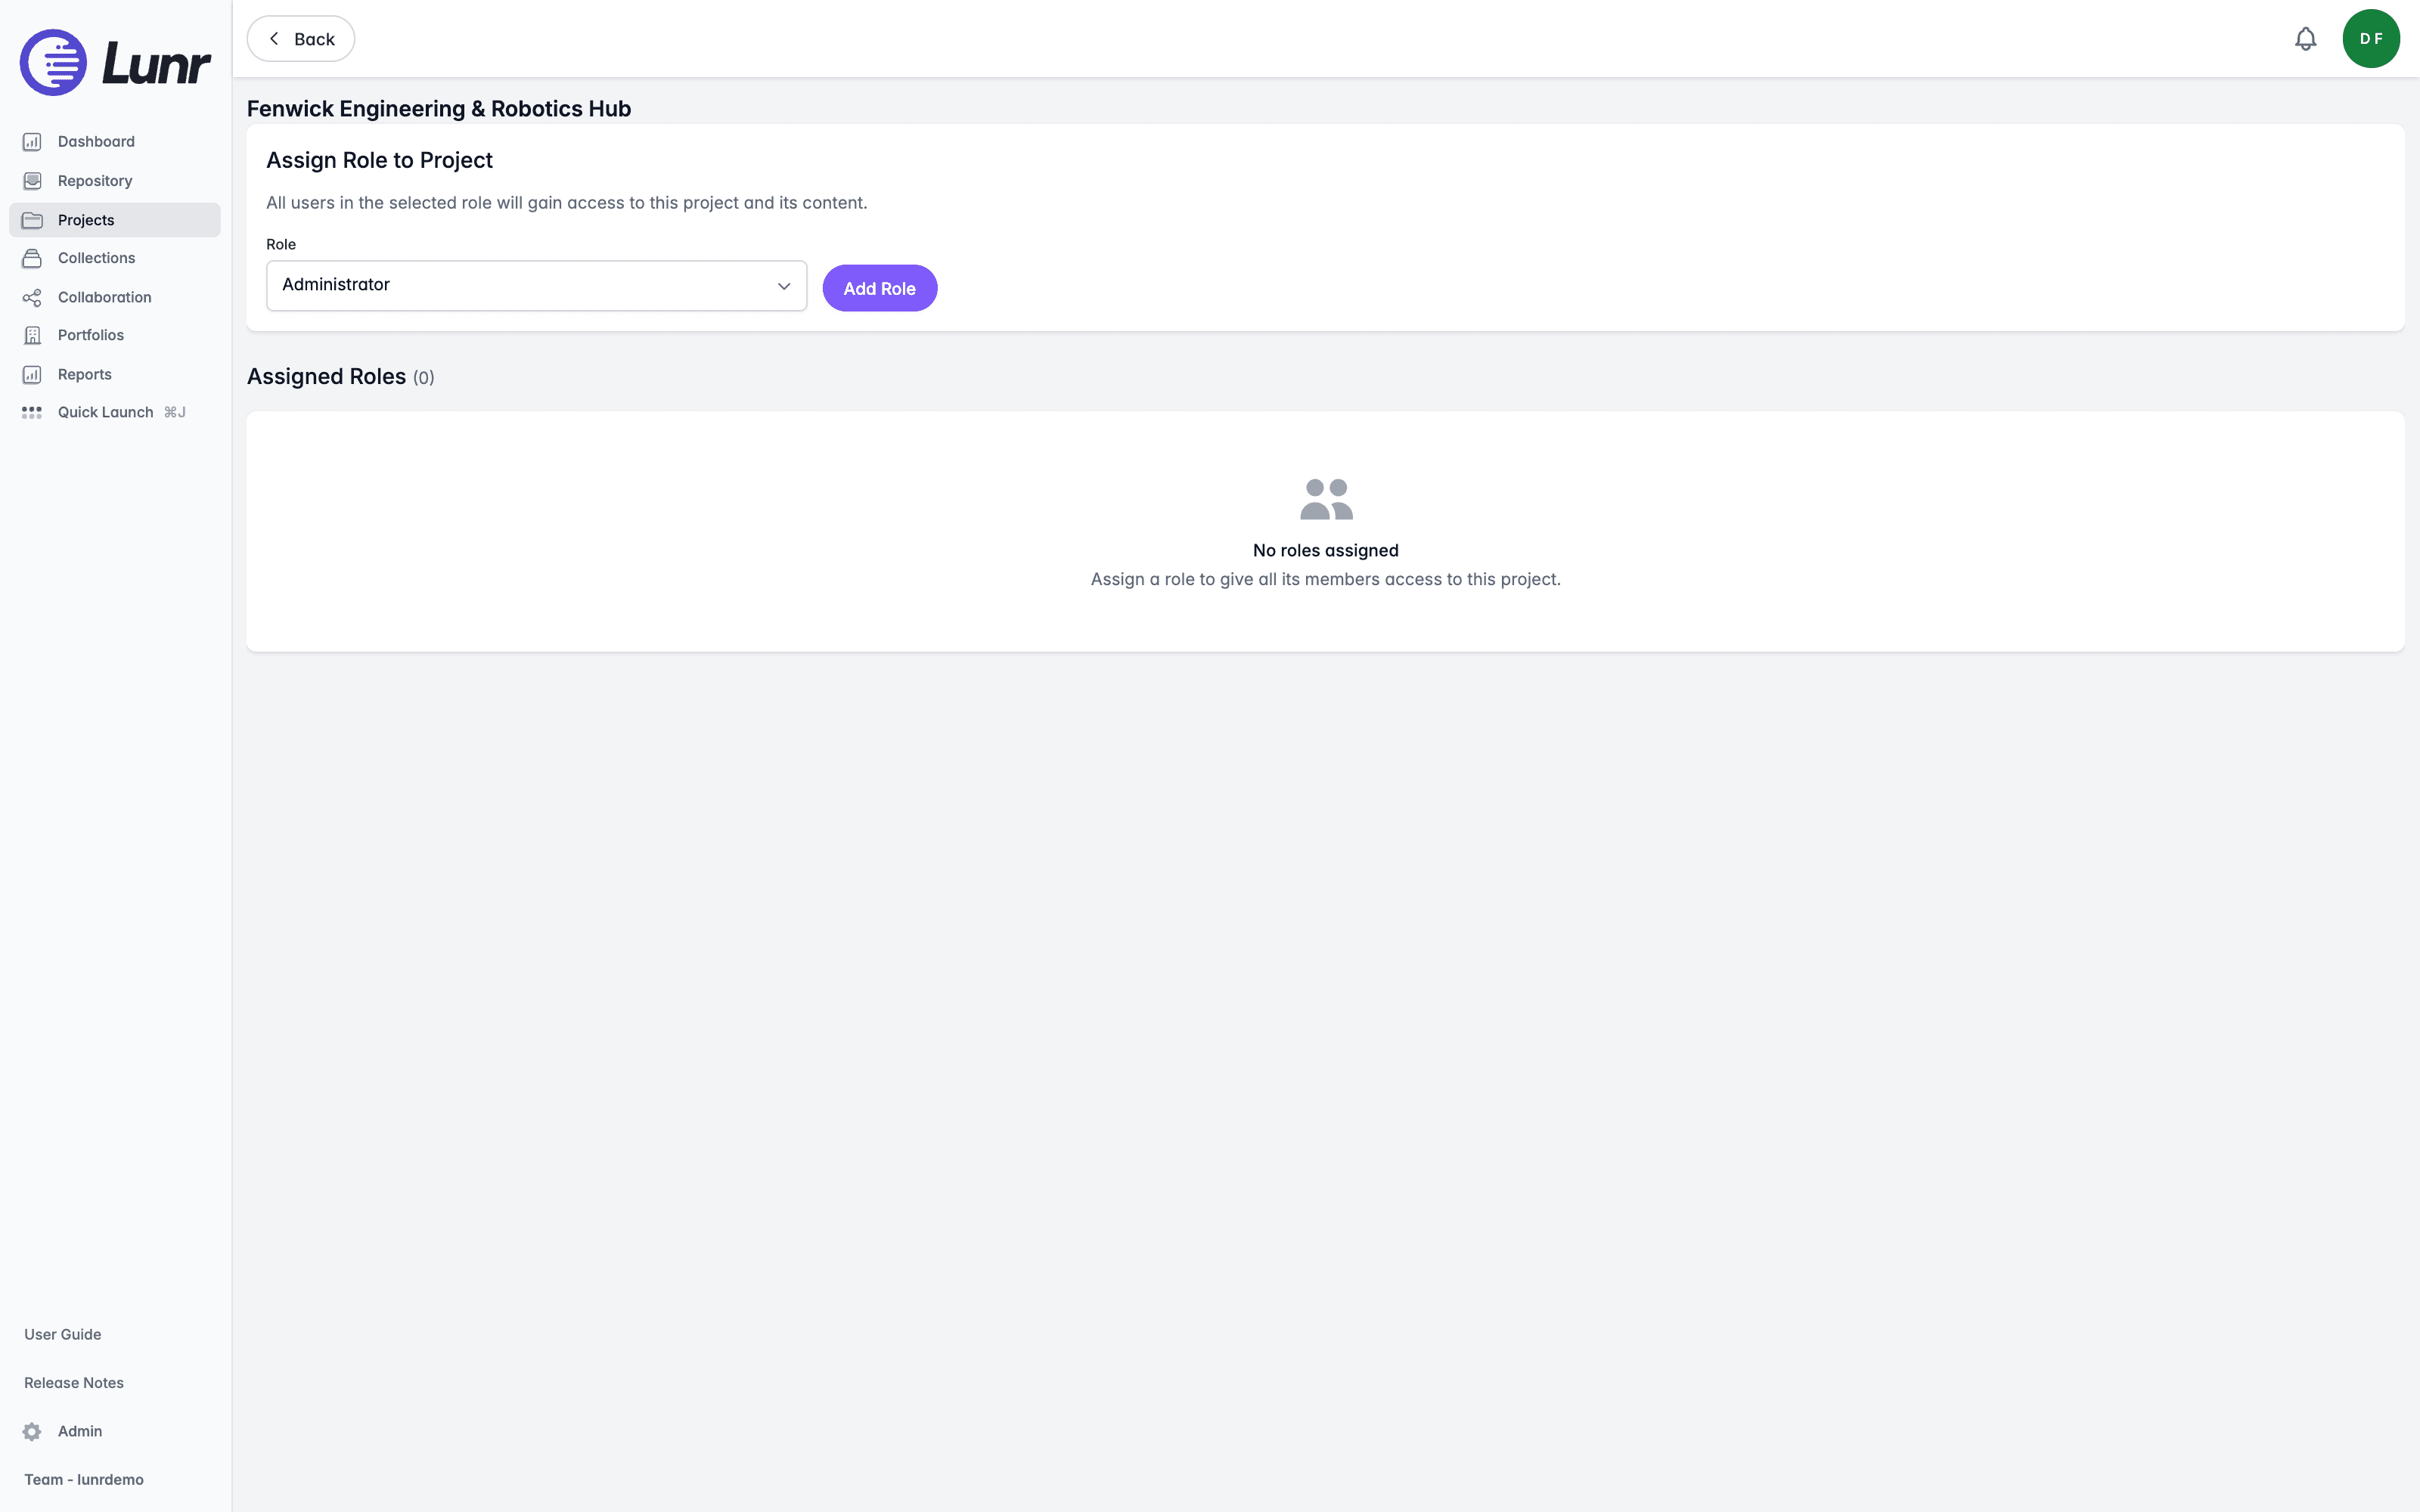
Select Role Access in the Action Pane to open the Project Role Access page, headed with the project name, then "Assign Role to Project" with the note "All users in the selected role will gain access to this project and its content." Choose a role from the Role dropdown and select Add Role. Assigned roles are listed below under "Assigned Roles", with a count. This page needs the Administration Pages access right.
Editing a Project
Select Edit from a project's Options menu in the projects list to open the Edit project form, which requires the Manage Projects access right. It carries the same fields as the create form, minus the template selector and the Create as Template box, plus a Checklists block listing "Checklist templates from the tenant library that apply to this project." Add one using a Checklist template dropdown, an Attaches to dropdown (Change request or Project), an Attach automatically to new change requests box, and an Add checklist button.
Administrators also see an Advanced settings link in the footer, opening the Advanced project settings dialog: "These settings override organisation-wide defaults for this project. They're only visible to administrators." It offers a Change Request upload v2 toggle, which applies the folder's default document type when Change Request document uploads use the v2 endpoint, and shows whether the project currently matches or overrides the organisation default, with a link back to the default. A Form recognition model setting reads fields from uploaded forms into document tags, using the organisation's field mappings, once your organisation has added one. Select Apply to save, or Cancel to discard.
Select Save project to save your changes. If the project is itself a template, a Project number format field also appears on this form.
Archiving or Deleting a Project
Open a project's Options menu in the projects list to archive or delete it. Archiving or deleting an active project is only possible from this list, not from inside the project. This menu offers Edit, Members, Archive, and Delete, and is gated on the Manage Projects access right. Once a project is archived, Archive is replaced with Unarchive; once it is deleted, Delete is replaced with Undelete.
- Select Archive to take a finished project out of the default list while keeping it available for reference, or select Unarchive to bring it back into active use.
- Select Delete to soft-delete a project, or select Undelete to restore it. If the project has related data, such as existing change requests, deleting it fails with the message "Cannot remove this project because it has referenced data (for example existing Change Requests). Please archive it instead."
Select the Show archived projects or Show deleted projects box in the filter panel to find an archived or deleted project again; both boxes only appear for users with the Manage Projects access right. Archived and deleted projects show a badge in the projects list and in the project header.
Document Workflows
Move a document through its workflow, read its status badge, take part in reviews, and see why a workflow action might be unavailable.
Project Templates
Mark a project as a template to create other projects from it, learn exactly what is and is not copied to a new project, and understand the project number format that numbers projects created from a template automatically.