Uploading Documents
Bring files into the Lunr repository with the Create menu, the Upload button, or drag and drop, and understand when an upload becomes a new document, a new revision of an existing one, or a rendition attached to another.
Overview
There are two routes into the repository. Create starts a new document of a type your organisation has configured, and Upload takes files that already exist on your computer. Both sit at the top of the Action Pane on the right of the document list.
What matters most about an upload is which of three things it turns into: a new document, a new revision of a document already in the repository, or a rendition attached to an existing document. Lunr decides by comparing file names, covered under What an Upload Becomes.
To bring in many documents and their tags at once, see Importing Documents.
The Create Menu
Select Create to open a menu of things you can start from here. Its contents depend on how your organisation has set up Lunr and your access rights.
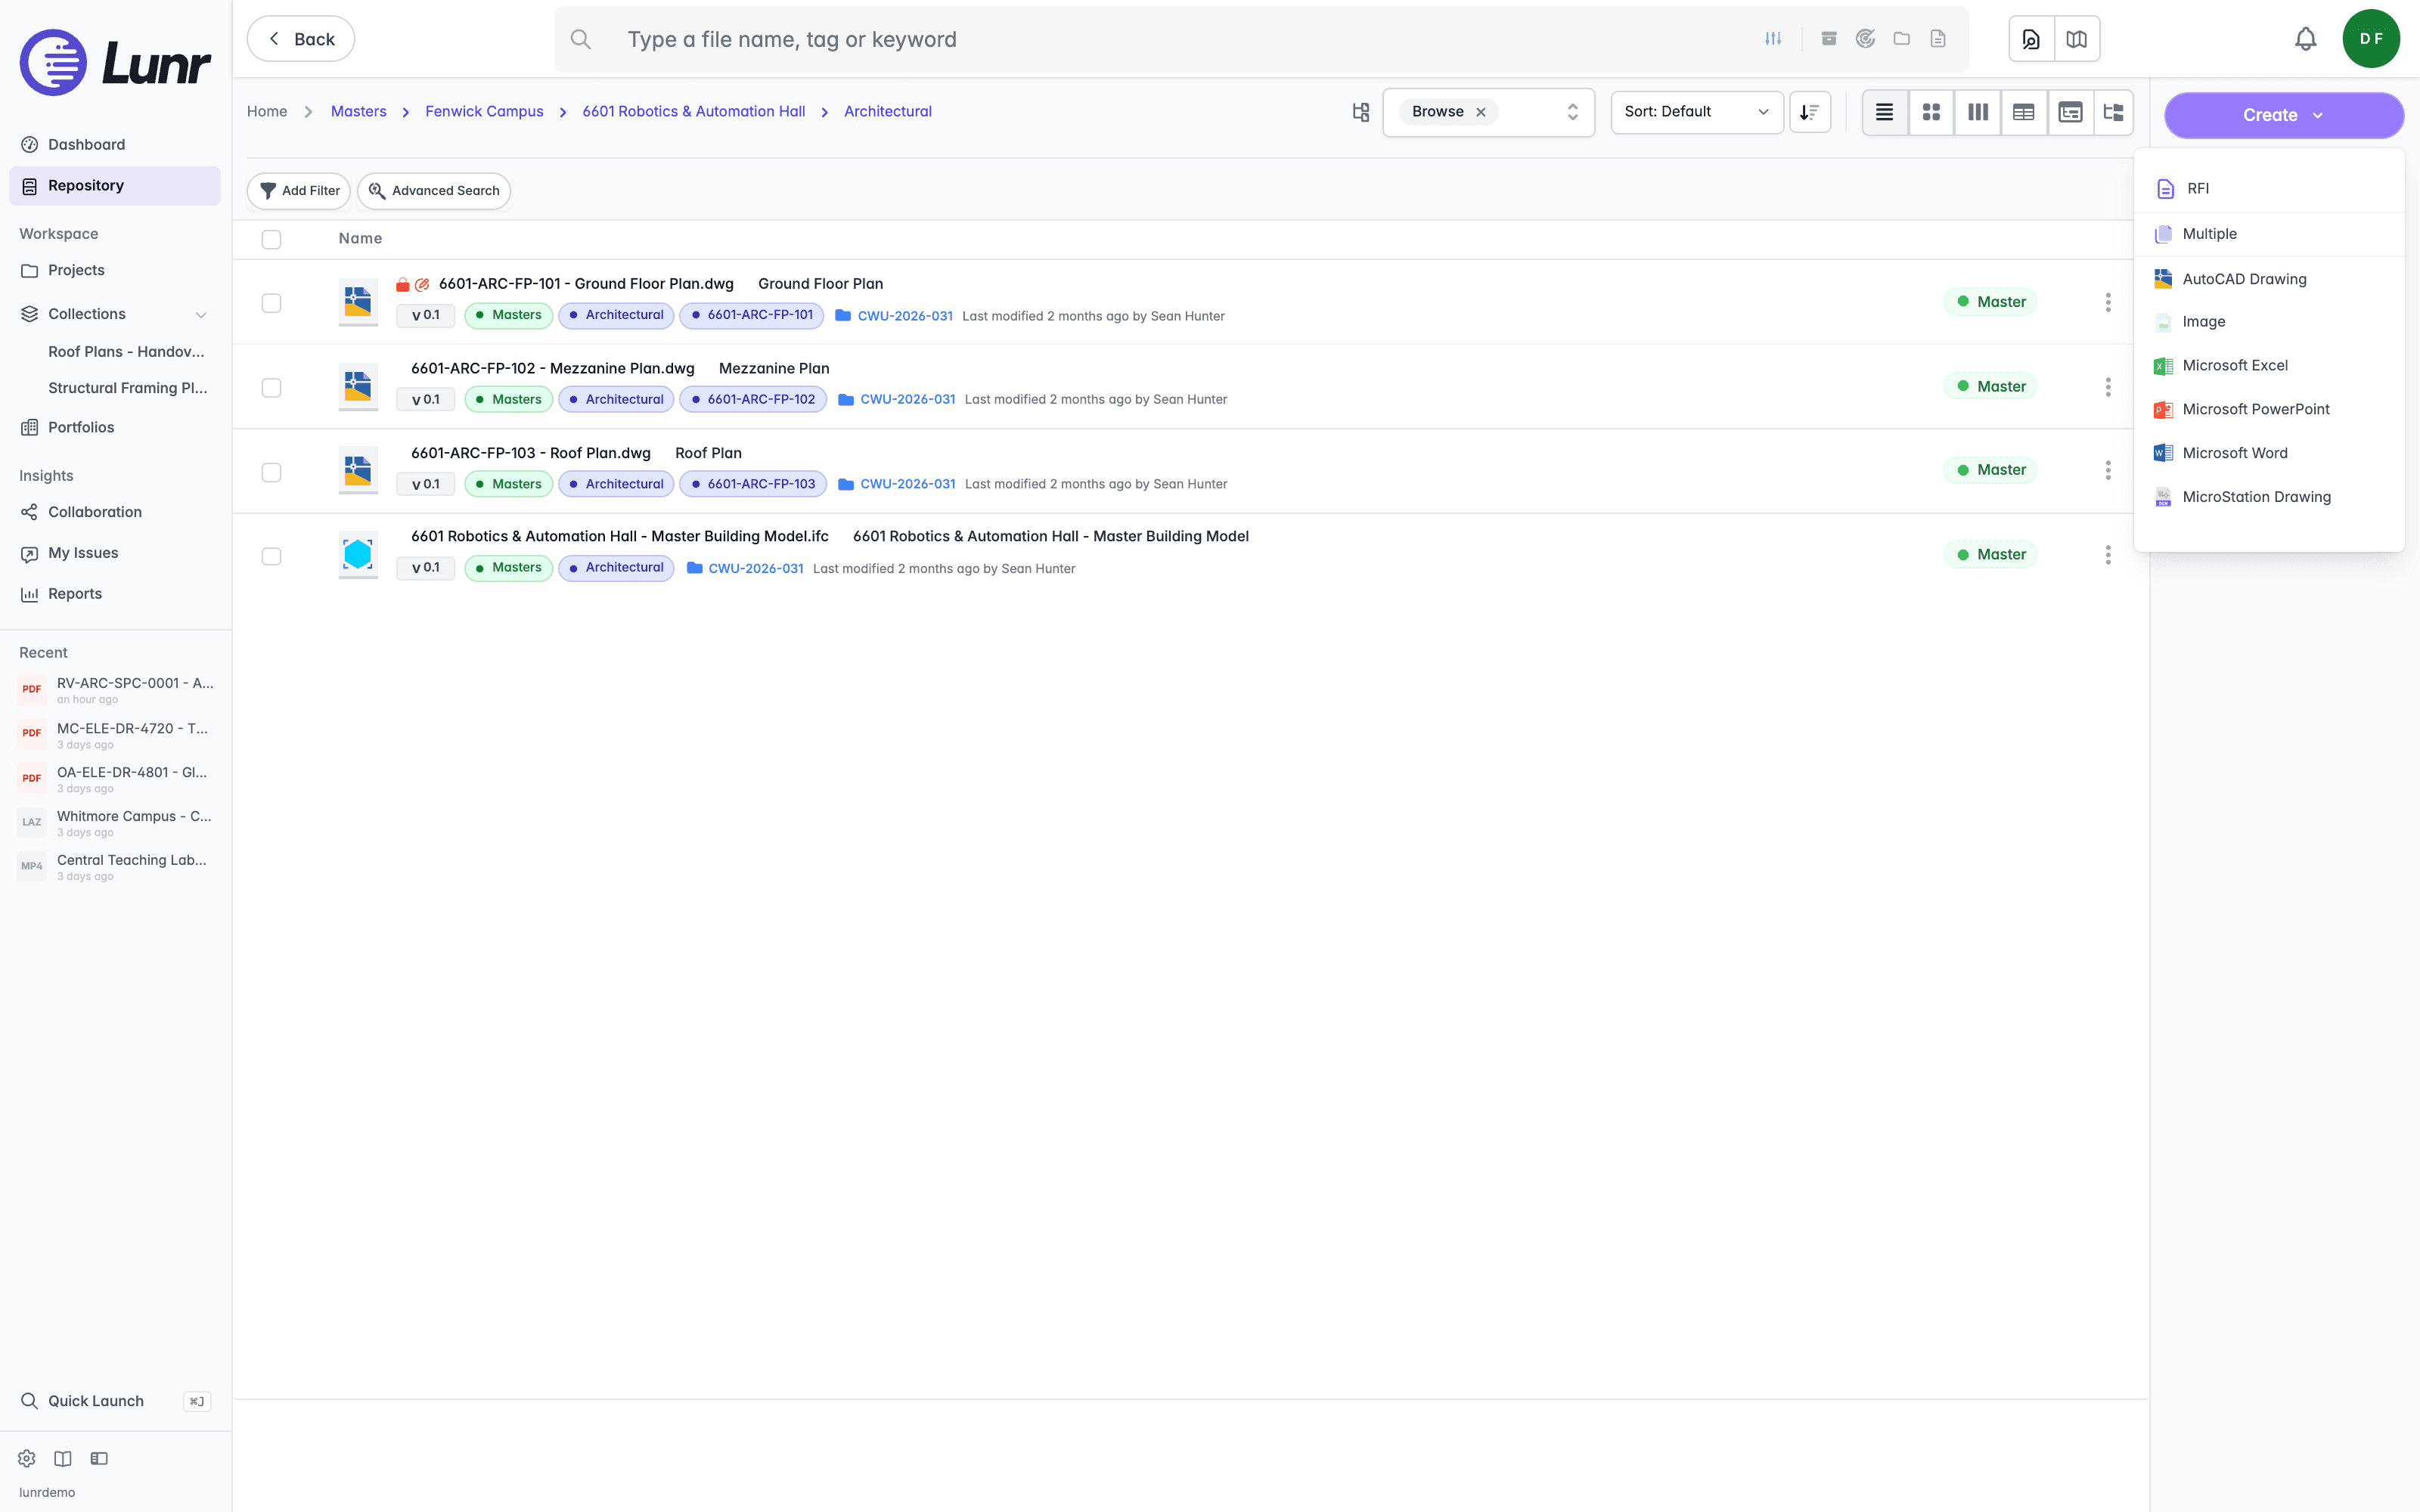
The first group holds records rather than documents, such as an RFI, labelled with your organisation's own wording. A Change Request entry appears where you can raise one, and a Drawing Numbers entry where you are allowed to view drawing numbers.
The second group starts documents. Multiple takes several files at once, and below it sits one entry per document type your organisation has configured, each with its file-type icon, for example AutoCAD Drawing, Image, Microsoft Excel, Microsoft PowerPoint, Microsoft Word, and MicroStation Drawing. Choose a type to tell Lunr what the document is, so it can apply the right tags, numbering, and workflow.
When you create a document from a project, or from a Change Request that belongs to a project, the new document takes its Branch tag from the project, where the project has a Branch or Project Branch tag with a value. Otherwise the dialog supplies a default. A Branch value you enter yourself is kept.
Uploading Files
Select Upload to open your computer's file browser and choose the files to bring in. You can also drag files from your desktop onto the document list.
Files land in the folder you are looking at, so the tags of that folder are the tags the new documents pick up. Check the breadcrumb trail before you upload rather than moving documents afterwards.
What an Upload Becomes
Lunr checks whether the folder already holds a document of the same name, then takes one of three paths.
| The file you upload | What happens |
|---|---|
| Its name matches an existing document exactly, ignoring case and surrounding spaces | The upload replaces that document's content, creating a new revision, where you are allowed to replace it, covered in Replacing a Document's Content. Its name, tags, and history carry over. |
| It is a PDF whose name matches a non-PDF document, for example Plan-01.pdf onto Plan-01.dwg | Lunr asks, in a prompt titled Attach Rendition, whether to attach it to that document as a rendition. The prompt offers Yes, No, and Upload as separate document, which files it on its own instead. To make the PDF the document itself, see Turning a Drawing Into a PDF Document below. |
| Neither applies | Lunr creates a new document. |
The match has to be the whole file name. Plan-01.pdf does not claim Site-Plan-01.pdf, and Plan-01-revB.pdf does not claim Plan-01.pdf. Where an exact match and a same-name PDF both apply, the exact match wins, so a new revision of a PDF replaces that PDF rather than attaching itself to a drawing.
An exact name match replaces content without asking. To add a file as its own document, give it a name that no document in that folder already carries.
Two cases differ. Where the only exact match is a released master revision, which cannot have its content replaced, the upload creates a new document with the same name instead. Where the match is a document you cannot replace because it is not under workflow, the upload is refused and nothing is created.
Linking Uploaded Documents
After you upload new documents, Lunr can offer to link them to documents already in the folder. The Link the uploaded document? prompt, or Link the uploaded documents? for several, appears where your organisation has set up link types and you are allowed to edit documents or tags. It does not appear for an upload that becomes a new revision.
The prompt lists each document whose name starts with the same name as a document in the same folder, reading "It starts with the same name as a document in the same folder." Each row shows the new file, the link type, and the document it would link to. Where several documents match, choose one from the dropdown list, which reads "Choose one of" followed by the number of matches.
Select the box on each row you want to link, then select Link, or Link followed by a number where you chose several. Each linked row then reads "Linked". Select Not now to skip. Linking lets workflows copy tags between the two documents, and you can add or remove the link later, covered in Linking Documents.
A prompt covers up to 50 documents, and Lunr offers the rest in another prompt.
Replacing a Document's Content
To replace one document's content deliberately, choose Replace Content from its Options menu, opened with the three dots at the end of its row, then pick the file.
Content can be replaced only while the document is under workflow, and only by its assignee. Reviewers cannot replace content, and appointing a reviewer does not take the right from the assignee. A released master revision cannot have its content replaced, which keeps an approved revision from being overwritten; start a new revision first. Where replacement is not allowed, Replace Content is unavailable and a file dropped onto that document's row is refused, with the message "Content can only be replaced by an assigned user while the document is under workflow. Start a new revision first."
Attaching a PDF to a drawing as its rendition is not affected, because it leaves the drawing's own content as it is.
Where the file you pick carries a different name from the document, a Replace Document Content dialog opens, subtitled "You're uploading a file to replace existing content". It shows the Current Document and the New Document so you can see both names, and a Document Name After Upload field you can edit.
- Leave the name as it is and the dialog reads "Content will be replaced", noting that the content changes while the name stays the same. The action reads Replace Content.
- Change it to the new file's name and the dialog reads "Document will be renamed", naming both the old and new names. The action reads Rename & Replace.
Select Cancel to abandon the upload. Where the names already match, no dialog appears and the content is replaced directly.
Turning a Drawing Into a PDF Document
A document whose native file is a drawing, such as a DWG, keeps its PDF as a rendition rather than as the document itself. To make the PDF the document, rename the document to .pdf first, which promotes its existing rendition to be the document's content, then upload the PDF again to replace that content.
Renaming to .pdf needs a rendition to promote. Where the version has none, the rename is refused and the name reverts.
Uploading in a Project or a Change Request
The name-matching rules on this page apply when you upload into a project or a change request as well as into the repository. The zip and spreadsheet prompts do not: they appear only in a change request, where they bring in or update many documents at once. Anywhere else, Lunr files a zip or spreadsheet as a single document without asking. See Importing Documents. Three further things differ:
- Files pick up the tags of the project or change-request folder you are in, and that folder's default document type where one is set.
- A member with the Change Requests Only access level can upload into a change-request folder they belong to, but not to the project root. See Project Members and Access.
- Your administrator can configure upload behaviour for an individual project, so uploads into one project may behave differently from another.
See Working in a Project for the Documents tab itself, and Change Requests for the ways documents reach a request.
To upload an Inventor or SolidWorks assembly together with its parts, use Upload Assembly on a project's Documents tab. See Uploading Assemblies.
Validation Errors
A document can arrive without everything your organisation requires, for example a missing tag. Lunr keeps it and flags it rather than refusing the upload, and a Validation Errors tab appears on the document listing what is outstanding. Dismiss All clears the flags on that document once you have dealt with them, and shows only while an issue is open. An import package can raise these flags on many documents at once, covered in Validation Issues After an Import.
To clear flags across several documents at once, select them and choose Dismiss Validation Issues from the Archive & Delete group of the More menu, covered in Document Actions. Both Dismiss All and Dismiss Validation Issues are available only to users who can release documents as master.
Introduction to Uploading
Find the file extensions Lunr allows you to upload, and where to go next for uploading documents, assemblies, and point clouds.
Importing Documents
Bring in many documents and their tags at once inside a change request, with an import package or an import spreadsheet, and build the spreadsheet that drives them.