Change Request Workflow Display
Customise the display name, category, badge colour, and progress-nav position of each Change Request status, and the labels and ordering of the workflow actions offered at each status.
Overview
Change Request Workflow Display lets administrators customise how each Change Request status is labelled and ordered, and how the actions offered at each status are labelled. It requires the Administration Pages access right to open and to save; the current, already-saved configuration is also read elsewhere in the app by every user, for example to render status pills, regardless of access rights.
Open this page from Configure workflow display → on the Change Request tab of Project Settings.
The page has two tabs, States and Transitions, described below. A shared footer below both tabs shows an Unsaved changes notice whenever you have edited something, plus Reset to default, Discard, and Save buttons.
Status IDs are fixed
Every Change Request status has a fixed internal ID and key, for example PendingReview or AwaitingRelease. Neither tab lets you add, remove, or rename these keys. What you can change is the display name, ordering, category, and badge colour attached to each one, plus the labels used for the actions that move a Change Request between them.
States Tab
The States tab lists every Change Request status as a row in a table, with these columns. Status IDs and keys are fixed; the display names, colours, and ordering belong to your organisation.
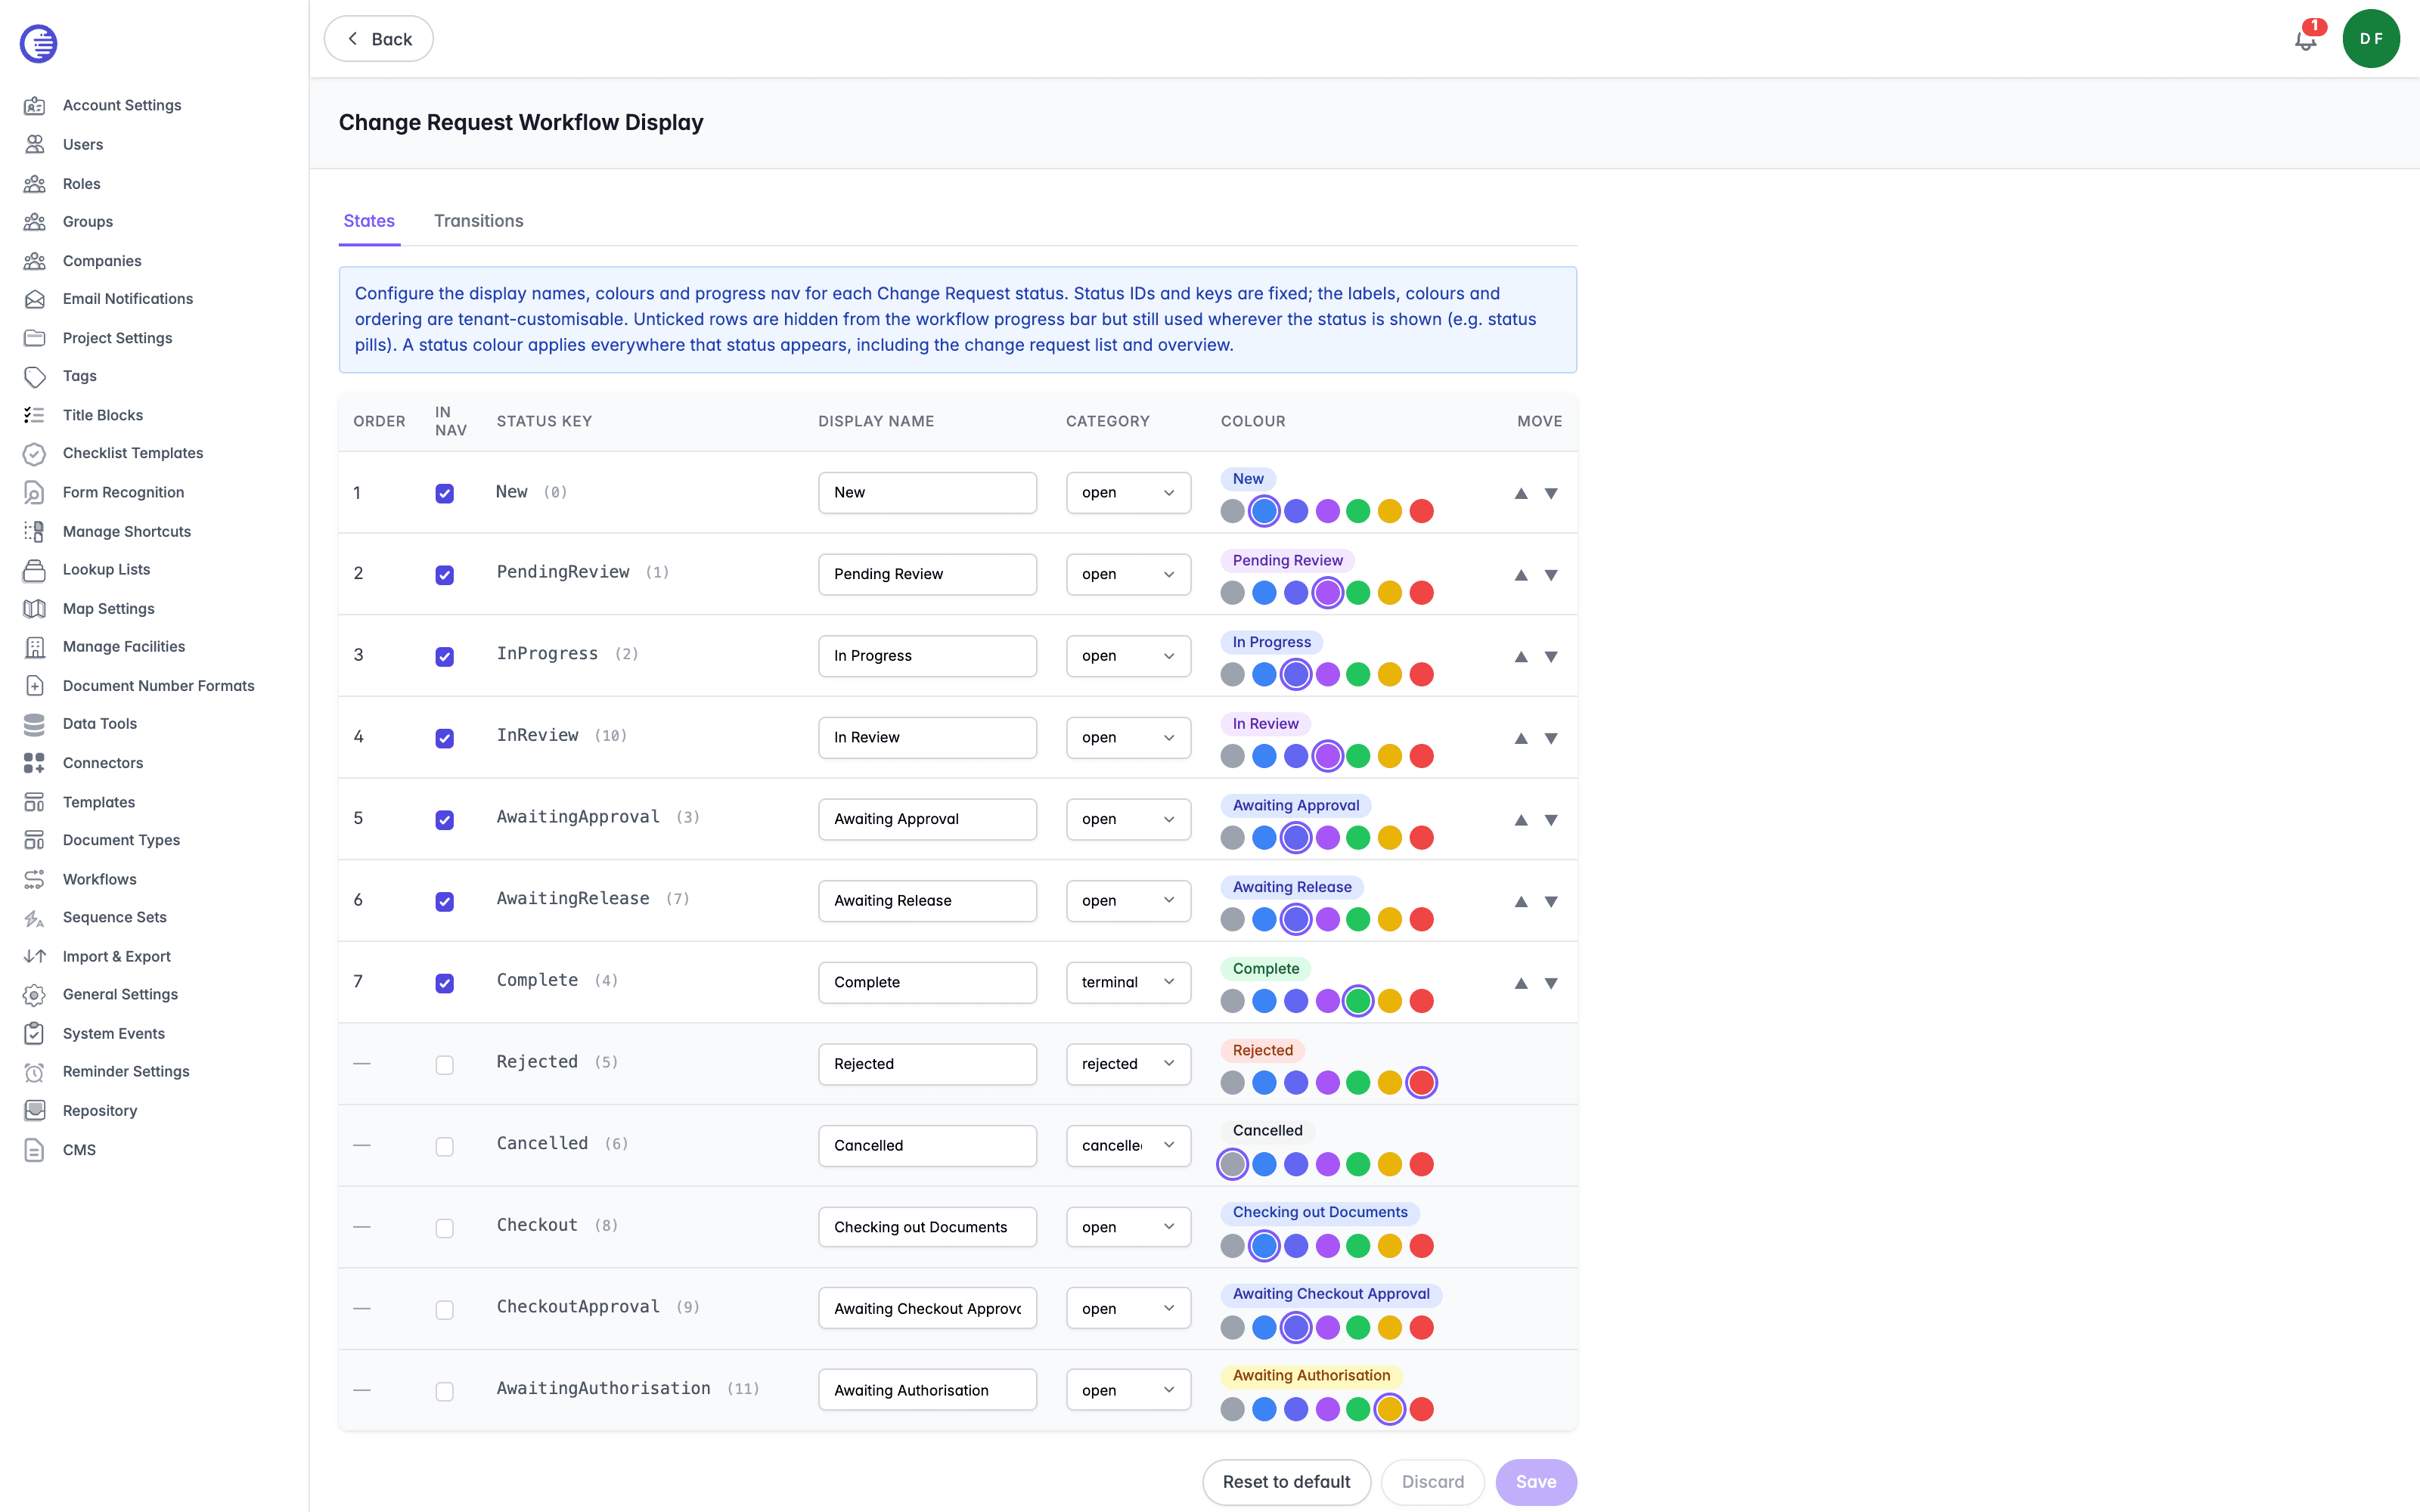
| Column | What it shows or controls |
|---|---|
| Order | The status's position in the workflow progress nav. Blank for a status that is not shown in the nav. |
| In nav | A box that shows or hides the status from the workflow progress nav. Clearing it removes the status from the nav but does not stop the status being used elsewhere, for example on status pills. Selecting it again adds the status back at the end of the nav. |
| Status key | The status's fixed internal key, with its numeric ID alongside in brackets. Not editable. |
| Display name | The label shown for the status throughout Lunr. |
| Category | One of open, terminal, rejected, or cancelled, chosen from a dropdown. This is a grouping used elsewhere in Lunr, separate from the badge colour. |
| Colour | A live preview pill in the status's badge colour showing the Display name you have entered, above a row of swatches. Select a swatch to recolour the status: Grey, Blue, Indigo, Purple, Green, Yellow, or Red. The colour applies everywhere the status appears, including the Change Request list and overview. |
| Move | Up and down arrows that swap a status's Order with the status immediately above or below it. Only shown for statuses currently in the nav. |
Selecting Save re-numbers every status still in the nav to a contiguous 1, 2, 3 sequence in their current order, closing any gaps left by statuses you removed from the nav.
States as Seeded by Default
A newly created tenant is seeded with the following twelve statuses. This is also what Reset to default restores.
| Status key (ID) | Display name | Progress order | Category | Badge colour |
|---|---|---|---|---|
New (0) | New | 1 | open | blue |
PendingReview (1) | Pending Review | 2 | open | purple |
InProgress (2) | In Progress | 3 | open | indigo |
InReview (10) | In Review | 4 | open | purple |
AwaitingApproval (3) | Awaiting Approval | 5 | open | indigo |
AwaitingRelease (7) | Awaiting Release | 6 | open | indigo |
Complete (4) | Complete | 7 | terminal | green |
Checkout (8) | Checking out Documents | not in nav | open | blue |
CheckoutApproval (9) | Awaiting Checkout Approval | not in nav | open | indigo |
AwaitingAuthorisation (11) | Awaiting Authorisation | not in nav | open | yellow |
Rejected (5) | Rejected | not in nav | rejected | red |
Cancelled (6) | Cancelled | not in nav | cancelled | grey |
Since this table reflects the seeded default, a tenant that has already customised its display names, ordering, or nav membership will show different values on its own States tab.
Transitions Tab
The Transitions tab customises the labels and ordering of the actions offered in the Request Workflow dropdown, grouped by the status a Change Request is currently in. Permissions, that is who is allowed to see or perform each action, and side effects such as forwarding or requiring a comment, are not configurable here and remain fixed in Lunr's code.
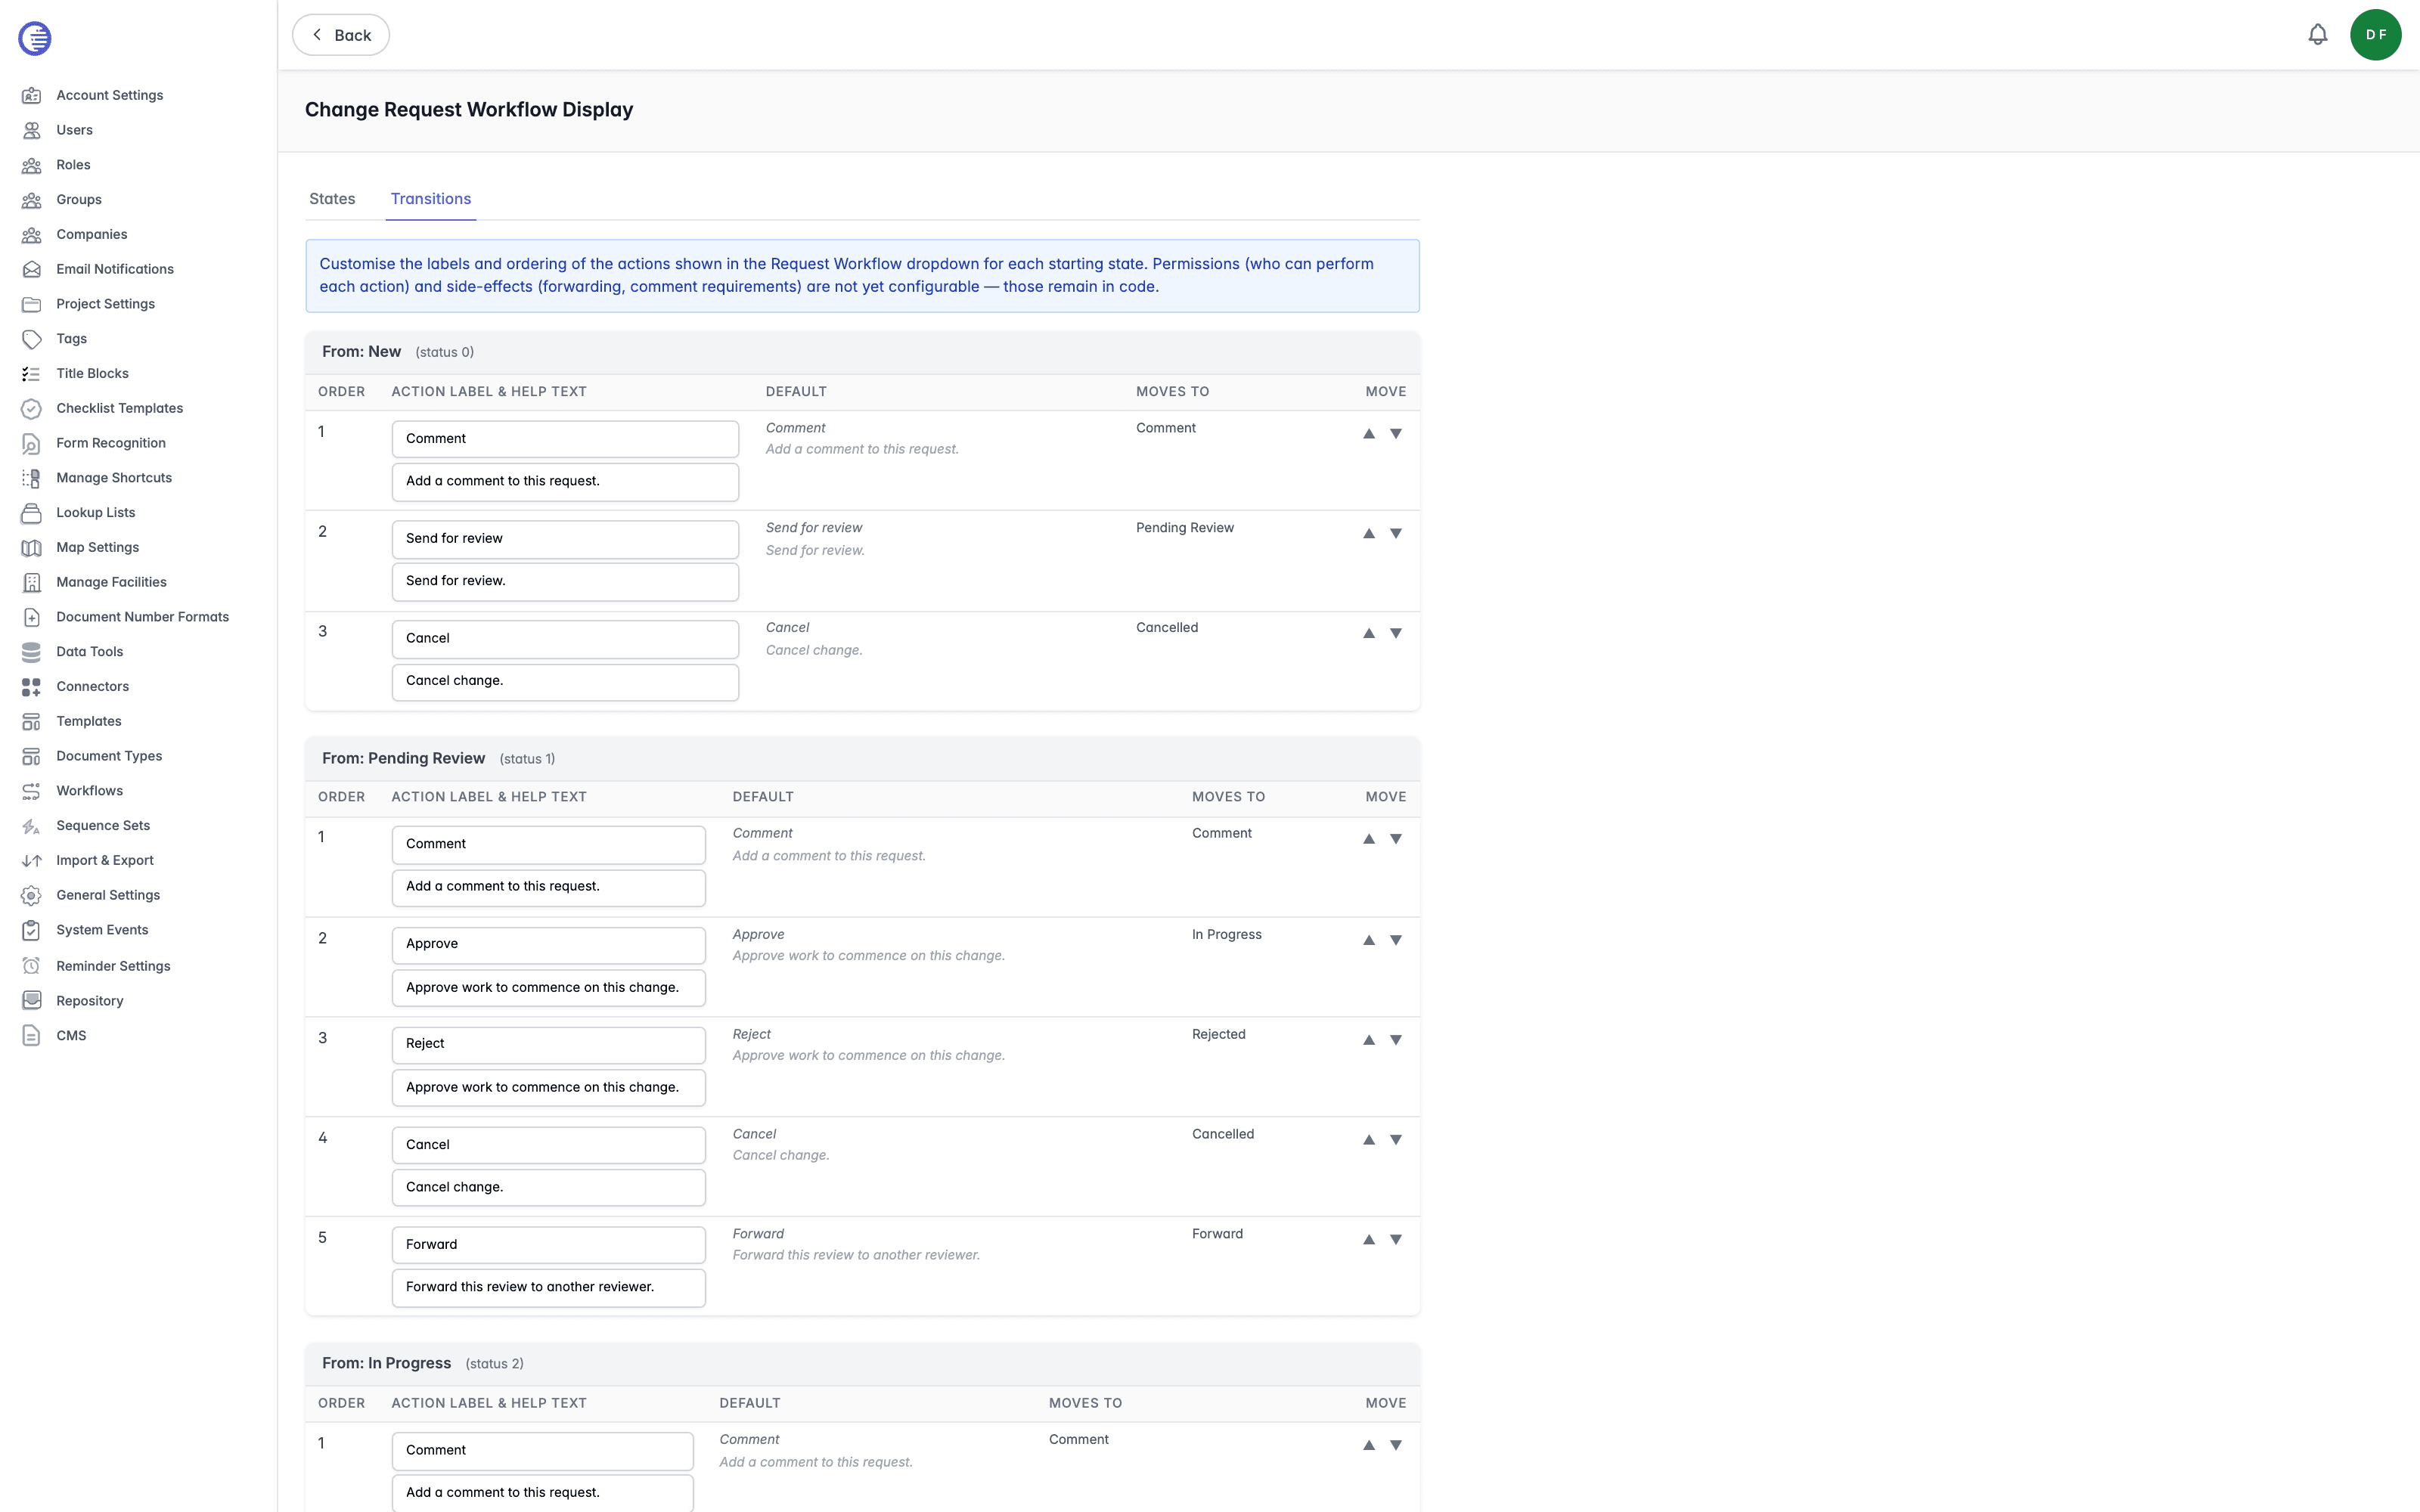
Each group is headed From: followed by the status name, and lists the actions available from that status as rows.
| Column | What it shows or controls |
|---|---|
| Order | The action's position within the dropdown for that starting status. |
| Action label & help text | Two fields: the button label shown in the dropdown, and a line of help text shown beneath it. Both are empty until you enter a custom value, and fall back to the in-code default shown as placeholder text. |
| Default | The in-code default label and help text, shown in italics for reference, so you can see what an empty field would fall back to. |
| Moves to | The display name of the status this action moves the Change Request to. |
| Move | Up and down arrows that reorder the action within its group. |
A row you leave untouched is saved with no override at all, so the dropdown continues to track any future change to the in-code default label. Only a row where you have actually changed the label, help text, or order is saved as a customisation.
Which actions you see
The set of actions available from each status, and which roles can use them, is fixed in Lunr's code and can differ between tenants. What every tenant can customise here, regardless of which underlying set applies to it, is the label, help text, and ordering of whatever actions it has.
Saving, Discarding, and Resetting
The footer below both tabs is shared, so any edit on either tab is included in the same save.
- Save persists your changes. It is disabled until something is dirty.
- Discard reloads the saved configuration from the server, dropping any unsaved edits. If you have unsaved changes, a confirmation prompt appears first.
- Reset to default replaces the states with the seeded default table above and clears every transition override, after a confirmation prompt warning that it overwrites your tenant's current saved configuration.
Reset to default saves immediately
Unlike Discard, selecting Reset to default on this page writes the default configuration back to the server as soon as you confirm the prompt. There is no further Save step, and no way to undo it apart from re-entering your previous customisations by hand.
Related Settings
Project Settings documents the Change Request tab this page is linked from, along with the rest of the tab's Change Request configuration.
Change Request Number Formats
Configure the format Lunr uses to automatically assign a sequence number to new Change Requests, including its running number, tag placeholders, and padding.
Change Request Export Columns
Choose which columns appear in the documents and reference documents tables on the Change Request PDF export, in what order, how wide, and whether they wrap.